Cre8tive Granny who said...
Karen, your card is lovely. I like the colors you used and the pearls really make it. Becca's blog is one I read daily. She is sooooo talented and so sweet. The woman is just amazing and I hope someday to meet her. Thanks for the chance to win your beautiful card.
Please contact me with your snail mail address and I will get the card into the mail for you.
If I haven't heard from Cre8tive Granny by Wednesday night, I will draw another name.
Thanks for stopping by. Please keep coming back. I have lots of fun things coming up that I want to share with you!
Hugs,
Karen
Tuesday, June 30, 2009

Friday, June 26, 2009
A little clarification on the card giveaway
It appears to me that some people are commenting on the card I made to give away thinking that will enter them into my drawing. NOPE! You've gotta read the fine print. Actually it isn't really even fine print. To enter the contest, you must comment on my post day 1 of the Spellbinders contest where Becca's talent is linked. That is the place I will choose the name from. So, if you want to possibly win this most stunning card (lol, I'm so humble) please scroll down a few posts and enter the proper place. I will draw a name sometime Monday, June 29th, so you'd better hurry.
Tuesday, June 23, 2009
New Spellbinders die card giveaway!

This is the card I am giving to one of my lucky followers. Is it you? I hope so. If you are the winner, you can tell me if you would like a sentiment added to the card and I will do that before sending it to you.
This card is a 5-1/2" square and features the new Spellbinders die Fleur de Lis! Isn't it purdy? I love this new die!!!!! For this card, I stamped French Script onto the vanilla card base and then aged it with Tim Holtz tea dye ink, Memento Rich Cocoa and Memento Tuxedo Black inks and a sponge. I cut the Pendant die using Kraft card stock and used my inks again to age it. I then cut the Pendant die again, from black card stock, cutting out the center. The center is a separate piece, so you can cut it or not. I didn't cut it out of the craft card stock. I turned the black pendant on the kraft one to really set them off. I used dimensionals to pop up all the die cut pieces so that the shadows add even more dimension. The center piece was cut from vanilla card stock and distressed with the inks one again. I added the rose button to the center with a glue dot. I added half pearls to the black pendant for just a bit more ooomph! So, what do you think? Do you like it? If so, you'd better read down a few posts to find out how to have a chance to make it yours. It is a card, but it would be beautiful framed and hung on a wall too.
Thanks for stopping by!
Hugs,
Karen
Oooo ooooo ooooo DAY 2!
Another new pendant die is being released today - Eyelet Pendant and borderabilities! Oh they are so cute. It takes me back to little girls and pinafores. How about you? Be sure to stop by Debbie Olson's blog and enter to win some FREE dies! Nothing is better than FREE, am I right?
I'll be back in just a little while to post the card I will be giving to someone! It might be you, if you read my entry yesterday and left a comment!
Hugs,
Karen
I'll be back in just a little while to post the card I will be giving to someone! It might be you, if you read my entry yesterday and left a comment!
Hugs,
Karen
Monday, June 22, 2009
You will be awed!!!
Oh my friends, you must visit Becca's blog and see what she has done with the new pendant that was released by Spellbinders today! And be sure to enter the contest to win a FREE die, and keep following all week to win ALL of the new dies! Oh my!
Here is a link to Becca's blog.
Let me know what you think and I will enter you into a contest to win a beautiful card made by me with this new die! I will choose a random name from anyone commenting on THIS post. I will draw the winner from commenters on THIS post on Monday, June 29th!
Hugs,
Karen
Here is a link to Becca's blog.
Let me know what you think and I will enter you into a contest to win a beautiful card made by me with this new die! I will choose a random name from anyone commenting on THIS post. I will draw the winner from commenters on THIS post on Monday, June 29th!
Hugs,
Karen
Friday, June 19, 2009
Cute shoes!
The inspiration for this card is this little girl's shoe.

So, here is the card I created.

I stamped the flower using Perfect Plum ink and cut it out. The center was pierced and popped up with dimensionals. The swirls are stamped with white craft ink. I used Spellbinders Labels One to cut/emboss the panels and then I stamped the sentiment on the Pale Plum one. The card front is embossed with the cuttlebug birds and swirls folder.
Don't you want to wear these shoes? I do!!!!!

So, here is the card I created.

I stamped the flower using Perfect Plum ink and cut it out. The center was pierced and popped up with dimensionals. The swirls are stamped with white craft ink. I used Spellbinders Labels One to cut/emboss the panels and then I stamped the sentiment on the Pale Plum one. The card front is embossed with the cuttlebug birds and swirls folder.
Don't you want to wear these shoes? I do!!!!!
Ooooo, ooooooo, ooooooo!
Exciting news! There are some new dies coming from Spellbinders and they are awesome!!!!!!! Check out all the information about the sneak peeks coming next week by going to the Spellbinders blog. You won't want to miss it I tell ya!
And here is a card I want to share with you today. It was created for a challenge on SCS to use a foreign language. I don't seem to have any stamps that have a foreign greeting, but I did have this cuttlebug folder which has French, German and Spanish on it, so I used it! I didn't want to cover up the embossing, so I just made a little flower to decorate it. I stamped the flower from Fifth Avenue Floral onto Blush blossom card stock using versamark and Tangerine Tango ink, then clear embossed it. Using Spellbinders Peony die, I cut and embossed the image before sponging the edges with the Tangerine Tango ink and coloring the center with Summer Sun marker. Get the water bottle ready and then spray! I really got it wet. Then I added color with my aqua pen and let it flow. It is such a great way to color. I added some ribbon to the card front and popped the flower up with dimensionals. I added three loops of ribbon to give the impression of leaves. Did you think they were leaves? lol That's it - a pretty simple card.
Thanks for stopping by! I hope you will come back next Tuesday or Wednesday and see my sample of the new die Spellbinders will be sneak peeking on Monday! It's gorgeous!!!! See you then!
And here is a card I want to share with you today. It was created for a challenge on SCS to use a foreign language. I don't seem to have any stamps that have a foreign greeting, but I did have this cuttlebug folder which has French, German and Spanish on it, so I used it! I didn't want to cover up the embossing, so I just made a little flower to decorate it. I stamped the flower from Fifth Avenue Floral onto Blush blossom card stock using versamark and Tangerine Tango ink, then clear embossed it. Using Spellbinders Peony die, I cut and embossed the image before sponging the edges with the Tangerine Tango ink and coloring the center with Summer Sun marker. Get the water bottle ready and then spray! I really got it wet. Then I added color with my aqua pen and let it flow. It is such a great way to color. I added some ribbon to the card front and popped the flower up with dimensionals. I added three loops of ribbon to give the impression of leaves. Did you think they were leaves? lol That's it - a pretty simple card.

Thanks for stopping by! I hope you will come back next Tuesday or Wednesday and see my sample of the new die Spellbinders will be sneak peeking on Monday! It's gorgeous!!!! See you then!
Thursday, June 18, 2009
Oh yea!!!!
I am making this post from my new laptop! Yea!!!! It was ready for me when I got up this morning, but dh was still asleep, so I didn't know that. This will be great. I'm so excited to have all the functionality of this baby! Now to learn all the ins and outs so I can use it to the best advantage. Look at me go!!!!!!
Still waiting . . .
It still isn't ready and it's challenging to get anything done in my craft room right now. There are wires draped over my keyboard while the process continues. But I couldn't leave you hanging with nothing new to look at - so -
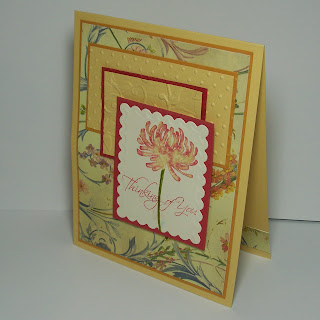
This card is showcasing a hostess stamp from the new SU! catalog. Yes, a sneak peek. I used markers to ink up the stamp for this fun effect. I then cut/embossed it with the Spellbinders classic scalloped rectangle before mounting it onto ruby red card stock. The other panels are embossed with different cuttlebug folders and mounted onto the designer paper.
For this next card, I used colors suggested by the color challenge, and surprisingly I like the combo. What do you think of it? The sentiment is stamped with Baja Breeze ink. I added the three red brads to balance the top of the card. The bottom panel is embossed with the cuttlebug textile texture folder and the top edge punched with the EK success Fleur de lis border punch. I backed that edge with the baja breeze card stock which was embossed with swiss dots. It's a very simple card and one that might actually go through the mail easily. lol No one wants to pay extra postage, right?

Well, that's all I have for you today. Thanks for stopping by and I love reading your comments.
Hugs,
Karen

This card is showcasing a hostess stamp from the new SU! catalog. Yes, a sneak peek. I used markers to ink up the stamp for this fun effect. I then cut/embossed it with the Spellbinders classic scalloped rectangle before mounting it onto ruby red card stock. The other panels are embossed with different cuttlebug folders and mounted onto the designer paper.
For this next card, I used colors suggested by the color challenge, and surprisingly I like the combo. What do you think of it? The sentiment is stamped with Baja Breeze ink. I added the three red brads to balance the top of the card. The bottom panel is embossed with the cuttlebug textile texture folder and the top edge punched with the EK success Fleur de lis border punch. I backed that edge with the baja breeze card stock which was embossed with swiss dots. It's a very simple card and one that might actually go through the mail easily. lol No one wants to pay extra postage, right?

Well, that's all I have for you today. Thanks for stopping by and I love reading your comments.
Hugs,
Karen
Wednesday, June 17, 2009
Slowly . . .
So, my computer has been giving me fits lately, truly tempting me to pitch it through the nearest window. I didn't though. My dear son Ben took pity on me and came and took care of things for me, time after time. He's such a good kid. And it doesn't hurt that he actually knows what he is doing! lol Anywho, my dh got me a new PURPLE laptop! Oh joy! However, it is taking all day for him to get it all updated and ready to go, and now it is transferring all my files from the dinosaur to my new computer. It will be great to be able to take her wherever I want and still surf. I'm also going to add a few rub ons to personalize the little darling. Now won't that be fun? Oh yeah! Eventually anyway. So, that is why you haven't seen much from me for the past couple of days. Check back tomorrow! You might get to see before and after pictures of my purple lady, AND I will upload some cards I've done. Thanks for stopping by!
Hugs,
Karen
Hugs,
Karen
Monday, June 15, 2009
A new technique.
I tried a new technique this morning, and I have to say, when I first saw the instructions, I thought OH NO! But let me tell you, it worked beautifully and I really like the results. This one is called faux handmade paper.
First I will let you look at it and then tell you how to do it.

What do you think? It is so hard to capture the texture and sparkle in a photo, but let me assure you, it looks really interesting. In fact, if you click on the photo, it will enlarge a lot and you can get a really good view.
So, how to do it:
I used two different shades of brown, black and one metallic finish acrylic paint. Squeeze about a nickel size glob of each onto a sheet of wax paper. Next get the very technical wad of toilet tissue (fresh is best! ha ha ha ha!) and dip it into the lighest of colors and dab it onto the card stock. I used a creamy caramel color card stock for this one. Dip into the next darker color and dab where you didn't dab the first time. You will see bits of the toilet tissue sticking to the card stock. That's a good thing! Keep going. Now, I dipped into the black and added a bit of that. Lookin' good! Now dip into that metallic paint and add that on top of it all. Yep, that's it. I heated mine with my heat gun because I'm way too impatient. To use mine, I cut it into three strips to add a little more interest and mounted it onto the black card front. Next I stamped my tree image with versamark ink and clear embossed it. I wish I had stamped it in a darker ink. Maybe next time. I then dabbed a bit of my metallic paint (and a little of the black still showed) around the image and especially the edges of the tree panel. I mounted that onto black card stock and distressed it with my fingernails. Oh yeah, I embossed a strip of black card stock with the cuttlebug tiny mosaic folder before attaching it about half way on the card. I stamped the sentiment with versamark and clear embossed before cutting/embossing with the Spellbinders double ended tags die and then mounting on the black card stock. I added some brads and that is about it. I really like the look of this. What do you think?
First I will let you look at it and then tell you how to do it.

What do you think? It is so hard to capture the texture and sparkle in a photo, but let me assure you, it looks really interesting. In fact, if you click on the photo, it will enlarge a lot and you can get a really good view.
So, how to do it:
I used two different shades of brown, black and one metallic finish acrylic paint. Squeeze about a nickel size glob of each onto a sheet of wax paper. Next get the very technical wad of toilet tissue (fresh is best! ha ha ha ha!) and dip it into the lighest of colors and dab it onto the card stock. I used a creamy caramel color card stock for this one. Dip into the next darker color and dab where you didn't dab the first time. You will see bits of the toilet tissue sticking to the card stock. That's a good thing! Keep going. Now, I dipped into the black and added a bit of that. Lookin' good! Now dip into that metallic paint and add that on top of it all. Yep, that's it. I heated mine with my heat gun because I'm way too impatient. To use mine, I cut it into three strips to add a little more interest and mounted it onto the black card front. Next I stamped my tree image with versamark ink and clear embossed it. I wish I had stamped it in a darker ink. Maybe next time. I then dabbed a bit of my metallic paint (and a little of the black still showed) around the image and especially the edges of the tree panel. I mounted that onto black card stock and distressed it with my fingernails. Oh yeah, I embossed a strip of black card stock with the cuttlebug tiny mosaic folder before attaching it about half way on the card. I stamped the sentiment with versamark and clear embossed before cutting/embossing with the Spellbinders double ended tags die and then mounting on the black card stock. I added some brads and that is about it. I really like the look of this. What do you think?
Friday, June 12, 2009
And the answer is . . .
No, I couldn't sleep in. I did stay in bed until 7:15, but I wasn't sleeping. Oh well.
So, here is another card creation for you. The stamp was colored with markers and blended to get the two tones on the flowers. I mounted it onto the rose red cs that was punched with Fleur de Lis border punch. The sentiment was stamped, then cut/embossed with the Spellbinders Petite Ovals LG. To get just the small border of the rose red, I carefully trimmed the embossed edge off the vanilla layer and then attached it to the rose red oval. They are both cut with the same die. Get it? It is easier to do than to explain. lol I added a few lovely jewels and mounted it onto the CB swiss dots layer and then onto the rose red card. Oh yeah, the little corner embellishments are the scraps made when I punched the border. May as well use them, eh? Waste not, want not!

Thanks for stopping by!
So, here is another card creation for you. The stamp was colored with markers and blended to get the two tones on the flowers. I mounted it onto the rose red cs that was punched with Fleur de Lis border punch. The sentiment was stamped, then cut/embossed with the Spellbinders Petite Ovals LG. To get just the small border of the rose red, I carefully trimmed the embossed edge off the vanilla layer and then attached it to the rose red oval. They are both cut with the same die. Get it? It is easier to do than to explain. lol I added a few lovely jewels and mounted it onto the CB swiss dots layer and then onto the rose red card. Oh yeah, the little corner embellishments are the scraps made when I punched the border. May as well use them, eh? Waste not, want not!

Thanks for stopping by!
Thursday, June 11, 2009
Off to bed - can I sleep in?????
Yeah, right. I wish! I just can't sleep in. What happened? I used to as a kid, but . . . no more! If I'm still in bed at 7 AM, someone needs to hold a mirror under my nose to see if I'm breathing! lol Well, I'm going to try to sleep in tomorrow anyway. Wish me luck!
Oh yeah, the card. I'm not usually a fan of blue roses, but the challenge on SCS was to use shades of blue, green, grey and neutrals (sand and water, ya' know!). So, I stamped the rose with versamark ink and clear embossed, then I wet the card stock quite a bit and floated some color onto it with my aqua pen. It's a pretty cool technique, but I'm not sure the blue rose shows it off the best. I cut the rose out and then curled the edges of the petals. It is mounted onto the Pacific Point which is cut/embossed with the Spellbinders Labels One die and also embossed with the Flowers Impressabilities. It's pretty hard to see in the photo. The organdy ribbon was also colored slightly with the Pacific Point ink before being heated and mounted onto a strip of the card stock and onto the Sahara Sand layer. The image panel is attached with rhinestone brads, then I pierced along the edges of the ribbon panel. The sentiment is stamped with the Pacific Point ink and cut/embossed with Spellbinders Petite Ovals LG and then onto a panel cut/embossed with the Spellbinders Labels Four dies. The corners of the Sahara Sand layer are punched with the wrought iron punch and that is mounted onto the Pacific Point card stock.
All righty then, I'm off to bed. My eyelids are getting heavy, I'm getting sleepy, my body is heavy and I'm dozing off! Well, that's the plan anyway.
Goodnight!

Oh yeah, the card. I'm not usually a fan of blue roses, but the challenge on SCS was to use shades of blue, green, grey and neutrals (sand and water, ya' know!). So, I stamped the rose with versamark ink and clear embossed, then I wet the card stock quite a bit and floated some color onto it with my aqua pen. It's a pretty cool technique, but I'm not sure the blue rose shows it off the best. I cut the rose out and then curled the edges of the petals. It is mounted onto the Pacific Point which is cut/embossed with the Spellbinders Labels One die and also embossed with the Flowers Impressabilities. It's pretty hard to see in the photo. The organdy ribbon was also colored slightly with the Pacific Point ink before being heated and mounted onto a strip of the card stock and onto the Sahara Sand layer. The image panel is attached with rhinestone brads, then I pierced along the edges of the ribbon panel. The sentiment is stamped with the Pacific Point ink and cut/embossed with Spellbinders Petite Ovals LG and then onto a panel cut/embossed with the Spellbinders Labels Four dies. The corners of the Sahara Sand layer are punched with the wrought iron punch and that is mounted onto the Pacific Point card stock.
All righty then, I'm off to bed. My eyelids are getting heavy, I'm getting sleepy, my body is heavy and I'm dozing off! Well, that's the plan anyway.
Goodnight!

Good morning!

So, I guess pink is another of my go to colors. I really do like pink - just look in my closet.
For this card, I used core'dinations color core card stock for my crinkled flower. First I stamped the large rose using Rose Red ink and then tore the circles, crinkled, sanded, and layered with dimensionals. I also used the tear, crinkle, sand technique for the leaves as well. The bottom border is the EK success Fleur de Lis punch, with a white one backing the pink card front. The sentiment is stamped onto white card stock, and then cut/embossed with Spellbinders petite ovals lg, and matted with the next larger size in rose red.
I hope you like my crinkled flower. Thanks for looking. Have a happy day today.
Wednesday, June 10, 2009
New stamps!

I love getting new stamps to play with. This is a new set that will be in the new SU! catalog. I think it is lovely, and it has so many nice sentiments.
For this card, I kept it a simple silhouette, using black and white and that's all. The image was stamped with black craft ink and clear embossed (I know, I hardly ever do that! lol LOL) I love the simplicity the b&w combo gives. I added just a touch of ribbon to the sentiment panel.
Thanks for dropping by! Come back soon.
Hugs,
Karen
Tuesday, June 9, 2009
Unfortunately I am finding myself in need of lots of sympathy cards lately. I used today's challenge on SCS to create this soft, simple card.
The image is stamped with versamark and then white embossed it. I then sponged over the image to make it show up. White on white is beautiful, but hard to see. I used the Spellbinders Labels Four to emboss around the image. The sentiment is stamped with Baja Breeze ink. Simple, but I think very nice. What do you think?

The image is stamped with versamark and then white embossed it. I then sponged over the image to make it show up. White on white is beautiful, but hard to see. I used the Spellbinders Labels Four to emboss around the image. The sentiment is stamped with Baja Breeze ink. Simple, but I think very nice. What do you think?

Monday, June 8, 2009
Masculine creations
Masculine type cards are harder for me to come up with. Yes, I love my flowers and all things girly. BUT this card has a masculine touch, don't you think? For this one I ran the caramel colored card stock through the wizard with the Paisley impressability and then lightly went over it with black ink to highlight the embossing. It almost has a tooled leather look to it, I think. The black panel is a color core card stock and was wadded up (I know that is a very technical term, but . . . what can I do?), smoothed out and run through the wizard with the same Paisley impressability and then sanded. Distressing at its best. The sentiment was stamped with versamark and clear embossed and the border was stamped with black. I had to add some ribbon, but the black and white gingham isn't too girly, is it? I thought it was okay - even for a guy. I added a few strips of the distressed black to the inside of the card and a sentiment there too. What do you think? Manly enough?


Friday, June 5, 2009
Little Lu

I'm sharing my April layout with you today. This is my grandniece. She is a dolly pie and so photogenic. Her Mommy took the photos. For this layout I used Spellbinders 12" border, Classic Lace Border Grand. I so love this border, and it matches Little Lucy's dress! I cut another of the cut/embossed borders to make the corner details and the "leaves" behind the flower on the one photo, and on the title. You will be seeing more of this little doll.
Thursday, June 4, 2009
Did you miss me?

I've been at my daughter's house playing with the grandkids, so didn't get any projects done lately. I do have something to share with you though.
Here is one of the projects I did for Spellbinders in April.
The black background is embossed with the Spellbinders Butterfly Impressability. Actually, so is the smallest black panel. For the smaller one I used Core'dinations card stock and sanded it to bring out the design. Isn't that awesome? I love that paper. The panels are created with the ever wonderful Labels Four nested dies. Ooooo, I love that shape.
And here is another creation. This is actually a little container, so you could gift someone with something small and wonderful. I ran the designer paper through the cuttelbug for more texture before adhering it to the box shape. Then I added some little vellum butterflies. Oh so soft and pretty!

I hope you like this creation. Thanks for stopping by!
Saturday, May 30, 2009
Flower pounding

Did you know you can make a print by pounding flowers with a hammer? You can - but even better than that (and much quieter too) is to use your Wizard. Yes, you heard me right!
My pink card uses these Spellbinders dies: Classic Lace Border Grand, Labels One, double ended tags.
I went into my yard and collected some blooms and gave it a try. Some flowers work, some just don't. The drier type flowers seem to work the best. I live in Phoenix, and the ones that worked best for me were the Bougainvillea and the Vinca. You can see creations using both of them here. The pink card uses the bougainvillea (there are some of the petals around my finished card) and the bottom card uses the vinca.
I am planning on creating a video soon, to show you just how this is done, but for now, here are the steps.
1) go into your yard (not your neighbor's - they may get mad) and pick some blooms.
2) get all the bugs off of them before you bring them into your house. (Ask me how I know! Ewwww)
3) This is how I stacked my sandwich:
White Master Mat
Watercolor paper
Flower- right side down on the watercolor paper
Waxed paper (you could use another piece of watercolor paper, a folded paper towel or just some scrap paper.
Tan Embossing Mat
White Master Mat
4) Run this through your Wizard and your flowers are pounded. Just remove the poor squashed flowers and voila! you have a print of your flowers. It's gorgeous.
Now here are a few things I learned:
Do not attempt to use your waxed paper again. It has pigment from the previous project and may mess up what you are trying to do. Don't ask me how I know. lol
Try different flowers, realizing some will not work at all, they will just leave a slooshy mess. I tried it with leaves too. They left a very very light impression.
Light colored flowers really don't leave much of a pattern at all. Use deep colored flowers for the best results.
The colors will change. The blooms I used on both cards were a dark pink. The vincas made a purple print. Interesting.
Experiment with with you have. If you try it, leave me a link to your creation. I would love to see what you come up with!

On this purple card, I used Spellbinders: Butterfly Impressabilities and Petite Ovals LG.
My purple card is featured on Spellbinders blog today. Why not pop over there and check it out.
Thanks for stopping by!
Thursday, May 28, 2009
It's hip to be square!

I've had these citrus color square buttons for a while, and today I got a chance to use them.
This is a CAS (clean and simple) card, I think. I cut and embossed scalloped squares from the same colors of cs as the buttons are with Spellbinders Scallop Square dies and layered them a few times. The sentiment stamp is colored with the markers to make it match the buttons.
I think this is a fun summer card. What do you think?
Tuesday, May 26, 2009
It just couldn't end.
Yesterday was such a great day with family, I guess I just didn't want it to end, so I posted photos, and of course made a card all in the wee hours of the morning.
Now these are not colors I would normally choose, but it was the color challenge on SCS so I had to give it a try. Last night I didn't care much for it, but this morning, I don't think it is so bad! lol
This card is also a hinge card.
For the top panel I reverse embossed using the Spellbinders butterfly impressability. I do like that element. For the bottom panel, I used the cuttlebug textile texture folder and then went over it with the white craft pad. The top is punched with the MS arched lattice punch. One of the small butterflies is hiding the brad. The main butterfly was stamped with pumpkin pie craft ink and clear embossed before being cut out. I popped the wings up with dimensionals onto the Spellbinders label one nestie which was also embossed with the swiss dots folder.
Have a great Tuesday. Thanks for stopping by.

Now these are not colors I would normally choose, but it was the color challenge on SCS so I had to give it a try. Last night I didn't care much for it, but this morning, I don't think it is so bad! lol
This card is also a hinge card.
For the top panel I reverse embossed using the Spellbinders butterfly impressability. I do like that element. For the bottom panel, I used the cuttlebug textile texture folder and then went over it with the white craft pad. The top is punched with the MS arched lattice punch. One of the small butterflies is hiding the brad. The main butterfly was stamped with pumpkin pie craft ink and clear embossed before being cut out. I popped the wings up with dimensionals onto the Spellbinders label one nestie which was also embossed with the swiss dots folder.
Have a great Tuesday. Thanks for stopping by.

Oh what do you do in the summertime?
So, what do you do on a holiday in Phoenix? Get in the pool, of course. Here are some photos I took today to show how the family cools off!


Monday, May 25, 2009
Hinge card


This is a hinge card. It is a really fun and easy card to create. I did another one weeks ago that is a bit different - with a main panel that slides when you open it.
For this one I didn't want to hide that great daisy border, so I didn't use a large image panel over it. The Spellbinders die was used to cut the wavy bottom edge, and then that panel was embossed using the same die. Now wait! I also used that die as a stencil, coloring the embossed portions with copic markers and spica gel pens. The sentiment is stamped with Tangerine Tango ink. The bottom portion of the card is embossed with the Sizzix eyelet folder. The inside has a tiny little daisy stamped in the upper right corner and I sponged around the edges.
Thanks for stopping by!
Thursday, May 21, 2009
Friday's circle challenge

Today's challenge on SCS is to use circles on your card and the limit is to use only one stamp set for the image and the sentiment. I chose Inspired by Nature.
I kept my card quite simple by stamping the grass with Memento black ink which was stamped off once before stamping onto white cs. I then inked up the flower image with black craft ink, stamped and then - surprise, surprise - embossed with clear ep! I know it's shocking, but it's true. hee hee hee I use it like every day! lol I then cut/embossed it with Spellbinders circle nestabilities and mounted it onto black cs. The sentiment is also stamped with black craft and clear embossed before being cut and embossed and matted with black. The whole card is matted with black. I then added the little touch of ribbon. I usually create very feminine cards, but, hey, this might work for a masculine card. What do you think?
Good morning!
I guess I'm in a pink mood this morning. I am working on a scrapbook page and it is pink, and then I created this card with two shades of pink.

For this card, I embossed a circle using my Nestabilities circles to keep the shape, then stamped the image repeatedly around that shape. The flowers are cut and embossed with the Spellbinders Flower Bouquet pansy and then I used the stencil feature of the dies to add my copic marker color and Spica glitter pens. These flowers were glued to the image, making sure the stamped images peeked from behind. The lightest color flowers are popped up with dimensionals. I then stamped the image in the center of the wreath and added the ribbon. Do you love that wavy scalloped bottom? It was created using the scalloped Paisley die to cut and emboss it.
Thanks for stopping by! Come back soon!

For this card, I embossed a circle using my Nestabilities circles to keep the shape, then stamped the image repeatedly around that shape. The flowers are cut and embossed with the Spellbinders Flower Bouquet pansy and then I used the stencil feature of the dies to add my copic marker color and Spica glitter pens. These flowers were glued to the image, making sure the stamped images peeked from behind. The lightest color flowers are popped up with dimensionals. I then stamped the image in the center of the wreath and added the ribbon. Do you love that wavy scalloped bottom? It was created using the scalloped Paisley die to cut and emboss it.
Thanks for stopping by! Come back soon!
Wednesday, May 20, 2009
A giveaway!
My friend Jennifer Davis has a set of punches she is giving away. All you have to do is visit her blog and leave a comment about why you like your house. Stop by and enter: Jenn's blog
Purple makes me happy!
I just love purple. It's such a charming color. Lilacs are purple, beautiful irises are purple, lavender is purple . . . nice.
I chose to color my image with purples today. I really like the stamp set from Crafty Secrets called Glamour Girls. It's so vintage and I'm all about vintage.
I stamped the image with black craft ink and clear embossed before coloring with Copic markers and using the Spica pen for a bit of shimmer. I used the EK success border punch on two of the corners of the image panel as well as a double border on the next layer. I used another of the stamps from the set on that layer also. The next layer is embossed with the cuttlebug Swiss Dots folder. The ribbon is doubled with the lavender colored one being looped a few times before adding the button, which was also colored with the copic marker. It's so feminine, don't you think?
Thanks for stopping by!

I chose to color my image with purples today. I really like the stamp set from Crafty Secrets called Glamour Girls. It's so vintage and I'm all about vintage.
I stamped the image with black craft ink and clear embossed before coloring with Copic markers and using the Spica pen for a bit of shimmer. I used the EK success border punch on two of the corners of the image panel as well as a double border on the next layer. I used another of the stamps from the set on that layer also. The next layer is embossed with the cuttlebug Swiss Dots folder. The ribbon is doubled with the lavender colored one being looped a few times before adding the button, which was also colored with the copic marker. It's so feminine, don't you think?
Thanks for stopping by!

Tuesday, May 19, 2009
A friend dropped in!
I forgot to tell you that my friend Wendy (Wendybell) came to visit me last week. We were talking on the phone and I told her she needed to get away, so first thing you know, she was at my door! lol We had a great time visiting, creating and laughing. We even took time to create a pasta dish Heidi had mentioned on her blog. This photograph shows us enjoying our pasta. Thanks Heidi - it was delicious.


Subscribe to:
Posts (Atom)