Friday, February 27, 2009

My Spellbinders Submissions

These are the projects I created for the Spellbinders Design team application. I love love love the Spellbinders dies and they really are easy to use and look terrific, don't you think?


Thursday, February 26, 2009

Ring, ring, ring


So I posted yesterday at 9:05 AM - anticipation! Then look what I saw on the phone at 9:11 AM!!!!!!! My heart started pounding and I could hardly believe my eyes and then my ears as I was told I had been chosen to be on the new design team. But the final test!!!! I couldn't tell anyone until they posted it on their blog the next morning! Ahhhhhhhhhhhhhhh-gony!!!!!!! lol My dear friend Wendy called me so many times and I couldn't say a word! Ask her how well I did at keeping the secret! It was excruciating. But now - EEEEEEEEEEEEEEEEEEEEEEEEEEEEEEE! I made it. I am so excited and honored! Now I'm nervous - hoping I won't disappoint them! Happy day!!!!! Okay Jill, bring me the chocolate! LOL

Wednesday, February 25, 2009

tick tick tick


Oh the agony! I am watching the clock ticking and wondering what time Spellbinders will make the calls. The time is crawling by! Ahhhhhhhhhhhhh!!!!!!

Today is the day!

Today is the day to find out if I made it onto the Spellbinders' Design Team. I'm a little nervous and just keep remembering the old adage, "Blessed are they who expect nothing for they will not be disappointed!" lol I am hoping I will be shrieking with delight, but it is out of my hands now.

Spellbinders' next contest


Spellbinders has some challenges up and they are giving away some FREE dies. I have submitted these projects - a layout, a card and an altered item. I would love to know what you think of them.

Sunday, February 22, 2009

Another reject


This is another card I created for the Spellbinder's design team try. I didn't end up using it, but thought you might like to see it.

Friday, February 20, 2009

One of the rejects


Here is one of the projects I rejected. Hmmmmm. I hope I made the right decision. I had a great time dreaming (and I mean literally) of the projects.

I cut and embossed the scalloped heart into the front of the card and lined the inside with Vellum card stock which had been punched with the Martha Stewart border punch. Oooo, it's pretty! Then I stamped the sentiment in the lower right corner. The inside is lined with a beautiful designer paper and a butterfly and heart were mounted inside the card. The butterfly shows through to the front of the card.

What do you think of this one?

Thursday, February 19, 2009

Where have I been?


You mean, besides thinking of my final creations for Spellbinder's Design Team? lol Well, I took a few days and went to visit my daughter, grandchildren and sister. That was fun, but still in the back of my mind was - what should I do? Actually, I created my project last week as soon as I got my supplies, but wondered if I would come up with something better. So, I've tried several but keep coming back to my first. I can't show you though, not until it is submitted anyway.

But I did get another project done which I will share with you. It fits the sketch challenge and the ways to use it challenge (stripes). Can you see the stripes on the card base? They were made on my scor pal.

I changed up the sketch challenge by making my card a gate fold. I don't have a good circle to use, so I used my heart Nestability.

The image stamp was inked with versamark and then colored with markers before stamping and clear embossing. I cut the rectangles with scalloped rectangle nesties and layered them. The butterflies are embossed with my cuttlebug textile texture folder and then punched with the MS butterfly punch. The mellow moss band across the bottom was made with the MS punch and embossed with my cuttlebug.

So, back to creating and seeing if I can come up with something better. Wish me luck!

Saturday, February 14, 2009

I'm a card maker


and apparently a card hoarder. I didn't send out any Christmas cards this year, though I had made quite a few. Oh well, I thought to myself, I will get busy and send out Valentines. Now I have made several valentines, but did I get any mailed? Well, one I can think of. lol

Alas, here it is Valentine's day and I said to myself, "Self! You need a valentine for your dh!" You must understand - he is my biggest cheerleader. He has really been encouraging me lately and helping me a LOT! So, I got up this morning and made him a valentine before he woke up. I also gave him a shirt and tie I had bought on sale weeks ago, but I saved them for today. hee hee hee, aren't I sneaky? When I gave them to him, he said, "You bought me a gift?" We don't usually give each other gifts, so I really took him off guard. A while later I went out shopping and had this 50% off coupon in my purse calling to me to use it. So, I went to Michael's and bought the lace doily border punch. When I got home I showed it to dh and thanked him again and again for getting me something I wanted! And he even used a 50% off coupon, saving $. What a guy! He laughed! Well, that was a good way to get another punch, and give him credit for it. What a good wife I am. lol

Anywho, here is the card I created for him. I found this beautiful flocked paper by 7 gypsies and thought it would make a great valentine. I tried to keep it more masculine. I also used a card by Sharon (notimetostamp) as inspiration.

I stamped the love with black craft and clear embossed, then colored in the letters with my Stardust clear gelly roll pen from Treehouse stamps. Boy I love the look that gives. Sorry you can't see that very well in the photo, but in real life - mmmmmmm, so nice!

I cut and embossed the scalloped heart with my nesties. The black layer behind was cut with the deckle edge scissor. Since the red on this paper is flocked and oh so nice, I punched out three small hearts from the red flocked area and used one where the hat pin went through the heart (covering up a small tear - er, I mean, using a creative opportunity, another for the o in Love and the last one on the inside near my signature. What do you think? Is it masculine enough?

Oh, and Happy Valentine's day to all of you!

Changing it up!


For this card I tried something different and it worked. For the sentiment panel, I used the Labels One die, but changed the shape. I really didn't want a square shape, so for this one I used the shape only on the top and bottom of the panel. Hey, it worked! Then after embossing it, I used my marker to highlight the embossed area to give it a layered look without a layer. What do you think? Did I achieve it?

The image and sentiment is from a newly released set by Treehouse called butterfly kisses.

Thanks for stopping by. Come back soon!

Thursday, February 12, 2009

Crafty Secrets Panel


Oh fun, I tackled two challenges with this card. First is the Crafty Secrets challenge. Now I love their products and I've had some of the cotton scraps for a long time. I actually found them today and used one on this card. I used a little batting behind it and did some quilting around the image, as well as stitching along the outside edge. I love the dimension it added. The other SCS challenge today was Julia's and that was to use fabric. Since these panels are fabric - ta dah! A two-fer!

The mat for the fabric panel is cut with deckle edge scissors. I layered two ribbons behind the panel. The sentiment is stamped onto white cs, and then cut and embossed with the Spellbinder's die and then I cut it out by hand on the inside. I then mounted it onto a Perfect Plum die cut and added a jewel. The bg is cuttlebugged with the textile texture folder and inked to bring out the design.

Oooo, I love lilacs. Now I need to scent it to match! Oh yeah!

Tuesday, February 10, 2009

Butterfly Kisses


This is a sneak peek of a new set being released by Treehouse Stamps Friday, Feb. 13. There will be a release party on Thursday night beginning at 9PM on the Treehouse site. Just click the link to the right and you will be transported over! lol

I really like this sentiment and that it is in two different fonts. Cute stuff. There are four butterflies in the set. I chose one of the largest for this card. It is stamped and clear embossed and then colored iwth marker. If you would like more details, check out my SCS gallery.

Thanks for stopping by. Come back soon!

Sneak Peek!


Here is a sneak peek of two of the new sets being released at Treehouse stamps this Friday. There will be a release party on Thursday night from 9-11 PM EST. Be sure to drop by Treehouse and check out the fun. You can click on the link to the right to get there in a hurry!

The new sets being released Friday by Treehouse Stamps are Butterfly Kisses and Count Your Blessings.

I inked the butterfly with Pink Pirouette and then sponged over the edges with the Perfect Plum. The scripture is inked with the Perfect Plum marker. I also colored the ribbon with Old Olive, Pretty in Pink, and Perfect Plum markers before heating it. I think this one qualifies as a CAS = Clean and Simple card too. What do you think?

Eeeeeeee! I can't even sleep!


I am still so excited about being in the finals for Spellbinder's design team that I couldn't sleep when I went to bed last night. Luckily the color challenge was up on SCS so I got up and created this card.

The stamp is a new one I got by Inkadinkado. I colored it with markers before stamping onto watercolor paper. I then went over it with a paintbrush to add a bit more color to the image. Then I cut it out with the Spellbinders' Label One and also embossed it. The embossed edge is colored with a paintbrush and the Pretty in Pink ink. I mounted that with dimensionals onto the card base, which is also cut with the Label One die, leaving just the top connectef for the hinge on the card. I also stamped the little rose inside the card for the finishing touch! I mounted that onto the Perfect Plum card base. I am loving my dies from Spellbinders. They are such a great bargain, as you get six sizes of each shape, they cut, emboss and you can stencil with them, and they store in the space of nothin'! If you haven't gotten any yet, you'd better get to it! They are the bomb baby, the bomb!

Monday, February 9, 2009

My darling daughter!


This is my darling daughter Wendy wearing her cute cute apron I made her for Christmas!

Oh my!!!!!


My stomach is in a knot and I can't breathe very well! I made it into the finals for the Spellbinders Design Team! OH oh OHHHHHHHH! I feel like a silly little school girl, I am soooooooooo excited! Okay, I have to take some deep breaths and relax! Ohhhhhmmmmmmmmmmmm! lol

Whew!

All right, here are the projects I submitted. Now I wait for them to send me a die and make one more project and submit it. Ooooo, I wonder if I will be able to sleep at all for the next 11 days. I know I will be dreaming layouts and color combos and such! lol

Anticipation! Anticipation!!!!!!

Almost Amethyst


I really like this color of Almost Amethyst. That's why you get to see two cards made with it. I made the multi butterfly card first, and a scrap was left on my table, so I used it for the friend card.

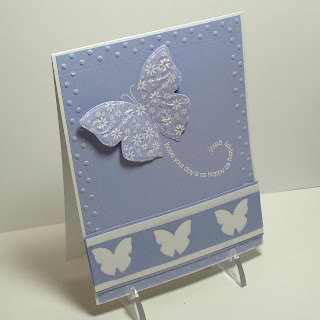
For the large butterfly card: I used Nestabilities Flying Beauties, I die cut three butterflies from the border piece and layered it onto the white. The swiss dot border was made with the Cuttlebug Just My Type border embossing folders. The main butterfly is also cut and embossed with the Nestabilities and mounted only at the body to give it more dimension. I added the sentiment using versamark and white ep.

For the friend card: I used the Cuttlebug Stylized Flower embossing folder, cutting out a border. It worked quite well for this challenge. The sentiment is stamped with Almost Amethyst and I added a small ribbon and a butterfly which was cut with Spellbinders Flying Beauties. I added a little bit of embossing to the butterfly with my stylus. Clean and Simple, don't you think?

Thursday, February 5, 2009

Oh what a fun challenge on SCS today!


Pile on the embellishments! I am usually a hoarder, but I got over it today! I really layered on some embellishments on these two cards.

On the butterfly card, I used the wrought iron punch on the white strips behind the flower and butterfly, and the cuttlebug frills folders to create the dimension on the card. Then I layered the ribbon, the flower from the pretties kit which I stamped - OH there is stamping! lol I added a ribbon knot to the center of the flower. The butterfly was created in layers by brayering the textile texture embossing folder before running the white cs through it, then cutting out the butterfly with the Nestabilities Flying beauties. I layered on the silver dome thingies, and that is it. It actually is a pretty simple card. I hope you like it!

On the black and pink card, I layered lots and lots of embellishments on this one! Let's see, my embellishment layer is: brad, paper circle cuttlebug embossed, prima, ghost flower, cuttlebug die cut and ribbon. Now if that isn't layers, I don't know what is!

The sentiment (from Treehouse Stamps) is stamped onto ww cs and cut and embossed with my Nestabilities Labels Two. I added layers by punching 1/4" dots of black cs and putting the pink brads through them in each corner.

Wednesday, February 4, 2009

The season of love!


Valentine's day is getting close and I am in the mood to make Valentines. This one was made for the sketch challenge on SCS today. It's a great sketch, don't you think?

For my main panel, I stamped love with real red and put the flowers from noteworthy into the V vase, coloring the stamp with markers before stamping it. It is mounted onto a scalloped square made with my Nestabilities rectangle. Did you know you can create a square with them? Coolio, eh?

I used some of the SU paper packs for the red papers. The white layer is embossed with the cuttlebug diamonds in the rough folder. I also embossed the largest panel with swiss dots and sanded it. I love the red gingham ribbon with it. Now, does it look more like a Christmas card since I chose always artichoke? Hey, it's the color of the stem for the flower. What do you think?