Saturday, May 30, 2009

Flower pounding


Did you know you can make a print by pounding flowers with a hammer? You can - but even better than that (and much quieter too) is to use your Wizard. Yes, you heard me right!

My pink card uses these Spellbinders dies: Classic Lace Border Grand, Labels One, double ended tags.

I went into my yard and collected some blooms and gave it a try. Some flowers work, some just don't. The drier type flowers seem to work the best. I live in Phoenix, and the ones that worked best for me were the Bougainvillea and the Vinca. You can see creations using both of them here. The pink card uses the bougainvillea (there are some of the petals around my finished card) and the bottom card uses the vinca.

I am planning on creating a video soon, to show you just how this is done, but for now, here are the steps.

1) go into your yard (not your neighbor's - they may get mad) and pick some blooms.

2) get all the bugs off of them before you bring them into your house. (Ask me how I know! Ewwww)

3) This is how I stacked my sandwich:
White Master Mat
Watercolor paper
Flower- right side down on the watercolor paper
Waxed paper (you could use another piece of watercolor paper, a folded paper towel or just some scrap paper.
Tan Embossing Mat
White Master Mat

4) Run this through your Wizard and your flowers are pounded. Just remove the poor squashed flowers and voila! you have a print of your flowers. It's gorgeous.

Now here are a few things I learned:
Do not attempt to use your waxed paper again. It has pigment from the previous project and may mess up what you are trying to do. Don't ask me how I know. lol

Try different flowers, realizing some will not work at all, they will just leave a slooshy mess. I tried it with leaves too. They left a very very light impression.

Light colored flowers really don't leave much of a pattern at all. Use deep colored flowers for the best results.

The colors will change. The blooms I used on both cards were a dark pink. The vincas made a purple print. Interesting.

Experiment with with you have. If you try it, leave me a link to your creation. I would love to see what you come up with!


On this purple card, I used Spellbinders: Butterfly Impressabilities and Petite Ovals LG.

My purple card is featured on Spellbinders blog today. Why not pop over there and check it out.

Thanks for stopping by!
Thursday, May 28, 2009

It's hip to be square!


I've had these citrus color square buttons for a while, and today I got a chance to use them.

This is a CAS (clean and simple) card, I think. I cut and embossed scalloped squares from the same colors of cs as the buttons are with Spellbinders Scallop Square dies and layered them a few times. The sentiment stamp is colored with the markers to make it match the buttons.

I think this is a fun summer card. What do you think?

Tuesday, May 26, 2009

It just couldn't end.

Yesterday was such a great day with family, I guess I just didn't want it to end, so I posted photos, and of course made a card all in the wee hours of the morning.

Now these are not colors I would normally choose, but it was the color challenge on SCS so I had to give it a try. Last night I didn't care much for it, but this morning, I don't think it is so bad! lol

This card is also a hinge card.

For the top panel I reverse embossed using the Spellbinders butterfly impressability. I do like that element. For the bottom panel, I used the cuttlebug textile texture folder and then went over it with the white craft pad. The top is punched with the MS arched lattice punch. One of the small butterflies is hiding the brad. The main butterfly was stamped with pumpkin pie craft ink and clear embossed before being cut out. I popped the wings up with dimensionals onto the Spellbinders label one nestie which was also embossed with the swiss dots folder.

Have a great Tuesday. Thanks for stopping by.

Oh what do you do in the summertime?

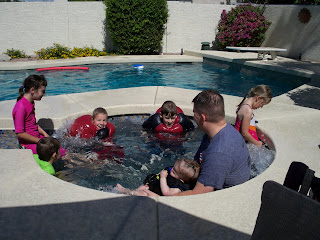
So, what do you do on a holiday in Phoenix? Get in the pool, of course. Here are some photos I took today to show how the family cools off!


Fun in the sun!


Gosh I love my family!!!!

Monday, May 25, 2009

Hinge card


This is a hinge card. It is a really fun and easy card to create. I did another one weeks ago that is a bit different - with a main panel that slides when you open it.

For this one I didn't want to hide that great daisy border, so I didn't use a large image panel over it. The Spellbinders die was used to cut the wavy bottom edge, and then that panel was embossed using the same die. Now wait! I also used that die as a stencil, coloring the embossed portions with copic markers and spica gel pens. The sentiment is stamped with Tangerine Tango ink. The bottom portion of the card is embossed with the Sizzix eyelet folder. The inside has a tiny little daisy stamped in the upper right corner and I sponged around the edges.

Thanks for stopping by!

Thursday, May 21, 2009

Friday's circle challenge


Today's challenge on SCS is to use circles on your card and the limit is to use only one stamp set for the image and the sentiment. I chose Inspired by Nature.

I kept my card quite simple by stamping the grass with Memento black ink which was stamped off once before stamping onto white cs. I then inked up the flower image with black craft ink, stamped and then - surprise, surprise - embossed with clear ep! I know it's shocking, but it's true. hee hee hee I use it like every day! lol I then cut/embossed it with Spellbinders circle nestabilities and mounted it onto black cs. The sentiment is also stamped with black craft and clear embossed before being cut and embossed and matted with black. The whole card is matted with black. I then added the little touch of ribbon. I usually create very feminine cards, but, hey, this might work for a masculine card. What do you think?

Good morning!

I guess I'm in a pink mood this morning. I am working on a scrapbook page and it is pink, and then I created this card with two shades of pink.


For this card, I embossed a circle using my Nestabilities circles to keep the shape, then stamped the image repeatedly around that shape. The flowers are cut and embossed with the Spellbinders Flower Bouquet pansy and then I used the stencil feature of the dies to add my copic marker color and Spica glitter pens. These flowers were glued to the image, making sure the stamped images peeked from behind. The lightest color flowers are popped up with dimensionals. I then stamped the image in the center of the wreath and added the ribbon. Do you love that wavy scalloped bottom? It was created using the scalloped Paisley die to cut and emboss it.

Thanks for stopping by! Come back soon!

Wednesday, May 20, 2009

A giveaway!

My friend Jennifer Davis has a set of punches she is giving away. All you have to do is visit her blog and leave a comment about why you like your house. Stop by and enter: Jenn's blog

Purple makes me happy!

I just love purple. It's such a charming color. Lilacs are purple, beautiful irises are purple, lavender is purple . . . nice.

I chose to color my image with purples today. I really like the stamp set from Crafty Secrets called Glamour Girls. It's so vintage and I'm all about vintage.

I stamped the image with black craft ink and clear embossed before coloring with Copic markers and using the Spica pen for a bit of shimmer. I used the EK success border punch on two of the corners of the image panel as well as a double border on the next layer. I used another of the stamps from the set on that layer also. The next layer is embossed with the cuttlebug Swiss Dots folder. The ribbon is doubled with the lavender colored one being looped a few times before adding the button, which was also colored with the copic marker. It's so feminine, don't you think?

Thanks for stopping by!

Tuesday, May 19, 2009

A friend dropped in!

I forgot to tell you that my friend Wendy (Wendybell) came to visit me last week. We were talking on the phone and I told her she needed to get away, so first thing you know, she was at my door! lol We had a great time visiting, creating and laughing. We even took time to create a pasta dish Heidi had mentioned on her blog. This photograph shows us enjoying our pasta. Thanks Heidi - it was delicious.

Ahhhh, roses!


I love this Roses in Winter stamp set, and it worked beautifully for the color challenge posted on SCS today. I don't usually enjoy using the bold bright colors, I'm more into pastels and softer colors, but I think I got them to work on this card. I inked the stamps with Only Orange ink and then rock'n' rolled them in Rose Red ink to soften the orange color. I also heavily sponged the edges of the card stock with the orange ink and then again with the rose red ink. I think it really softens it and makes it look so nice. I used the same techniques on the sentiment panel also cutting and embossing with Spellbinders Labels Four die. I even sponged the rose red ink onto the orange ribbon to soften that as well. What do you think?

Monday, May 18, 2009

Thanks for stopping by!

Good Monday morning!

Today's card is a labor intensive card, but it is so much fun. It really isn't difficult, it just takes some time, and you have to figure out what you want on each of the 9 panels. The designer paper is enough decoration on many of them, so I left it at that. What do you think of this fun fold?


This weekend I got to see my darling little granddaugther perform in a dance recital. Oh, she was cute and very good too! Her Mom had an injured eye, so had to go all Hollywood, wearing the shades. lol


Wednesday, May 13, 2009

I'm on a roll!

My card today started out as a masculine card. Well, that's what I was aiming for, but . . . femininity just kept sneaking in. I can't help it! I didn't use any clear embossing powder on my card today though. Now that is a shocker! lol

Even though it didn't turn out to be a more masculine card, I like it.


My dear friend Wendy (Wendybell) is staying with me for a few days. We both got up at the break of dawn and came directly into my stamp room to create cards for today's SCS sketch challenge. No wonder we are friends - we're both crazy stampin' addicts! lol I, at least, brushed my teeth. I'm not sayin' what Wendy did or didn't do. lol

Now go and have a happy Wednesday.

Tuesday, May 12, 2009

Colorful Tuesday

I created this card using the colors on the SCS challenge today, Summer Sun, Only Orange and Kiwi Kiss.

The image is stamped in orange, then I used chalks to get the yellow around the image before cutting and embossing with Spellbinders Nestabilities Labels Four. To get the tiny little mat, I cut and embossed the orange layer and then using scissors, cut the outer edge off so the green would be very slight. The sentiment is stamped and clear embossed, and then embossed with the cuttlebug swiss dot folder. I added orange ribbon and bows.

I like the combination of the shape and the image. I think it has a vintage flare, don't you? I hope you like it.

Monday, May 11, 2009

A new technique for me!

I tried the bandana technique today. It's gonna take a little more practice to look really good, but I'm pretty happy with this result - and as always it looks better in person than it does in a photo.


I used a brayer to ink my Spellbinders Paisley Impressability before embossing the red card stock. I then went over parts of the design with my white gel pen, adding dots, lines, etc. I used just a strip of the result on my card, matting with black and tying a black gingham ribbon around the strip. The sentiment is Hero Arts Thoughtful set, inked with black craft ink and clear embossed.

I think this is a more masculine kind of card. After searching through all my cards the other day, I realize I need to make a lot more masculine cards. Obviously I am drawn to flowers and feminine images and colors. Today - I went more masculine.

I hope you like today's card. Have a great Monday!

Saturday, May 9, 2009

Happy Mother's Day

I created this card just for you to wish you a very Happy Mother's day, filled with delightful surprises, love and family.

I used the Spellbinders Peony die and vellum cardstock for the main flower, sponging on the color to create depth. The main card panel is embossed with Spellbinders Butterfly Impressability, then sponged on color to bring out the gorgeous embossing.


I hope you like your Mother's Day card!

Hugs,
Karen

Saturday is a special day

I'm so bummed. I've caught a cold and I'm feeling lousy, so I haven't gotten to do anything fun. All I'm doing is cough, sneeze, blow nose, repeat. At least I got a good night's sleep after taking Nyquil last night. What a relief. So, I'm taking it easy today. Hopefully I can create soemthing too. If so, I'll post it for you to see. Later though. Oh, I know. I'll make a Mother's Day card for all of you! Come back to see it. I'm sure it will be fantastic! lol

This will make for a lousy Mother's Day - home alone and sick!

Thursday, May 7, 2009

Happy Thursday!

Want to see something nice? I love the combination of kraft card stock and black and red. I decided to make it a butterfly card and use my wonderful Labels Four nesties. That is such a beautiful shape.

For this card I used black craft ink and clear embossed the butterfly and sentiment onto kraft card stock. I colored the embossed edge on the butterfly panel with a marker to get a more layered look without the bulk of more card stock. I think the rest is pretty easy to figure out, but if you have any questions . . . ever . . . please email me.

I hope you like my butterfly card today. Thanks for stopping by.

Hugs,
Karen

Wednesday, May 6, 2009

A birthday cupcake

Here is the card I created for today's SCS sketch challenge. What a fun sketch. This one can be used for so many things.

The cupcake and the dotted card are Sizzix embossing folders from my sweet freind Terri! Thanks Terri!

I paper pieced the cupcake liner and the candle, used some liquid pearls on the icing and Stickles on the glow from the candle. The scalloped punch is by Martha Stewart.


Have a happy day!

Tuesday, May 5, 2009

Do you think she will like it?


I don't think my granddaughter ever looks at my blog, so I'm pretty safe posting this. Her birthday is coming up, so I was playing around with my dies and came up with this birthday crown for her. Her favorite color recently changed from pink to blue, so I made it blue just for her. Now you must know, this is a girly girl for sure, so I had to add some bling. I don't think it is blingy enough for her yet, but . . . maybe I will add more later, or let her add some more. She would like that.

I think I've fixed it!

Whew! I think I finally found what the hangup was on this blog! I had added the reactions thingy under the comments. That was causing all kinds of troubles. I took that off and VOILA! It's all better. I'm so relieved.

Thanks for sticking with me through this difficult time! lol It will all be better now.

A week later!

Oh my goodness, I can't believe it's been a week since I updated my blog. Yes, I can. It is still a little wonky and so I get annoyed trying to update. Well, I haven't been idle that whole week. I've worked on lots of things, but I can only share one of them with you today. This is a gift set I've been working on and I finished it and got a photo taken, so I thought I would share it with all of you today.