Guess who is joining the Rubbernecker Design Team! I'll give you a few hints:
1) She loves teapots
2) She loves polka dots
3) She snorts when she laughs! And she laughs a lot!
Yes, you got it! The new team member is ***** Cindy Motherway ****** Mothermark to those of you familiar with her on SCS. She is a fabulous stamper and oh so much fun! Be sure to check out her SCS gallery and her blog (which she endearing calls her glob!) SNORT!!!
Sunday, January 31, 2010

Friday, January 29, 2010
A great tip!
I had a friend ask me how to find creations made with a certain SPELLBINDERS™ die template! Guess what! There is a way to find all the creations on the SPELLBINDERS™ site. Just go to the search box on the home page and type in the name of the die template. Wooo hooo! Lots of art using that specific one will pop up to inspire you! Go take a look!
Thursday, January 28, 2010
WOW!
I got back to Arizona late last night, but didn't get home until later this evening. I'm kind of worn out! Standing for that many hours every day is tough on the feet and legs. It was a lot of fun though! I really enjoyed sharing all the new Spellbinders products - lots of wonderful new die templates and the big reveal of the *********** PRESTO PUNCH***************!!!!!! If you don't know what I am talking about, be sure to visit the Spellbinders blog to get all the information.
I personally can't wait to get all the new dies! They are awesome!
I am too tired to upload much right now, but hopefully tomorrow I can share more and do the tutorial on the hinge ice cream cone card. That is - IF anyone wants to see it. Leave a comment if you want me to do the tutorial!
I'm going to have some blog candy coming really soon too! Keep your eyes pealed!!!!
I personally can't wait to get all the new dies! They are awesome!
I am too tired to upload much right now, but hopefully tomorrow I can share more and do the tutorial on the hinge ice cream cone card. That is - IF anyone wants to see it. Leave a comment if you want me to do the tutorial!
I'm going to have some blog candy coming really soon too! Keep your eyes pealed!!!!
Wednesday, January 20, 2010
Sorry I've been MIA. I am getting ready to leave for Anaheim, California to work in the Spellbinders booth at CHA-W. I've never been before, so I am so excited! Today I bought an umbrella and a rain poncho! I hope California hasn't floated away before I get there on Saturday!
If you are going to be there, please come by and say hello! I'd love to meet you!
If you are going to be there, please come by and say hello! I'd love to meet you!
Friday, January 15, 2010
Fun
Wasn't the Spellbinders™ Surprise party fun? The new dies are awesome and the art created by the Design Team was outstanding!
Today I am sharing a card I created using a Spellbinders™ die and an image from Rubbernecker. Aren't these roses beautiful? I inked the image with markers before stamping onto vanilla cardstock and clear embossing. I then colored over the flowers with a Copic marker. I also stamped the image onto pretty in pink cardstock and cut/embossed it with Spellbinders™ Labels 5. I cut the vanilla cardstock roses out and popped some of them up. The chocolate chip mat was cut/embossed with Spellbinders™ Labels 5 as well. I added some ribbon and rhinestones for the bling!

I hope you like it.
Thanks for stopping by!
Today I am sharing a card I created using a Spellbinders™ die and an image from Rubbernecker. Aren't these roses beautiful? I inked the image with markers before stamping onto vanilla cardstock and clear embossing. I then colored over the flowers with a Copic marker. I also stamped the image onto pretty in pink cardstock and cut/embossed it with Spellbinders™ Labels 5. I cut the vanilla cardstock roses out and popped some of them up. The chocolate chip mat was cut/embossed with Spellbinders™ Labels 5 as well. I added some ribbon and rhinestones for the bling!

I hope you like it.
Thanks for stopping by!
Monday, January 11, 2010
Spellbinders Surprise Party!

SPELLBINDERS™ SURPRISE PARTY!!
January 7- 13, 2010
Commenting on this post is welcome but does NOT enter you into the contest. This contest is sponsored by Spellbinders™ Paper Arts. Directions on how to enter are in the Blog Post and Official Rules at Spellbinders™ Surprise Party Rules. If you have any questions, please e-mail ContestQuestions@Spellbinders.us
Welcome to the sixth day of the Spellbinders™ Surprise Party!!
Spellbinders™ Paper Arts is hosting Spellbinders™ Surprise Party!! We will introduce 25 new Die Templates and 2 Impressabilities™ templates! These sneak peeks are part of the collection that will be released at the Craft and Hobby Association Trade Show on January 24, 2010. We want to invite YOU, our greatest fans, to join the party from January 7-14, 2010! See the newest Spellbinders™ products, visit our Designers’ Blogs, and win fabulous Spellbinders™ prizes!
Today you have the opportunity to win a Spellbinders™ prize package (including all three Spellbinders™ Die Templates revealed today) through the contest entry email address listed below. Be sure to visit the other Designers’ Blogs participating today, and enter from those blogs for additional chances to win! You may enter once from each Blog! Each Spellbinders™ Surprise Party!! blog post is open to contest entries for 48 hours. You have until 11:59 p.m. Eastern Standard Time January 13, 2010 to enter this contest through my blog. Be sure to read the rules at Spellbinders Surprise Party Rules before entering so that your entry will be valid!
To see previous Spellbinders™ Surprise Party!! posts or to go to any of the future blog posts, feel free to visit the following:
January 7
January 8
January 9
Beth Pingry and Cathy Chlebana
January 10,
January 11
January 12
January 13
After the entry deadline is reached, Spellbinders™ Paper Arts will randomly pick one winner from each Spellbinders™ Surprise Party!! blog event as stated in the rules at Spellbinders Surprise Party. Winner will be contacted by email within 24 hours of the contest deadline. The winner will have 72 hours to reply to that email to claim prize. If Winner fails to respond within 72 hours, a new winner will be drawn for said prize.
Entrants visiting all 21 Spellbinders™ Surprise Party!! events and correctly entering the drawing on each Blog will automatically be entered into the SPELLBINDERS™ SURPRISE PARTY!! GRAND PRIZE give away with a retail value of over $350.00. The GRAND PRIZE will be announced on January 24, 2010, on the Spellbinders Blog and consists of super secret products being released at the Craft and Hobby Association Trade Show. You WILL be excited!!
I’m thrilled to share my Spellbinders™ Surprise Party!! project with you...

These are the Spellbinders™ Die Templates I used for this project:
S4-275 Nested Ice Cream Cone (Center)

I also used Spellbinders™ S4-235 Fancy Tags and S3-148 Tags Trio die templates.
The papers are from The Paper Company, Studio Celebration line: Green Mini Dot, Bright Stripe Glitter, Dotted Circle Paper, Glittered Striped. I also used embellishments from the Celebration line: Celebration Dome Stickers and Celebration Bouncy Party Icon Stickers.
Let’s get started. Begin by cutting the Green Mini Dot cardstock to 4 ¼x 11”. Score at 5½” and fold with the blue on the inside of the card.

Cut Glittered Striped cardstock 5 ¼ x 4”.
Cut/emboss S4-275 Nested Ice Cream Cone, Cone #3 (with #1 being the smallest) from Celebration Bright Stripe Glitter paper and attach to Glittered Striped cardstock. Cut Scoop #3 from red side of Dotted Circle paper and attach at top of cone onto the Glittered Striped cardstock.

Position S4-275 Nested Ice Cream Cone, Scoop #2 die template onto the red scoop die cut, secure with low tack tape, and feed into Wizard to cut through all layered of paper.
Glue onto card front, reposition Scoop #2 die template and cut through card front. To avoid cutting through card back, fold the back under the Spacer Plate in your sandwich.


Place both dies back into place and emboss. Carefully add red atyou Spica glitter pen to outside embossed edge of scoop and clear atyou Spica glitter pen to inside embossed edge of scoop.

Next, create the text for the invitation on the computer. I used Accent Dot Writer as the font and chose brown because it looks like chocolate. Yum!
To get it to line up, I created a MS Word document and printed it on regular paper. Keep testing by placing the card over the text until it is lined up just right, having the bottom edges even. Mark the edge of the card on the test paper, then open the card up and use a repositionable adhesive to adhere it to the test paper with the edge lined up with the mark you made. It should be aligned exactly where it needs to print. Run it through the printer. Remove your card from the test paper.


Print text for tag onto green side of cardstock using my positioning video tutorial here to align it perfectly, and cut/emboss with S3-148 #2.
Tie ribbon through ice cream scoop window and add your S3-148 Tags Trio tag, being sure the word Celebration on the ribbon is right side up on front of card and on inside of card. Adhere tag to front of card.
Cut/emboss S4-235 Fancy Tag from Celebration Bright Stripe cardstock and attach on inside of card near the top. Adhere candle bouncy sticker onto S4-235 Fancy Tag. Add the two dome stickers near invitation information.

Here is the new Spellbinders™ die template I have revealed today!

S4-275 Nested Ice Cream Cone
$19.95
This is a Limited Edition, Summer Collection die template, only available through May 30, 2010.
The measurements of these dies are:
Cone SM 1 5/16 x 1”
Cone MD 2 x 1 9/16”
Cone LG 2 7/8 x 2 3/16”
Ice Cream SM 1 3/16 x 1 5/16”
Ice Cream MD 1 13/16 x 2 1/16”
Ice Cream LG 2 9/16 x 2 15/16”
Here is another fun card I created using the new Spellbinders™ S4-275 Nested Ice Cream Cone die templates. This card is a hinge card, so the ice cream scoops actually swing away to show the information on the inside of the card. The cherry chips on the bottom scoop are brads with one of them utilized as the hinge.


If you would like a tutorial on this card, come back in about a week and I will have it ready for you!
RULES
For the complete Spellbinders™ Surprise Party!! rules go to http://spellbinderspaperarts.com/blog/spellbinders-suprise-party/ .
TO ENTER CONTEST:
1) Send your email entry to: REVEAL16@spellbinders.us
2) Type the name of the die being revealed on my blog in the “subject” line of the email.
3) Click send!
If you have any questions regarding the contest, send an e-mail of inquiry to: ContestQuestions@Spellbinders.us
Thank you for visiting my blog and good luck!
Saturday, January 9, 2010
Here is the kick off of my Rubbernecker tenure.
I stamped this Rubbernecker inchie butterfly using Elegant Eggplant in on Very Vanilla Cardstock before cutting/embossing with Spellbinders Classic Circle. I then cut/embossed a Spellbinders Blossom from Perfect Plum paper to mount it on. The dp's are from my stash, and I don't know from where. I added the vanilla ribbon and the sentiment from the Rubbernecker Fashion Icon set stamped on the striped dp with Elegant Eggplant ink. A fairly simple card and easily mailed.

Thanks for dropping by. Come again soon. I have blog candy coming up very soon. You won't want to miss it.
Hugs,
Karen
Friday, January 8, 2010
Dangling Love!

I created this card for today's LSC challenge on SCS and Sharon's stamp simply challenge. My dear friend Wendy posted the challenge, and in honor of her, I used a dangle on my card. She's famous for dangling! I used different papers for the kick on this card. I cut/embossed the scalloped hearts from a rose petal paper and black to help it stand out on the music dp. I stamped love with black memento ink and then clear embossed on the petal paper. The front of the card is covered with the music paper and then I added the ribbon dangle and popped up the hearts. I also put a panel of the rose petal paper on the inside.
Don't forget to check out the Spellbinders Surprise Party postings today. New dies revealed. Awesome!
Thursday, January 7, 2010
It has begun!
The Spellbinders Surprise Party has officially begun. Be sure to follow along and possibly win some of the new dies for FREE! What an awesome opportunity. Debbie, Julie and Lesa have fabulous projects to inspire you. Be sure to go take a look! I can't wait to see what tomorrow will bring!
Have a super fabulous day!
Karen
Have a super fabulous day!
Karen
Wednesday, January 6, 2010
Spellbinders™ Surprise Birthday Party!!
Spellbinders™ Surprise Birthday Party!!
Posted using ShareThis
It starts tomorrow!!!!!! Get ready, it's going to be great!
Posted using ShareThis
It starts tomorrow!!!!!! Get ready, it's going to be great!
Tuesday, January 5, 2010
More fun!
Here is my big news: I have joined the Rubbernecker Design Team for the year 2010! How cool is that? I'm so excited to be joining a wonderful group of extremely talented designers! I will get links to their work on the right side of the blog a little later, so check back! I'm so grateful for the opportunities that are coming my way!

Here is a card I would like to share with you today that I created to use the colors of the SCS color challenge: Certainly Celery, Handsome Hunter and Bermuda Bay and a touch of pink for dessert. I stamped the image with Memento Black and then clear embossed before coloring with an SU! marker as well as Copics. The background of the card is stamped with Handsome Hunter ink.
I hope you have a wonderful day and stay warm since most of the country is FREEZING!
Hugs,
Karen

Here is a card I would like to share with you today that I created to use the colors of the SCS color challenge: Certainly Celery, Handsome Hunter and Bermuda Bay and a touch of pink for dessert. I stamped the image with Memento Black and then clear embossed before coloring with an SU! marker as well as Copics. The background of the card is stamped with Handsome Hunter ink.
I hope you have a wonderful day and stay warm since most of the country is FREEZING!
Hugs,
Karen
Monday, January 4, 2010
HAPPY NEW YEAR!!!
Happy New Year my friends!!!!!
I have been missing in action for a while as I was preparing for my beautiful daughter's wedding January 2. Whew, we made it and all went so well. She was a stunning bride, of course.


I have been missing in action for a while as I was preparing for my beautiful daughter's wedding January 2. Whew, we made it and all went so well. She was a stunning bride, of course.


I've got some big news for you too! It's time for a
Spellbinders Surprise Party!!!!!
There will be dies given away and lots of inspirational creations showing you the new dies being debuted at CHA later this month!!! Click on the link above to take you to the Spellbinders blog for more information and to let you know who will be revealing the new dies and which day! Mine will be January 12, so I hope you will be back to see my reveal.
Spellbinders Surprise Party!!!!!
There will be dies given away and lots of inspirational creations showing you the new dies being debuted at CHA later this month!!! Click on the link above to take you to the Spellbinders blog for more information and to let you know who will be revealing the new dies and which day! Mine will be January 12, so I hope you will be back to see my reveal.
Saturday, December 26, 2009

I hope you all had a great Christmas! I certainly did. The best part was being with all my family!
At the request of my youngest grandson, I made a pan of lemon squares. As you can see from the photo, we are a family of edge eaters! lol Well, I do have a daughter in law that likes the middles, but most of us fight over corners and edges. My daughter gave me an all edge pan to make brownies so we always get at least two edges. I should have used it for the lemon bars. Uh oh, too late smart once again.
In case you would like to have some lemon squares at your home, here is the recipe:
Lemon Squares
1 C butter, softened
2 C flour
1/2 C powdered sugar
4 eggs, beaten
2 C granulated sugar
1 tsp. lemon zest
1/2 C lemon juice
5 T. flour
1 tsp. baking powder
Beat butter, powdered sugar and 2 c. flour until smooth. Spread into greased 13X9 pan and bake at 350 for 20 minutes. Beat together the eggs, sugar, lemon juice, 5 T flour and baking powder. The mixture will be thin. Pour over the top of the baked crust and continue to bake for 25 minutes more. Sprinkle with powdered sugar, cool and cut into squares.
Thanks for stopping by.
Tuesday, December 22, 2009
Busy, busy, busy!
 Here is a card I want to share with you today. Does it, brighten your day? I hope so. Butterflies are always so cheery aren't they? I used a cotton scrap from Crafty Secrets on this and then added the butterflies which are reverse embossed. To do this, ink the inside cutting side of your Spellbinders™ die template before cutting and embossing, then add your embossing powder and heat emboss. It gives a great look to your finished projects. The background of the card was created using the die template as a stencil and airbrushing! I love how it turned out.
I am very busy getting ready for Christmas and my daughter's wedding on Jan. 2! Yikes, so much to do. Actually I am doing pretty well, but it doesn't leave much time for creating. Sorry! I will have more surprises for you. I have some tutorials I want to create and share with you and I will be doing them in the very near future, so keep checking back.
I hope you all have a very Merry Christmas and a blessed New Year!
Hugs,
Karen
Saturday, December 19, 2009
A great resource
Hi there! Thanks for stopping by my blog.
I want to share a great resource with you. I'm sure you love your Spellbinders™ Nestabilities, Nesties™, and other die templates as much as I do, so here is a chart that lets you know which dies are compatible with which JustRite stamps! It also has some punches listed as well. What a great resource. I hope it helps you out:
Punch and Die Compatibility Chart
I want to share a great resource with you. I'm sure you love your Spellbinders™ Nestabilities, Nesties™, and other die templates as much as I do, so here is a chart that lets you know which dies are compatible with which JustRite stamps! It also has some punches listed as well. What a great resource. I hope it helps you out:
Punch and Die Compatibility Chart
Wednesday, December 16, 2009
Boys n Ice Cream
Two things that go together oh so well - boys and ice cream. Can anything be better for these boys than a nice warm day, no shirts and unlimited ice cream just so Mom could get pictures of them?

Here is how I created the ice cream cone: Use computer to print “ ice cream” onto vanilla cardstock. Cut/emboss using Spellbinders blossom die template, aligning text. Leave cardstock in die and emboss with Spellbinders Snowflakes Impressabilities. Emboss 3 ½ X 2 rectangle with diamond and stars Impressabilities. Leave cardstock in place and airbrush with Copic airbrush system and Sketch Marker E43 Dull Ivory. Cut into cone shape and adhere to page with cone overlapping photo. Use foam squares to pop ice cream up and attach to top of cone. I used Spellbinders Labels 8 to cut/emboss the photo.
Thanks for stopping by! Please come again soon.
Hugs,
Karen

Here is how I created the ice cream cone: Use computer to print “ ice cream” onto vanilla cardstock. Cut/emboss using Spellbinders blossom die template, aligning text. Leave cardstock in die and emboss with Spellbinders Snowflakes Impressabilities. Emboss 3 ½ X 2 rectangle with diamond and stars Impressabilities. Leave cardstock in place and airbrush with Copic airbrush system and Sketch Marker E43 Dull Ivory. Cut into cone shape and adhere to page with cone overlapping photo. Use foam squares to pop ice cream up and attach to top of cone. I used Spellbinders Labels 8 to cut/emboss the photo.
Thanks for stopping by! Please come again soon.
Hugs,
Karen
Friday, December 11, 2009
And colder!
Last night my husband and I went to the Mormon Tabernacle Choir Christmas Extravaganza in downtown Salt Lake City. The doors were to open at 6:30 for the 8:00 performance. We wanted to get a good seat, so we joined the line at about 6:10. I don't know how cold it was, but I'm sure it wasn't more than 20 degreees, and for this Phoenix girl, that is COLD! We were there a few minutes when a lady lined up behind me. She did not have on a coat or scarf or gloves or anything warm. She thought the doors opened at 6:00. She said she didn't own a coat, as she usually just drives somewhere, gets out and goes into a heated building. Well, we had at least 15 minutes to wait there. Another lady near her put her own scarf around her neck. I turned and gave her my gloves. She kept insisting she was all right, but . . . she was freezing! We all huddled up around her trying to share our warmth. What a wonderful thing to see, so many giving and sharing people around this woman who resisted but was given warmth from strangers. I hope we can all look outside ourselves this season for those around us needing a little warmth, whether it is a smile, a kind word, food or a coat! Let's open our hearts and share the blessings we have been given.
Hugs to you all!
Karen
Hugs to you all!
Karen
Thursday, December 10, 2009
Coldness!

So here I am in Utah with lots of snow outside. Luckily I'm toasty warm inside. Brrrrr! I don't do snow, ice and cold very well at all! I'm on "vacation" so I didn't bring my own computer and trying to just relax and enjoy some quiet time. I thought I would update my blog and post a new photo for you.
I created this card for my daughter's bridal shower. It's kind of over the top, don't you think? Lots and lots of layers, but keeping it all white. I love the elegance of an all white card. I used shimmery white cardstock for all the layers except the top blossom which is vellum cardstock. I added lots of pearls too. So pretty on the Spellbinders Fleur de Lis pendant and the Labels One. This card is 5 1/2" X 5 1/2 " and very thick. I couldn't just put it into an envelope, so I used it on top of the package as the bow, adding some white organdy ribbon. Delicious!
I hope you like what you saw today and will stop by again soon! Stay warm everyone!
Saturday, December 5, 2009
Happy Birthday Erinn!
I had such a fun time last night. Jamie asked me to do a surprise birthday party for her daughter Erinn along with two of her friends. She got a Cuttlebug for her birthday! She was so excited. She is a really great crafter and enjoys making cards for friends and family. I had three projects for the girls to create. They had a great time and were such good students.
Project One: Sour Cream Container
Project One: Sour Cream Container

Erinn likes bright fun colors, so we used a great paper to create the fun containers. Inside are three Hershey nuggets. Candy's always a hit. The girls thought these containers were a lot of fun and easier to make than they thought they would be. I'll bet they will make more of them.
Next each of them made a personalized notecard with their own initial. They used the cuttlebug for the texture on the bottom of the card. Embossing is a blast.
After the Cold Stone Creamery Ice Cream birthday cake - oh yum! We did our last project which is a little mini album to preserve the memory of the night. It is just a square of cardstock with folds. The outside has a cuttlebug embossed front with a fun flower and a ribbon which wraps around the whole thing to hold it closed.
Now open it up and look! We stamped some fun images and colored them and added a photo of the girls. We even did a little heat embossing on the blue square. Lots of ooohs and aaaaahs on that one. lol It's like magic! The blank area is for them to journal about the evening.
They got a little crazy by the end. Was it a sugar high? Or being up late? Whatever it was they laughed and had a great time and that is the point.
Thanks for stopping by. Come back soon!
Thursday, December 3, 2009
Published!!!
I just got back from Wal Mart where I picked up a copy of Scrapbooking and Beyond. Just inside the front cover is the Spellbinders ad with my very own layout featured. Wooo hooo! My name and project are in a publication. I'm feeling veclempt. lol
Here is the layout used in the ad.

Here is the layout used in the ad.

Wednesday, December 2, 2009
Holidays!
Holidays are so much fun with family and lots of good food. Oh yum! I had a great Thanksgiving - I hope your's was too.
I'm sharing a layout I did for Spellbinders. My friend Christen has these four cute little boys and she took photos of them eating ice cream cones. What could be better?

Can you pick out the Spellbinders Die Templates? It might surprise you what I used, but I love how it worked out.
Instructions: Tear strip of red cardstock approximately 2” wide. Attach 3 metallic brads on each end of strip. Cut letter B and corresponding mat from gold cardstock with classic rectangle. Cut O from alphabet and mat onto dark brown mat cut/embossed with deckled rectangle. Cut/emboss square using navy blue cardstock. Cut Y using Tags Trio and mount onto navy square. Place brad through hole. Cut/emboss rectangle from kraft cardstock and apply S. Ink edges with Chestnut ink. On computer, print boys’ names, & and journaling with blue ink and B-o-y-s with brown ink onto gold cardstock. Cut/emboss & with oval die and ink edges with Chestnut ink. Apply title to red strip and attach to top of page. Cut boys names into strips and ink edges with chestnut ink. Cut brown letters and ink edges with chestnut ink. Use foam square to pop up in proper place on each name. Cut two strips of red cardstock 8X4 and emboss with Paisley Impressabilities. Glue together to form square and cover seam with ¼” strip of red cardstock. Attach to page. Stagger names to align brown letters in each name to spell boy down left side of red square. Cut/emboss photo with Curved Rectangles die template and mat with blue and brown cardstock. Adhere to red block. Cut/emboss journaling block and mat using rectangle die template. Attach brads in journaling block and attach to red mat. Use computer to print “ ice cream” onto vanilla cardstock. Cut/emboss blossom aligning text. Leave cardstock in die and emboss with snowflakes Impressabilities. Emboss 3 ½ X 2 rectangle with diamond and stars Impressabilities. Leave cardstock in place and airbrush with Copic airbrush system and Sketch Marker E43 Dull Ivory. Cut into cone shape and adhere to page with cone overlapping photo. Use foam squares to pop ice cream up and attach to top of cone. Glue journaling block to lower right corner of photo and red square. Cut/emboss doodle part from Gold cardstock. Leave cardstock in die template and airbrush with B24 Sky and then E44 clay. Remove from die and attach to bottom left corner of red panel. Cut/emboss three of the smallest circles from classic Circles Small. Punch hole in center. Using 12” length of twine, thread through circles and tie knots above each. Apply glue to back of circles and adhere to left side of page.
I'm sharing a layout I did for Spellbinders. My friend Christen has these four cute little boys and she took photos of them eating ice cream cones. What could be better?

Can you pick out the Spellbinders Die Templates? It might surprise you what I used, but I love how it worked out.
Instructions: Tear strip of red cardstock approximately 2” wide. Attach 3 metallic brads on each end of strip. Cut letter B and corresponding mat from gold cardstock with classic rectangle. Cut O from alphabet and mat onto dark brown mat cut/embossed with deckled rectangle. Cut/emboss square using navy blue cardstock. Cut Y using Tags Trio and mount onto navy square. Place brad through hole. Cut/emboss rectangle from kraft cardstock and apply S. Ink edges with Chestnut ink. On computer, print boys’ names, & and journaling with blue ink and B-o-y-s with brown ink onto gold cardstock. Cut/emboss & with oval die and ink edges with Chestnut ink. Apply title to red strip and attach to top of page. Cut boys names into strips and ink edges with chestnut ink. Cut brown letters and ink edges with chestnut ink. Use foam square to pop up in proper place on each name. Cut two strips of red cardstock 8X4 and emboss with Paisley Impressabilities. Glue together to form square and cover seam with ¼” strip of red cardstock. Attach to page. Stagger names to align brown letters in each name to spell boy down left side of red square. Cut/emboss photo with Curved Rectangles die template and mat with blue and brown cardstock. Adhere to red block. Cut/emboss journaling block and mat using rectangle die template. Attach brads in journaling block and attach to red mat. Use computer to print “ ice cream” onto vanilla cardstock. Cut/emboss blossom aligning text. Leave cardstock in die and emboss with snowflakes Impressabilities. Emboss 3 ½ X 2 rectangle with diamond and stars Impressabilities. Leave cardstock in place and airbrush with Copic airbrush system and Sketch Marker E43 Dull Ivory. Cut into cone shape and adhere to page with cone overlapping photo. Use foam squares to pop ice cream up and attach to top of cone. Glue journaling block to lower right corner of photo and red square. Cut/emboss doodle part from Gold cardstock. Leave cardstock in die template and airbrush with B24 Sky and then E44 clay. Remove from die and attach to bottom left corner of red panel. Cut/emboss three of the smallest circles from classic Circles Small. Punch hole in center. Using 12” length of twine, thread through circles and tie knots above each. Apply glue to back of circles and adhere to left side of page.
Monday, November 23, 2009
Snow glorious snow!
This is a photo layout I created from photos of friends having fun in the snow. I used Spellbinders Nested Pine Trees and added dimension by embossing them with Spellbinders Diamond and Stars Impressabilties. I also added lots of snowflakes created with Spellbinders Create a Flake Two.


Saturday, November 21, 2009
Excitement in the air!
My blog is spotlighted on Spellbinders' blog today featuring my little video tip on positioning of the die templates. Wooo hooo! If you haven't seen it yet, scroll down and take a look. It will make your life easier. lol
Today I want to show you a project I did for Spellbinders in September.

I created a project to encourage looking at all the blessings in our lives and doing some fun activities together to reinforce the feelings of love and appreciation in a family. I used Spellbinders Nested Maple leaves.
I used an empty Laughing Cow container, inked it up and covered it with paper, a few leaves and ribbon. I've typed up the blessings and activities found inside so you can easily duplicate my project.
Thanksgiving Countdown
Thanksgiving Day brings to mind the blessings in our lives that usually go unnoticed.
On each of the enclosed leaves is a blessing and activity. Remove one each day leading up to Thanksgiving Day. Doing the activity will help you recall some of the blessings in your lives.
We are thankful for our teeth.
Give mom and dad some of our
Halloween candy in exchange
for a gift.
We are thankful for our legs.
Go outside and run and jump!
We are thankful for our cousins.
Call or write a letter to one of your cousins.
We are thankful for our kitchen.
Cook or bake something fun
together in the kitchen.
We are thankful for good food.
Go to the grocery store and pick out
a food that you haven’t tried yet.
We are thankful for Turkeys!
Art Project: Make paper turkeys.
We are thankful for giving hearts.
Think of something fun to give
someone in the neighborhood.
We are thankful for Daddy.
Do something nice for daddy and
be extra nice to him all day!
We are thankful for Mommy.
Do something nice for mommy and
be extra nice to her all day!
We are thankful for the seasons.
Go on a bike ride and enjoy
the beautiful weather.
We are thankful for our brothers.
Do something nice for them and be
extra nice to them all day!
We are thankful for our sisters.
Do something nice for them and be
extra nice to them all day!
We are thankful for our house.
Play a cleaning game.
We are thankful for each other.
Play a game together.
We are thankful for our hands.
Art Project: Finger painting.
We are thankful for our eyes.
Watch a special Thanksgiving show together.
We are thankful for our ears.
Play some fun music and dance.
We are thankful for books.
Go to the library and pick out some
Thanksgiving books.
We are thankful for pies.
Make or buy a pie and
deliver it to someone.
We are thankful for our grandparents.
Call grandma and grandpa and tell
them you love them!
We are thankful for Heavenly Father.
Go on a nature walk and notice all
of Heavenly Father’s creations.
We are thankful for our friends.
Make a special visit to some friends.
We are thankful for the computer.
Send an email to someone you love.
Send them some pictures of your family.
We are thankful for all of our toys.
Donate some of the toys you haven’t been
Playing with to a charity.
We are thankful for our car.
Go on a special outing of your choice.
Today I want to show you a project I did for Spellbinders in September.
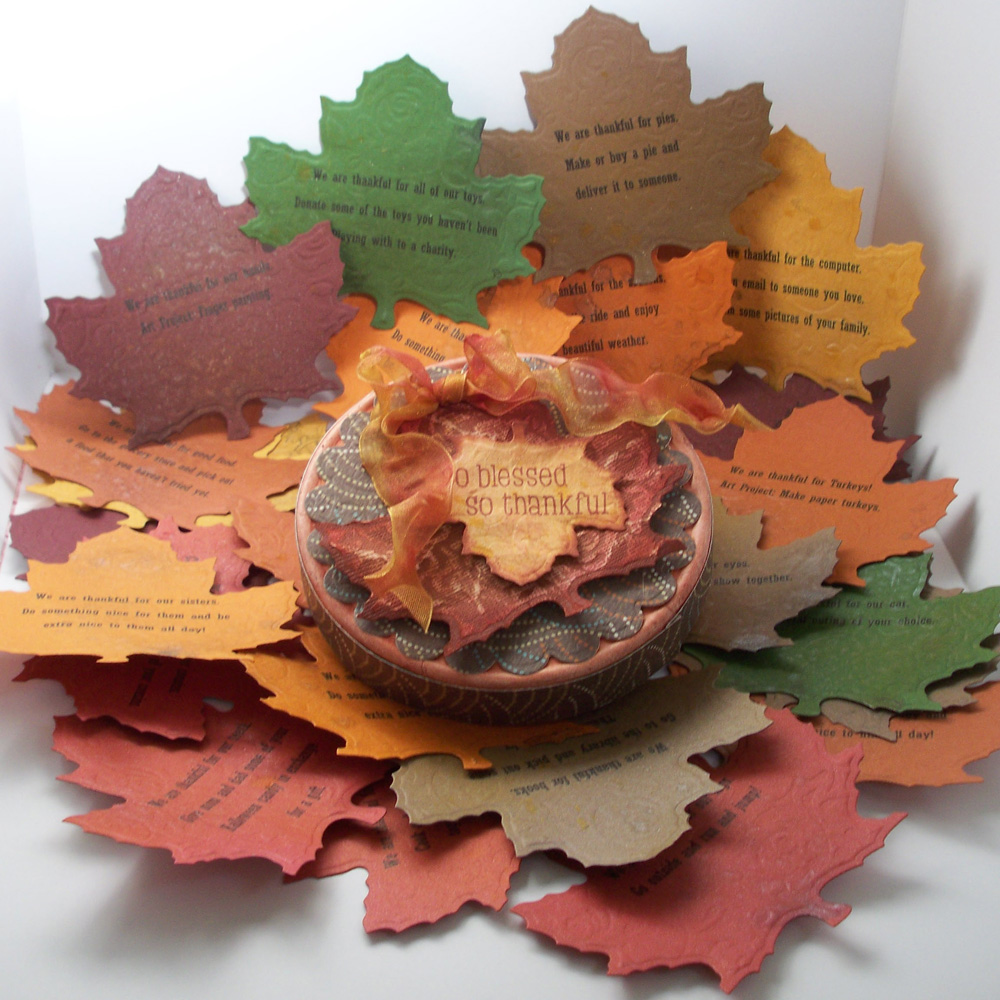
I created a project to encourage looking at all the blessings in our lives and doing some fun activities together to reinforce the feelings of love and appreciation in a family. I used Spellbinders Nested Maple leaves.
I used an empty Laughing Cow container, inked it up and covered it with paper, a few leaves and ribbon. I've typed up the blessings and activities found inside so you can easily duplicate my project.
Thanksgiving Countdown
Thanksgiving Day brings to mind the blessings in our lives that usually go unnoticed.
On each of the enclosed leaves is a blessing and activity. Remove one each day leading up to Thanksgiving Day. Doing the activity will help you recall some of the blessings in your lives.
We are thankful for our teeth.
Give mom and dad some of our
Halloween candy in exchange
for a gift.
We are thankful for our legs.
Go outside and run and jump!
We are thankful for our cousins.
Call or write a letter to one of your cousins.
We are thankful for our kitchen.
Cook or bake something fun
together in the kitchen.
We are thankful for good food.
Go to the grocery store and pick out
a food that you haven’t tried yet.
We are thankful for Turkeys!
Art Project: Make paper turkeys.
We are thankful for giving hearts.
Think of something fun to give
someone in the neighborhood.
We are thankful for Daddy.
Do something nice for daddy and
be extra nice to him all day!
We are thankful for Mommy.
Do something nice for mommy and
be extra nice to her all day!
We are thankful for the seasons.
Go on a bike ride and enjoy
the beautiful weather.
We are thankful for our brothers.
Do something nice for them and be
extra nice to them all day!
We are thankful for our sisters.
Do something nice for them and be
extra nice to them all day!
We are thankful for our house.
Play a cleaning game.
We are thankful for each other.
Play a game together.
We are thankful for our hands.
Art Project: Finger painting.
We are thankful for our eyes.
Watch a special Thanksgiving show together.
We are thankful for our ears.
Play some fun music and dance.
We are thankful for books.
Go to the library and pick out some
Thanksgiving books.
We are thankful for pies.
Make or buy a pie and
deliver it to someone.
We are thankful for our grandparents.
Call grandma and grandpa and tell
them you love them!
We are thankful for Heavenly Father.
Go on a nature walk and notice all
of Heavenly Father’s creations.
We are thankful for our friends.
Make a special visit to some friends.
We are thankful for the computer.
Send an email to someone you love.
Send them some pictures of your family.
We are thankful for all of our toys.
Donate some of the toys you haven’t been
Playing with to a charity.
We are thankful for our car.
Go on a special outing of your choice.
Tuesday, November 17, 2009
Grateful Heart
I wanted to share this Thanksgiving card with you. I created it to send to some special people so I had to make it larger so I would have enough room to write my thoughts. I still ran out of room, but I got most of my gratitude in it.
 The card base is a red card measured to fit a legal size envelope, with the brown mat behind it. I used another piece of brown and then a piece of striped designer paper, cut/embossed with Spellbinders Deckled Mega Rectangles. I added machine stitching around the edges. On that is mounted a Spellbinders oval of Always Artichoke cardstock which was embossed with the Flowers Impressabilities. The JustRite image was stamped with Memento Rich Cocoa ink and colored with Copic markers before being cut/embossed with Spellbinders Standard Circles. I colored the embossed edge with a Copic Spica pen and mounted it onto a Scalloped Circle cut from Real Red Cardstock. I added some square jewels and a rich chocolate satin ribbon with two loops on the left side.
Thanks for stopping by and taking a look.
Monday, November 16, 2009
Velveteen Poinsettia

I love this Spellbinders Poinsettia die, especially when it is cut/embossed using Velveteen paper. Unfortunately, I can't seem to capture it in the photo. I also embossed it with the Spellbinders Snowflakes Impressabilities. I've included a close up of the flower and you can see that embossing a little better.

The center is a brad from The Paper Company. I cut the holly leaves out and slipped the Spellbinders Labels Four die underneath to do the "out of the box" technique. The sentiment and holly leaves are stamped with craft ink and clear embossed. The outer embossed edge is colored with a Copic Spica pen, as are the holly leaves. The bg dp is from Basic Grey' Figgy collection. I also stamped a snowflake onto the sentiment panel to tie in the dp.
Thanks for dropping by.

Wednesday, November 11, 2009
My first instructional video!
Hey look! I figured out how to put a video on youtube and on my blog! I'm so proud! I'm not very techno savvy, so I am pretty impressed with myself. Okay, enough patting myself on the back. Take a look at my little tip!
A few of you have said you wanted to see the card I created using the tip in my video. Well, here it is!

For this card, I inked the JustRite stamp with markers before stamping. After stamping I used a watercolor brush and some ink to color the leaves pink. Using the video tip, I cut/embossed the stamped image out perfectly using Spellbinders Large Oval Die Template. I then used a Copic marker and the airbrush system to add some light color to the panel. I cut/embossed a regal rose scalloped oval to back the sentiment panel. I added a little airbrushed copic to the ribbon to add some of the deeper rose color to it and used a glue dot to adhere it. The dp squares are 2 ¼” and they are backed with regal rose 2 ½” squares. The green panel is 1 ¾” X 5 ¼” with borders of 1/16th of Old Olive. I embossed the green panel with the Sizzix Happy Birthday folder and added a bit of ribbon. The card is white but I used ”Mini Cosmic Swirl” template from The Crafter’s Workshop to mask before airbrushing with two shades of pink Copic markers. I backed the whole card with a regal rose panel. The stamp is from JustRite’s Thinking of You set.
If you want to see just how close I could get the cutting using my tip, click on the photo for a close-up.
Products Used:
Spellbinders Wizard
Spellbinders Large Oval Die Templates
JustRite Thinking of You set
Copic Markers: RV11, RV14, airbrush system
Stampin' Up! Regal Rose, Rose Red and Old Olive inks, Cardstock: Regal Rose, White, Always Artichoke, dp also in Regal Rose and Certainly Celery. Certainly Celery and Pretty in Pink ribbons.
The Crafter's Workshop Mini Cosmic Swirl template
Thanks for stopping by. I would love to know what you think of my first video!
A few of you have said you wanted to see the card I created using the tip in my video. Well, here it is!

For this card, I inked the JustRite stamp with markers before stamping. After stamping I used a watercolor brush and some ink to color the leaves pink. Using the video tip, I cut/embossed the stamped image out perfectly using Spellbinders Large Oval Die Template. I then used a Copic marker and the airbrush system to add some light color to the panel. I cut/embossed a regal rose scalloped oval to back the sentiment panel. I added a little airbrushed copic to the ribbon to add some of the deeper rose color to it and used a glue dot to adhere it. The dp squares are 2 ¼” and they are backed with regal rose 2 ½” squares. The green panel is 1 ¾” X 5 ¼” with borders of 1/16th of Old Olive. I embossed the green panel with the Sizzix Happy Birthday folder and added a bit of ribbon. The card is white but I used ”Mini Cosmic Swirl” template from The Crafter’s Workshop to mask before airbrushing with two shades of pink Copic markers. I backed the whole card with a regal rose panel. The stamp is from JustRite’s Thinking of You set.
If you want to see just how close I could get the cutting using my tip, click on the photo for a close-up.
Products Used:
Spellbinders Wizard
Spellbinders Large Oval Die Templates
JustRite Thinking of You set
Copic Markers: RV11, RV14, airbrush system
Stampin' Up! Regal Rose, Rose Red and Old Olive inks, Cardstock: Regal Rose, White, Always Artichoke, dp also in Regal Rose and Certainly Celery. Certainly Celery and Pretty in Pink ribbons.
The Crafter's Workshop Mini Cosmic Swirl template
Thanks for stopping by. I would love to know what you think of my first video!
Mailable too
Here is another easy peasy card for my girl's class.

Stamp image onto white cardstock using Brown ink. I used colored pencils to color the leaves and berries on border of the image and the gingerbread man. Cut/emboss image with circle die template. Cut/emboss red scalloped circle. Adhere image circle to red circle. Emboss front of card with snowflake embossing folder. Tie ribbon around front of card near the bottom. Use foam squares on back of circle and adhere to card front on right side, over ribbon. Carefully apply small bits of Candy Cane stickles to berries and to buttons and cheeks. Be very careful not to smear them. Ask me how I know! lol Set aside to dry!
I hope you like this little cutie. Thanks for stopping by today! Make it a great day!

Stamp image onto white cardstock using Brown ink. I used colored pencils to color the leaves and berries on border of the image and the gingerbread man. Cut/emboss image with circle die template. Cut/emboss red scalloped circle. Adhere image circle to red circle. Emboss front of card with snowflake embossing folder. Tie ribbon around front of card near the bottom. Use foam squares on back of circle and adhere to card front on right side, over ribbon. Carefully apply small bits of Candy Cane stickles to berries and to buttons and cheeks. Be very careful not to smear them. Ask me how I know! lol Set aside to dry!
I hope you like this little cutie. Thanks for stopping by today! Make it a great day!
Sunday, November 8, 2009
Do you like to color?

It seems there are many people that like to color images. If you are one of those people, this card is for you!
Stamp image on left side of card front near fold. Color image with colored pencils or markers. Cut off right edge of card with scallop scissors. Sponge edge with Blue ink. Stamp sentiment on inside edge of card as shown. Adhere card to blue cardstock. Another simple, mailable card.
Thanks for stopping by! Have a great week!
Saturday, November 7, 2009
Another Christmas card

Here is a Christmas card I wanted to share with you today, another I will be doing in a class with the eight young girls. It is a fairly simple card, which makes it good for mailing and mass producing, if you have a mind to.
Punch holes in card front near left folded edge and top of card. Ink pine bough stamp with green inkpad. Carefully stamp it with the stems between the holes you punched, then, without re-inking, huff on it and stamp it again away a little bit, with the stems touching. Ink berries stamp and stamp it twice, as shown. Ink sentiment stamp with red and stamp it near bottom of card, under boughs. Emboss right side of card with snowflakes embossing folder. Thread ribbon thru holes from front, cross ends and put ends up through holes to front of card.
See, I told you it was an easy card, but I think the results are lovely. What do you think?
Thursday, November 5, 2009
Sticker

Today's card features a sticker. Now I have a lot of stickers here in my craft room, but rarely reach for them when I begin a creation.
I used the Cloud 9 Design flower sticker in the center, mounted it onto vanilla cardstock. I outlined the inside of my Spellbinders Nested Poinsettia die template with my red marker before cutting/embossing in the Wizard. I really like the mottled look it gave, instead of the very opaque look lining it later would give. It's a little softer. I added candy cane stickles to the center of the flower and curled the edges a bit over a marker. The red poinsettia was cut/embossed/impressed with the Spellbinders Snowflakes Impressabilities. It is mounted with a foam square, and the petals curled slightly. The navy oval was also cut/embossed/impressed with Spellbinders Petite Ovals Large and Snowflakes Impressabilities. The dp is by Kaiser scrapbook and mounted onto real red before being adhered to the blue card front. I added a little Christmas plaid bow and DONE.
I hope you like it.
Subscribe to:
Posts (Atom)