
Thursday, March 4, 2010

Organization

My friend Janine had some questions about the storage cases I am using for my organization, so I thought I would post my answers to her questions, with additional pictures of how I am using them.

Will the cases you purchased hold stamps on both sides?

Cling Mount Red Rubber - They will only hold stamps on one side. They aren't thick enough for cling mount stamps on both sides.

Clear Stamps - yes, you could put stamps on both sides. The cases will close easily.


Clear- both sides. Yes, I like this.

Is there an opening like on standard CD cases where stamps could fall out? Does that make sense?

Yes, there is an opening along the hinge side. It is 1/2" wide and the length of the case. If you put cling mount stamps in it, they cling to the case, so it shouldn't be a problem. I have tested some of the smaller Spellbinders dies and after shaking the case, they can't get the angle to fall out. I think I will be adding a strip of the magnet sheet to hold the smallest dies in place though.
Will these cases fit the Borderabilities Petite and the Mega Curved Rectangles? Yes. The borderabilities will fit, the long way, but not horizontally.


Wednesday, March 3, 2010

Something new

I did demos in the Rubbernecker booth at a local Stamp show this past weekend and while cruising, picked up this BIG punch at one of the booths. I love this lattice it creates.


The sentiment from Rubbernecker is stamped with Rose Red onto Pretty in pink cardstock and then cuttlebugged with the swiss dot folder. I added little jeweled flowers from KaiserScrapbook to each corner. The big panel border was created with my new Martha Stewart Garden Trellis punch I picked up. The dp is from an old SU! paper pack. I doubled the trellis for a slightly different look.

Have a wonderful Wednesday (or whatever day you happen to read this!)

Hugs,
Karen

Tuesday, March 2, 2010

Focusing on the sentiment!

For today's card, I used several little techniques you might be interested in.

First, I created my background paper by smearing the marker ink onto my craft sheet, misting with water and smooshing the cardstock into it. I dried that with my heat gun, then stamped the sentiment in the center with Always Artichoke ink.


I used Spellbinders™ new Labels Eleven to cut/emboss that, and then used the next size up to create the mats. To get the artichoke one just a touch smaller than the gray, I hand trimmed the embossed edge off. For the curry layer, I stamped Rubbernecker's Flourish background with Versamark ink and clear embossed. Next I mounted all that onto the main piece of cardstock I had created, hiding the sentiment cut out underneath the sentiment panels. The main card is the curry cardstock, and I used Spellbinders™ Curved rectangles to create the borders on the top and bottom of the main panel.

I stamped the little Rubbernecker Butterfly Inchies image onto the white cardstock with the curry ink and then punched and mounted onto the green punched layer. Added a nice double bow, and there you go.

I hope you like this. Next week I am planning to do a tutorial on how to create backgrounds like this.

Thanks for stopping by!

I'm moving forward!

I got started and I'm loving the results! Now I'll tell you a little more with the risk you will think I am OCD. lol

So, I showed you the empty cases I bought to store my cling mount stamps. YesterdayI put the stamps in cases trying to fill the space as well as possible and/or with a theme going on. For instance, the hearts are in one (if they all fit), the farm style images are in one, etc. That is working great. I numbered each of the cases with my label maker and put a colored mark on each with a permanent marker.


Next, I went to the website and copied the images of the stamps I had and pasted them onto a page. I also copied the name of the stamp set and the SKU so I could name them when showing you a creation using them. Under that is the number of the case they are in. This is now my catalog. I've taken a photo of one of the pages to show you.


I also listed all my stamps in an Excel spreadsheet, separating them into categories: background, sentiments (all typed out so I know what they say), and Images. Each of those categories with the corresponding color and the number of the case they are stored in.

I have a lot more work ahead of me, but I have all my Rubbernecker images and sentiments done! Wooo hoooo!

Thanks for stopping by!

Sunday, February 28, 2010

Texture!


I really love texture on paper crafts! This card has lots of it with the embossed craft foil, the cuttlebug embossing on the panel and then of course the pattern of the paper. Isn't it fun?

The apple is cut/embossed with the new Spellbinders Nested Apples dies from red craft foil and then embossed with their Cherries Impressabilities and sanded to show off all that texture. I airbrushed the stem with Copic marker. The Handsome Hunter (the color I don't reach for very often) panel is embossed with a Cuttlebug Swiss dots folder. The sentiment is stamped on Green Galore. I even used a patterned paper for just a bit more oomph! Of course you have to have red gingham ribbon with apples, right?

Thanks for stopping by! Come back soon!

Hugs,
Karen

Thursday, February 25, 2010

Oooooo, organization!

I received my next organizational tool today - 100 clear DVD cases. I plan to put my cling stamps and my Spellbinders™ die templates in them! Woooo hoooo! I think it is going to be great! What do you think? I can hardly wait! I wonder how long it will take to get them all in the cases and organized (alphabetically, of course) on the shelves. It's gonna be purdy!


For those interested in where I got these cases, here is the link to Stamp-by-Step.

Thursday, February 18, 2010

Easter Morn

These new dies from Spellbinders™ are going to be oh so popular. Everyone at CHA absolutely loved them.


I created an Easter sunrise card using Labels Thirteen and Cross Collection. The card base is Pumpkin Pie. The bg panel was airbrushed with several Copic markers. I added a bit of lace trim and a bow (which didn't match until I airbrushed it too). Labels Thirteen was cut/embossed and stenciled from Marigold Morning cs and airbrushed. The cross was cut/embossed/stenciled using SU's weathered paper. The sentiment is stamped with Chocolate Chip ink, cut/embossed with Spellbinders™ Ovals Nestabilities® and popped up.

Thanks for dropping by! I so appreciate your visits and I love your comments! Have a great day!

Blog Candy Winner!

I used Random.org to choose a winner of the Spellbinders™ Large Octagons Nestabilities®. The number was 5!

Da da da dahhhhhhhhh!!!!! The winner is Michele!!!!

Michele said...
Great tutorial for the ice cream cone! What a great giveaway ... thanks for the chance to win!

Congratulations Michele! I'll get the prize mailed out to you right away!

Thanks to everyone for playing along, leaving comments and especially for visiting my blog. I so appreciate it!

Hugs,
Karen

Tuesday, February 16, 2010

Great Crafter's Tool Hunt 2

New tools for crafters were revealed at CHA, the best being the new Spellbinders Presto Punch!!!!! Take a minute and visit www.whencreativityknocks.com and vote for Presto Punch! You do have to register before you can vote and do a simple math project to protect the site from spammers. After registering, on the right side is a spot to take you to the voting. Registered voters can only vote one time. They are giving away incredible prize packages for voting, so it is really worth your time.

Valentine


I thought I would show you the Valentine I created for my husband. He is my number one supporter and cheerleader.

I used a beautiful glitter paper with the big X O on it for the base of my card, which I mounted onto white cardstock and then matted with black for the pop. The main panel is an embossed swiss dot paper also matted with black. The hearts are Spellbinders™ Classic Scalloped Hearts. To get that lacy look on the outside, first I cut the hearts from the embossed paper, then took them out of the die and colored that inside border of the die with a water based ink marker, replaced the heart into the die and embossed them. It isn't a solid color, and I really like that look. It works perfectly for this idea, don't you think? I added one black bow to the largest heart only.

Thanks for stopping by. If you haven't already left a comment to win the blog candy, be sure to scroll down to the Henry Rooster card and leave a comment. You only have until tomorrow at 5 PM.

Hugs,
Karen

Thursday, February 11, 2010

Copic chuckle - blog candy

I was teaching a Copic class at a LSS today. In referring to some colors I would use, I said, G24, G26, G27 when one of the students calls out BINGO! I laughed and laughed. Is that funny to you, or did you have to be there?

If you haven't already posted a comment on the Henry card (a few posts below), you will want to do so before 5 PM on the 17th of Feb. so you have a chance to win some blog candy - a Spellbinders™ die template.

Thanks for stopping by! Please come back soon.

Wednesday, February 10, 2010

Blog candy!

I have blog candy up for grabs. Scroll down to the post after the Rooster card for details. Don't miss out!

Tuesday, February 9, 2010

Triple Dip Ice Cream Hinge Card Tutorial - and blog candy!!!!

As promised, here is the tutorial to make my triple dip ice cream cone card.

1109KHIceCreamConeWithACherryONTop

I used:

Spellbinders™:

S4-275

Nested Ice Cream Cone

S4-266

Assorted Fresh Fruit

I2-1007

Diamond and Stars Impressabilities™

I2-1003

Snowflake Impressabilities™

Copic Sketch Markers: E13, G19 and the Airbrush system.

Cardstock: Very Vanilla, Chocolate Chip, Pretty in Pink, Real Red, Garden Green

Dark pink brads (unknown)

Signo White Gel Pen

Print invitation information onto neutral cardstock, being sure to leave enough room between each paragraph for the dies. I print it on computer paper and align the dies to be sure it fits before printing onto my cardstock.

ice cream 1

Cut/emboss each scoop.

ice cream 2

Cut/emboss largest cone from Creamy Caramel cardstock. Leave in die and emboss using Diamond and Stars Impressabilities™ , then airbrush with Copic E13 marker.

ice cream 3

ice cream 4

Glue printed scoops onto cone.

ice cream 5

As an optional step, you may wish to trace the card onto another piece of cardstock and back the whole thing for more stability.

ice cream 6

Cut/emboss 2 of the largest scoops from neutral Ivory Cardstock. Attach several brads to the embossed scoop, saving the space for the one that will act as the hinge. (bottom left). Glue the other large scoop to the back of the embossed scoop to cover the backs of the brads.

Poke hole through all layers (the scoop with all the brads, the backing scoop and the printed one for the inside of the card) for the hinge brad and attach that brad. This creates the hinge. (The purple is an old mouse pad I use when using my paper piercer.)

ice cream 8

Cut/emboss chocolate scoop and strawberry scoop and emboss with Snowflakes Impressabilities™ the same way I used the Diamond and Stars Impressabilities™ on the cone. Carefully align these scoops with the back printed cone and scoops so that they line up perfectly.

ice cream 9

Cut/emboss cherry from red cardstock. Cut/emboss 2 cherry dies from green cardstock. Leave one in die and airbrush with Copic G19.

ice cream 10

Cut red cherries from their stems and glue over green cherries on airbrushed green stem. Glue other green cherries to the back of the first to provide more stability. Cut off the one cherry with the leaf on the stem. Attach to top of ice cream. Add highlights to cherry with white gel pen.

ice cream 11

ice cream 12

I hope you enjoyed this step by step tutorial and you can make a similar card. If you do, please leave a link if you post it. I would love it see it!

Whew! It is finally done and uploaded. Now I can move on and quit feeling so guilty! lol Thanks for your patience with me. Be sure to check out the post just below to see how you can win some Blog Candy! A Spellbinders die template. Woooo hooooo!

Hugs,

Karen

Henry, a promise and BLOG CANDY!


Isn't this rooster too cute? He is a Rubbernecker stamp called Henry. I stamped him with rich cocoa Memento ink then colored with Copic markers. I love that even I can do a pretty good job using these fantastic markers! They make me look good. I used E11, E44, YR02, YR09, YR61, BG13. To do the reverse embossed edge on the Spellbinders™ Deckled Rectangle, I inked up just the inside of the die with my SU! Chocolate Chip marker and then embossed the vanilla cardstock. I matted that with the chocolate chip cardstock. The card is Sage Shadow and 5-1/4 X 4. I stamped the chicken wire bg stamp with Memento Rich Cocoa ink and then sponged SU! chocolate chip ink around the edges before attaching to the Dusty Durango cardstock which is 5-1/2 X 4-1/4.

AND, I promise to get the tutorial for the ice cream cone hinge card posted here TODAY! It is next on my to do list.

AND for being so patient with me and my extreme lateness, I am going to give away a set of Spellbinders™ dies, Large Octagons S4-185. All you need to do is leave a comment. I will post the name of the winner next Wednesday, Feb. 17 at 5 PM MST and tell you how to contact me with your address so I can mail it to you. Please let others know I am giving away blog candy!!!! Post it on FACEBOOK or on your BLOG!

Thanks for stopping by! Hugs, Karen

Saturday, February 6, 2010

Hinge card tutorial!

Seriously, I am working on it. Darn distractions!!!!!

Wednesday, February 3, 2010

Tutorial

Due to the overwhelming requests for my hinge ice cream card cone (2 I think) lol I am trying to get it done. You know the most challenging part of it? Clearing a space in my stamping room so I can show you how to do it. Isn't that pathetic? I think so. I may have to just move the whole show to my kitchen table. It's clear, as I don't cook! hee hee hee So, stay tuned. I'm trying to get 'er done!

In the meantime, I am sharing a fun card I created using one of the new Spellbinders™ dies that will be available soon. This one is the new S4-266 Assorted Fresh Fruits. Is that jar cute, or what? I love it. I think fruits are going to be big! These are all the dies I used on this card:
S4-130 Classic Rectangles SM; S4-202 Deckled Rectangles LG; S4-214 Eyelets Borderabilities® Petite; S4-266 Assorted Fresh Fruit


I cut/embossed the strawberry from red cardstock and then used the die as a stencil to color the seeds with white gel pen. Would you believe I cut the jar from packaging? Yes I did! I used the packaging the dies come in! Am I clever? Oh yeah!

I hope you have a great day! Keep on stamping and creating! It's good for you!

Hugs,
Karen

Sunday, January 31, 2010

It's rockin'!

Guess who is joining the Rubbernecker Design Team! I'll give you a few hints:
1) She loves teapots
2) She loves polka dots
3) She snorts when she laughs! And she laughs a lot!

Yes, you got it! The new team member is ***** Cindy Motherway ****** Mothermark to those of you familiar with her on SCS. She is a fabulous stamper and oh so much fun! Be sure to check out her SCS gallery and her blog (which she endearing calls her glob!) SNORT!!!

Friday, January 29, 2010

A great tip!

I had a friend ask me how to find creations made with a certain SPELLBINDERS™ die template! Guess what! There is a way to find all the creations on the SPELLBINDERS™ site. Just go to the search box on the home page and type in the name of the die template. Wooo hooo! Lots of art using that specific one will pop up to inspire you! Go take a look!

Thursday, January 28, 2010

WOW!

I got back to Arizona late last night, but didn't get home until later this evening. I'm kind of worn out! Standing for that many hours every day is tough on the feet and legs. It was a lot of fun though! I really enjoyed sharing all the new Spellbinders products - lots of wonderful new die templates and the big reveal of the *********** PRESTO PUNCH***************!!!!!! If you don't know what I am talking about, be sure to visit the Spellbinders blog to get all the information.

I personally can't wait to get all the new dies! They are awesome!

I am too tired to upload much right now, but hopefully tomorrow I can share more and do the tutorial on the hinge ice cream cone card. That is - IF anyone wants to see it. Leave a comment if you want me to do the tutorial!

I'm going to have some blog candy coming really soon too! Keep your eyes pealed!!!!

Wednesday, January 20, 2010

Sorry I've been MIA. I am getting ready to leave for Anaheim, California to work in the Spellbinders booth at CHA-W. I've never been before, so I am so excited! Today I bought an umbrella and a rain poncho! I hope California hasn't floated away before I get there on Saturday!

If you are going to be there, please come by and say hello! I'd love to meet you!

Friday, January 15, 2010

Fun

Wasn't the Spellbinders™ Surprise party fun? The new dies are awesome and the art created by the Design Team was outstanding!

Today I am sharing a card I created using a Spellbinders™ die and an image from Rubbernecker. Aren't these roses beautiful? I inked the image with markers before stamping onto vanilla cardstock and clear embossing. I then colored over the flowers with a Copic marker. I also stamped the image onto pretty in pink cardstock and cut/embossed it with Spellbinders™ Labels 5. I cut the vanilla cardstock roses out and popped some of them up. The chocolate chip mat was cut/embossed with Spellbinders™ Labels 5 as well. I added some ribbon and rhinestones for the bling!


I hope you like it.

Thanks for stopping by!

Monday, January 11, 2010

Spellbinders Surprise Party!

clip_image002

SPELLBINDERS™ SURPRISE PARTY!!

January 7- 13, 2010

Commenting on this post is welcome but does NOT enter you into the contest. This contest is sponsored by Spellbinders™ Paper Arts. Directions on how to enter are in the Blog Post and Official Rules at Spellbinders™ Surprise Party Rules. If you have any questions, please e-mail ContestQuestions@Spellbinders.us

Welcome to the sixth day of the Spellbinders™ Surprise Party!!

Spellbinders™ Paper Arts is hosting Spellbinders™ Surprise Party!! We will introduce 25 new Die Templates and 2 Impressabilities™ templates! These sneak peeks are part of the collection that will be released at the Craft and Hobby Association Trade Show on January 24, 2010. We want to invite YOU, our greatest fans, to join the party from January 7-14, 2010! See the newest Spellbinders™ products, visit our Designers’ Blogs, and win fabulous Spellbinders™ prizes!

Today you have the opportunity to win a Spellbinders™ prize package (including all three Spellbinders™ Die Templates revealed today) through the contest entry email address listed below. Be sure to visit the other Designers’ Blogs participating today, and enter from those blogs for additional chances to win! You may enter once from each Blog! Each Spellbinders™ Surprise Party!! blog post is open to contest entries for 48 hours. You have until 11:59 p.m. Eastern Standard Time January 13, 2010 to enter this contest through my blog. Be sure to read the rules at Spellbinders Surprise Party Rules before entering so that your entry will be valid!

To see previous Spellbinders™ Surprise Party!! posts or to go to any of the future blog posts, feel free to visit the following:

January 7

Debbie Olson

Julie Overby

Lesa Rapp

January 8

Becca Feeken

Janine Blackwelder

Debbie Seyer

January 9

Heidi Blankenship

Karen Taylor

Beth Pingry and Cathy Chlebana

January 10,

Linda Duke

Jennifer Davis

Terre Fry

January 11

Keri Lee Sereika

Kazan Clark

Mary Pfaff

January 12

Karen Hunsaker

Christy Farneth Kerr

Holly Simoni

January 13

Sherry Cheever

Kimberly Crawford

Sharon Johnson

After the entry deadline is reached, Spellbinders™ Paper Arts will randomly pick one winner from each Spellbinders™ Surprise Party!! blog event as stated in the rules at Spellbinders Surprise Party. Winner will be contacted by email within 24 hours of the contest deadline. The winner will have 72 hours to reply to that email to claim prize. If Winner fails to respond within 72 hours, a new winner will be drawn for said prize.

Entrants visiting all 21 Spellbinders™ Surprise Party!! events and correctly entering the drawing on each Blog will automatically be entered into the SPELLBINDERS™ SURPRISE PARTY!! GRAND PRIZE give away with a retail value of over $350.00. The GRAND PRIZE will be announced on January 24, 2010, on the Spellbinders Blog and consists of super secret products being released at the Craft and Hobby Association Trade Show. You WILL be excited!!

I’m thrilled to share my Spellbinders™ Surprise Party!! project with you...

clip_image004

These are the Spellbinders™ Die Templates I used for this project:

S4-275 Nested Ice Cream Cone (Center)

clip_image006

I also used Spellbinders™ S4-235 Fancy Tags and S3-148 Tags Trio die templates.

The papers are from The Paper Company, Studio Celebration line: Green Mini Dot, Bright Stripe Glitter, Dotted Circle Paper, Glittered Striped. I also used embellishments from the Celebration line: Celebration Dome Stickers and Celebration Bouncy Party Icon Stickers.

Let’s get started. Begin by cutting the Green Mini Dot cardstock to 4 ¼x 11”. Score at 5½” and fold with the blue on the inside of the card.

clip_image008

Cut Glittered Striped cardstock 5 ¼ x 4”.

Cut/emboss S4-275 Nested Ice Cream Cone, Cone #3 (with #1 being the smallest) from Celebration Bright Stripe Glitter paper and attach to Glittered Striped cardstock. Cut Scoop #3 from red side of Dotted Circle paper and attach at top of cone onto the Glittered Striped cardstock.

clip_image010

Position S4-275 Nested Ice Cream Cone, Scoop #2 die template onto the red scoop die cut, secure with low tack tape, and feed into Wizard to cut through all layered of paper.

Glue onto card front, reposition Scoop #2 die template and cut through card front. To avoid cutting through card back, fold the back under the Spacer Plate in your sandwich.
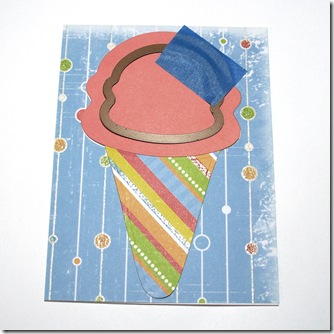
bh5

clip_image014 clip_image016

Place both dies back into place and emboss. Carefully add red atyou Spica glitter pen to outside embossed edge of scoop and clear atyou Spica glitter pen to inside embossed edge of scoop.
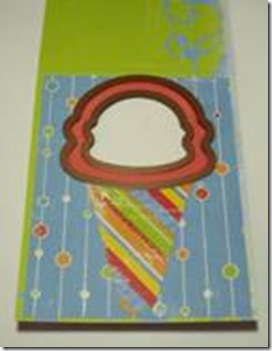
clip_image018

Next, create the text for the invitation on the computer. I used Accent Dot Writer as the font and chose brown because it looks like chocolate. Yum!

To get it to line up, I created a MS Word document and printed it on regular paper. Keep testing by placing the card over the text until it is lined up just right, having the bottom edges even. Mark the edge of the card on the test paper, then open the card up and use a repositionable adhesive to adhere it to the test paper with the edge lined up with the mark you made. It should be aligned exactly where it needs to print. Run it through the printer. Remove your card from the test paper.

clip_image020 clip_image022 clip_image024 clip_image026

Print text for tag onto green side of cardstock using my positioning video tutorial here to align it perfectly, and cut/emboss with S3-148 #2.

Tie ribbon through ice cream scoop window and add your S3-148 Tags Trio tag, being sure the word Celebration on the ribbon is right side up on front of card and on inside of card. Adhere tag to front of card.

Cut/emboss S4-235 Fancy Tag from Celebration Bright Stripe cardstock and attach on inside of card near the top. Adhere candle bouncy sticker onto S4-235 Fancy Tag. Add the two dome stickers near invitation information.

clip_image028

Here is the new Spellbinders™ die template I have revealed today!

clip_image030

S4-275 Nested Ice Cream Cone

$19.95

This is a Limited Edition, Summer Collection die template, only available through May 30, 2010.

The measurements of these dies are:

Cone SM 1 5/16 x 1”

Cone MD 2 x 1 9/16”

Cone LG 2 7/8 x 2 3/16”

Ice Cream SM 1 3/16 x 1 5/16”

Ice Cream MD 1 13/16 x 2 1/16”

Ice Cream LG 2 9/16 x 2 15/16”

Here is another fun card I created using the new Spellbinders™ S4-275 Nested Ice Cream Cone die templates. This card is a hinge card, so the ice cream scoops actually swing away to show the information on the inside of the card. The cherry chips on the bottom scoop are brads with one of them utilized as the hinge.

clip_image032 clip_image034

If you would like a tutorial on this card, come back in about a week and I will have it ready for you!

RULES

For the complete Spellbinders™ Surprise Party!! rules go to http://spellbinderspaperarts.com/blog/spellbinders-suprise-party/ .

TO ENTER CONTEST:

1) Send your email entry to: REVEAL16@spellbinders.us

2) Type the name of the die being revealed on my blog in the “subject” line of the email.

3) Click send!

If you have any questions regarding the contest, send an e-mail of inquiry to: ContestQuestions@Spellbinders.us

Thank you for visiting my blog and good luck!
Saturday, January 9, 2010

Here is the kick off of my Rubbernecker tenure.


I stamped this Rubbernecker inchie butterfly using Elegant Eggplant in on Very Vanilla Cardstock before cutting/embossing with Spellbinders Classic Circle. I then cut/embossed a Spellbinders Blossom from Perfect Plum paper to mount it on. The dp's are from my stash, and I don't know from where. I added the vanilla ribbon and the sentiment from the Rubbernecker Fashion Icon set stamped on the striped dp with Elegant Eggplant ink. A fairly simple card and easily mailed.


Thanks for dropping by. Come again soon. I have blog candy coming up very soon. You won't want to miss it.


Hugs,

Karen

Friday, January 8, 2010

Dangling Love!


I created this card for today's LSC challenge on SCS and Sharon's stamp simply challenge. My dear friend Wendy posted the challenge, and in honor of her, I used a dangle on my card. She's famous for dangling! I used different papers for the kick on this card. I cut/embossed the scalloped hearts from a rose petal paper and black to help it stand out on the music dp. I stamped love with black memento ink and then clear embossed on the petal paper. The front of the card is covered with the music paper and then I added the ribbon dangle and popped up the hearts. I also put a panel of the rose petal paper on the inside.


Don't forget to check out the Spellbinders Surprise Party postings today. New dies revealed. Awesome!

Thursday, January 7, 2010

It has begun!

The Spellbinders Surprise Party has officially begun. Be sure to follow along and possibly win some of the new dies for FREE! What an awesome opportunity. Debbie, Julie and Lesa have fabulous projects to inspire you. Be sure to go take a look! I can't wait to see what tomorrow will bring!

Have a super fabulous day!

Karen

Wednesday, January 6, 2010

Spellbinders™ Surprise Birthday Party!!

Spellbinders™ Surprise Birthday Party!!

Posted using ShareThis
It starts tomorrow!!!!!! Get ready, it's going to be great!

Tuesday, January 5, 2010

More fun!

Here is my big news: I have joined the Rubbernecker Design Team for the year 2010! How cool is that? I'm so excited to be joining a wonderful group of extremely talented designers! I will get links to their work on the right side of the blog a little later, so check back! I'm so grateful for the opportunities that are coming my way!


Here is a card I would like to share with you today that I created to use the colors of the SCS color challenge: Certainly Celery, Handsome Hunter and Bermuda Bay and a touch of pink for dessert. I stamped the image with Memento Black and then clear embossed before coloring with an SU! marker as well as Copics. The background of the card is stamped with Handsome Hunter ink.

I hope you have a wonderful day and stay warm since most of the country is FREEZING!

Hugs,
Karen

Monday, January 4, 2010

HAPPY NEW YEAR!!!

Happy New Year my friends!!!!!

I have been missing in action for a while as I was preparing for my beautiful daughter's wedding January 2. Whew, we made it and all went so well. She was a stunning bride, of course.


I've got some big news for you too! It's time for a
Spellbinders Surprise Party!!!!!

There will be dies given away and lots of inspirational creations showing you the new dies being debuted at CHA later this month!!! Click on the link above to take you to the Spellbinders blog for more information and to let you know who will be revealing the new dies and which day! Mine will be January 12, so I hope you will be back to see my reveal.