Tuesday, August 31, 2010

Here is another made for the VSN challenges.


I cut/embossed the sea shell using an older Spellbinders die and airbrushed it while still in the die, I then added some sparkle with the Copic AtYou pen. I think you can see it - barely. The background is the Spellbinders Impressabilities Sea Scape. I also lightly airbrushed that.

Monday, August 30, 2010

SCS VSN challenges

For the next few days I will be showing you a few more cards I created for the VSN challenges this past weekend.
These images are a sneak peek of a new set being released Sept. 7 by Mark's Finest Papers called Broom Rides. Isn't it fun?

I used white cardstock and airbrushed it with copic markers to get that eerie purple sky look and the amber ground. I stamped the tree, bats and Speedy the cat riding the broom with Elegant Eggplant ink. I did the same techniques for the sentiment panel and popped it up on a cuttlebug die cut. Oh yeah, the main panel is cut with Spellbinders deckle edge rectangles.

I hope you like it! Thanks for dropping by!

Saturday, August 28, 2010

VSN card

I created this card for my VSN challenge on SCS using a smoosh technique.


I placed several drops of three different re-inkers (Distress: Shabby Shutters, Scattered Straw and Tattered Rose) onto a non-stick craft sheet, then misted with water and gold shimmer mist. I smooshed two tags into the inky mess and then dried with my heat gun. I wish you could see the beautiful shimmer, but the photo just doesn't pick it up.


I stamped the camellia (from Mark's Finest Papers Apples & Camellia) onto the smaller tag with Rose Red pigment ink and clear embossed, then cut out. That was mounted onto a shimmery cs shape cut/embossed with Spellbinders Labels Five. The 5-1/2" square card front is imagine from Kaisercraft. I cut/embossed a piece of the smooshed tag using Spellbinders Lattice borderabilities and the green layer is Lotus Borders Petites borderabilities. I also cut another layer of the smooshed tag and cut with Martha Stewart Arched Lattice punch for the bottom of the card front. The ribbon behind the image panels is the beautiful silk ribbon from the Stamp Simply Ribbon store. I stamped the sentiment (from Apples & Camellia) using the Rose Red pigment ink and clear embossing.

Friday, August 27, 2010

Challenges and stamping fun!

Today there were several different challenges on SCS for VSN. lol Do you have any idea what that means? lol Luckily, I do. Here are my creations for today's challenges.

This challenge was to stamp an image of foods you enjoy in the summer. Well, when I was a kid growing up on a little farm with apple trees all around me, we would start eating apples as soon as they were the size of a walnut and continue all summer long. These were summer apples, of course and oh so delicious!

I stamped my apple (from MFP's Apples & Camellia) onto white cs and inked the butterfly and the sentiment with markers so I could add the red too. And what is more summery than red gingham tablecloths for picnics? That's why I added the gingham ribbon. Red buttons, just for fun. The card front is embossed with the Cuttlebug swirls folder.

The next challenge was to create a window in your card. The mum stamp was inked with markers before stamping and then I colored in the vase with a Copic marker then cut/embossed with Spellbinders Labels Ten. I also cut the dp in the same shape to mat the image. I punched out the shape from the card front and framed it with the hardware and added the ribbons. This is the outside:
and the inside:
This is a sneak peek of a new set being released Sept. 7 from Mark's Finest Papers called Thankful Mums & Pumpkin.

This challenge was to create a bg paper using the Cuttlebug Wax Paper Resist technique. What fun that was, even if I did have to pull out the iron to do it. You just emboss a piece of wax paper in the CB folder and then sandwich it between two pieces of glossy cs and iron. Remove the wax paper and sponge on the ink color. Don't you love the look of that alligator skin in the bg panels? I created that with the wax paper cuttlebug resist technique and the Cuttlebug animal print folder. What fun! I inked it with Forest Moss distress ink. The alligator image is stamped with Always Artichoke ink and cut/embossed using Spellbinders Mega Oval die, and sponging the edges. The card is kraft.

Now this is my favorite, but don't tell the others! lol This challenge was to create a card using something that reminds you of camping in the summer time.

Hee hee hee, don't you just love it? This is one of the memories I have of going camping. SKUNKS! PPPPPPPP UUUUUUUU! We would run over them and that odor would linger on and on with us as we continued down the road for miles and miles. The little critters would also come and visit the camp sites and go through the garbage. Yikes! We stayed far away.

For my card, I stamped the image of the skunk (a sneak peek of a new set being released in Sept. 7) onto white cs and cut/embossed using Spellbinders Oval. I then added the dots around the border. That is popped up onto another oval and the sentiment stamped in a slight curve to match the oval shape. It's so easy to do that with the clear stamps! Fun! The black and white color combo is perfect for the tree bard too, so I stamped that and matted that panel with black and then onto white. I embossed that panel with the woodgrain cuttlebug folder. The card front is black and also embossed with the woodgrain folder. I had to add a little sweetness and I did that with the black and white gingham bow.

I hope you like all my creations. Thanks for stopping by! I would love for you to leave a comment too!

Hugs,
Karen
Tuesday, August 24, 2010

I'm nuts about you!

I love this new squirrel image. It is a sneak peek from a new set called Autumn Fun from Mark's Finest Papers. It will be released Sept. 7.


I stamped the image using Memento Black ink and added a bit of color with copic markers. The sentiment was also stamped onto this panel using black ink. That is mounted onto a Basic Gray cs and the corners punched. I added the striped dp which is mounted onto black cs and punched with MS arch lattice. I airbrushed the flower and added a button for the circle element. The card front is real wood cherry.

Thanks for stopping by!

Lacey Mum

This card was created for the color challenge on SCS today. The dessert option was to use a doily, and the real challenge was finding the doily I knew was in my craft room somewhere. I actually found it!

I stamped the image (a sneak peek of a new set being released in September by Mark's Finest Papers) onto white cs using rich cocoa memento ink and clear embossed before coloring with an aqua painter and the rich razzleberry and old olive inks. I then airbrushed a little of the blue around the edges. It was cut/embossed using Spellbinders circles and mounted onto a rich razzleberry circle. That as mounted onto the paper doily which is mounted onto a Pacific Point circle which is actually cut with Spellbinders Eyelet Pendant and then mounted onto old olive which I cut to match the shape of the doily with my scissors. The card is a 5" square and embossed with the Cuttlebug swirls folder. I airbrushed the ribbon with Copic marker Peony RV69. The sentiment is stamped with the rich razzleberry onto white and punched out with an oval punch and sponged around the edges.

Thanks for looking.

Monday, August 23, 2010

Patience Grasshopper

This card uses a new to me technique called stained glass. It requires patience which is not one of my strengths! lol


To create this card I first used an embossing buddy on the acetate sheet. Let me tell ya, that acetate is a magnet for glitter, even after using that! Use it on both sides of the acetate. You know glitter - it goes everywhere. Be sure to turn off your fans too. You will be wearing glitter for days anyway, but it helps contain it a little bit! lol

I stamped the Rubbernecker image Chinese Lanterns onto acetate using Black StazOn ink. Then, flip that over and apply a clear craft lacquer (I used Crystal Effects)to the part of the image you want to add the first color of glitter to. I added the red first. Once that is applied and the excess dumped off, apply the lacquer to the next color area - in this case gold and add that glitter. Now comes the patience. Let it dry. I left mine overnight. Wow, it really is beautiful! To use that image, flip it over (glitter side down) and back it. I used black and attached it with mini black brads in the corners. I then mounted that onto red cardstock. The Rubbernecker sentiment is stamped using versamark ink onto red cardstock and embossed with gold detail embossing powder. That is mounted with black and again with red so it will pop off the bg. The bg is Rubbernecker's bamboo bg stamp - stamped onto the black with versamark and embossed with black detail embossing powder. I added just a knot of red ribbon above the sentiment. The entire card is mounted onto the red cs once again.

I hope you like this. It's a fun technique if you have the time.

Thanks for stopping by!

Friday, August 20, 2010

No WAY!

I can't believe how neglectful I've been of my blog! A whole week has gone by without updating it and sharing something new with you. Well, it has been a busy week so I haven't done as much stamping as I usually do. I did stamp late last night to create this quick, clean and simple card.

I just go this old Stampin' Up! set called Terrific Tulips (thanks Wendy) and wanted to use it. It is a classic in my opinion. I mean, how can you go wrong with these lovely tulips? You just can't - they always look good.


For this card I inked the first tulip shape using Cameo Coral ink and stamped directly onto the barely banana card front. I then inked the second stage of the tulip with the same ink and by adding it over the top of the first one, it is naturally a bit darker. I love how easy it is to create all that dimension. The stems are added using certainly celery ink. I inked the Sanded bg stamp using So Saffron ink and stamped right over the image. I like the effect. I then inked the sentiment stamp (from Rubbernecker) using the Cameo Coral ink once again and added it - not straight but at an angle. I like this difference too.

Thanks for stopping by. Please come again soon!

Friday, August 13, 2010

Blog Hop Day 4

Mark's Finest Papers' Design Teams are celebrating our NEWEST STAMP RELEASE with a Blog Hop. Our very talented Design Teams have created exciting paper crafts for your inspiration. With the addition of New Design Team members to inspire you, this is going to be a really fun-packed Hop!

We have 4 New Stamp Sets Released today: Tweet Blessings, Flourished Sea Creatures, Regal & Proud, and Owl Be Here. For your convenience, all 4 stamp sets are available for purchase TODAY!

For your chance to win BLOG CANDY, (a set that will be released NEXT month), visit and comment on each of the following design team members' blogs on August 10, 11, 12, and 13, 2010. On Saturday, (August 14, 2010), a winner will be chosen FOR EACH DAY from those participants who visited all the blogs listed for that day. (There will be four different winners, one winner for each day.)

THAT MEANS IF YOU MISSED A DAY, YOU STILL HAVE OTHER CHANCES WIN! And, you can go back and comment on each day's blogs, as the winners will be chosen Saturday morning!

Friday, August 13-Owl Be There
August Guest Designer- Wendy-
Nancyruth -
Lois -
Vicky-
Jeanne -
Anne-
Debbie-
Peggysue-
Faith -
Susan-
Judi-
Connie-
Emily-
Karen- That's me and you are here!
Patty-
Roxie-
Vicki-
Liz-
Claudine-
Joanne T-
Joanne G -
Mark’s Finest Papers -

And without further ado, here is the card I created for today! I love how this turned out. It was exactly how I had pictured it in my mind.


My first step was to cut the owl shape from the Core'Dinations cardstock using a piece that measures 4 X 5-1/4". I then embossed that with the Cuttlebug Woodgrain folder and then sanded to bring out the red core. Love it!!! Next I positioned that onto the Riding Hood Red card front and using my stamp-a-ma-jig (yes, I love saying that!) stamped the owl and flourish/branch through the cut out shape using Chocolate Chip pigment ink and clear embossing. Next I stamped the sentiment using Riding Hood Red ink and cut/embossed using a Spellbinders Oval die and matting with another oval cut from the Riding Hood Red cardstock. I positioned it onto the card front and pierced through all layers and added the brown brads. Isn't that little owl just too cute peering out through the owl shaped hole?

Thanks for stopping by! I appreciate your comments. I hope YOU win!

Hugs,
Karen

Thursday, August 12, 2010

Blog Hop Day 3

Mark's Finest Papers' Design Teams are celebrating our NEWEST STAMP RELEASE with a Blog Hop. Our very talented Design Teams have created exciting paper crafts for your inspiration. With the addition of New Design Team members to inspire you, this is going to be a really fun-packed Hop!

We have 4 New Stamp Sets Released today: Tweet Blessings, Flourished Sea Creatures, Regal & Proud, and Owl Be Here. For your convenience, all 4 stamp sets are available for purchase TODAY!

For your chance to win BLOG CANDY, (a set that will be released NEXT month), visit and comment on each of the following design team members' blogs on August 10, 11, 12, and 13, 2010. On Saturday, (August 14, 2010), a winner will be chosen FOR EACH DAY from those participants who visited all the blogs listed for that day. (There will be four different winners, one winner for each day.)

THAT MEANS IF YOU MISSED A DAY, YOU STILL HAVE OTHER CHANCES WIN! And, you can go back and comment on each day's blogs, as the winners will be chosen Saturday morning!

Here is the card I created using the set Regal & Proud.

I inked the tree stamp with markers using the lightest color of green first and then tapping on two other shades of green before stamping I then used Copic markers to fill in a bit. I used the same technique on the trunk of the tree and the flowers at the base. I added a little red to the flowers with an At You Spica pen. I then inked up the tree two more times using the same technique and stamped the shrubs. I then stamped the soaring eagle. Next I airbrushed the sky and the grass with Copic markers before cutting/embossing with Spellbinders oval die. I then mounted that onto an Always Artichoke Big Scalloped Oval. That is popped up with dimensionals onto the dp card front. The sentiment from thee set is stamped with Chocolate pigment ink and clear embossed before punching out and framing with the hardware. I also added the artichoke organdy ribbon and heated it just a little bit to get the bow to lay the way I wanted it.

Be sure to visit all the blogs and then go to Mark's Finest Papers and let them know you went to all the blogs so you can have a chance to win!

Thursday, August 12-Regal and Proud
August Guest Designer- Wendy-
Nancyruth -
Lois -
Vicky-
Jeanne -
Anne-
Debbie-
Peggysue-
Faith -
Susan-
Judi-
Connie-
Emily-
Karen- That's me and you are here!
Patty-
Roxie-
Vicki-
Julia-
Liz-
Claudine-
Joanne T-
Dawn-
Lynn-
Mark’s Finest Papers -

Thanks for stopping by! Come back tomorrow for Day 4 of the hop!

Wednesday, August 11, 2010

Blog Hop Day 2

Mark's Finest Papers' Design Teams are celebrating our NEWEST STAMP RELEASE with a Blog Hop. Our very talented Design Teams have created exciting paper crafts for your inspiration. With the addition of New Design Team members to inspire you, this is going to be a really fun-packed Hop!

We have 4 New Stamp Sets Released today: Tweet Blessings, Flourished Sea Creatures, Regal & Proud, and Owl Be Here. For your convenience, all 4 stamp sets are available for purchase TODAY!

For your chance to win BLOG CANDY, (a set that will be released NEXT month), visit and comment on each of the following design team members' blogs on August 10, 11, 12, and 13, 2010. On Saturday, (August 14, 2010), a winner will be chosen FOR EACH DAY from those participants who visited all the blogs listed for that day. (There will be four different winners, one winner for each day.)

THAT MEANS IF YOU MISSED A DAY, YOU STILL HAVE OTHER CHANCES WIN! And, you can go back and comment on each day's blogs, as the winners will be chosen Saturday morning!

Wednesday, August 11- Flourished Sea Creatures
August Guest Designer- Wendy-
Nancyruth -
Lois -
Vicky-
Jeanne -
Anne-
Debbie-
Peggysue-
Faith -
Susan-
Judi-
Connie-
Emily-
Karen- That's me and you are here!
Patty-
Roxie-
Vicki-
Liz-
Claudine-
Dawn-
Lynn-
Joanne G -
Geri-
Joanne T-
Mark’s Finest Papers -

I created this card using Flourished Sea Creatures.

I stamped the image of the sea horse onto white cs and colored with Copic markers and then I used At You Spica pens to add a little shimmer. This was cut out and dimension added by lifting, folding and curling. The dp is from Webster's Pages. I stamped some of the fish from the stamp set and again added bling with the At You Spica Pens. The sentiment from the set was stamped onto another piece of the dp and cut using Spellbinders Labels 3 and mounted onto the shimmery orange cs using Spellbinders Labels 1. The crab was stamped onto a scrap of the dp and water-colored, then cut out and popped up with foam squares. The strip behind the sentiment is layered cs which was embossed with Cuttlebug's Divine Swirls.

Thanks for stopping by! I hope you love this set as much as I do. It has such great images in it.

Tuesday, August 10, 2010

Blog Hop Day 1

Mark's Finest Papers' Design Teams are celebrating our NEWEST STAMP RELEASE with a Blog Hop. Our very talented Design Teams have created exciting paper crafts for your inspiration. With the addition of New Design Team members to inspire you, this is going to be a really fun-packed Hop!

We have 4 New Stamp Sets Released today: Tweet Blessings, Flourished Sea Creatures, Regal & Proud, and Owl Be Here. For your convenience, all 4 stamp sets are available for purchase TODAY!

For your chance to win BLOG CANDY, (a set that will be released NEXT month), visit and comment on each of the following design team members' blogs on August 10, 11, 12, and 13, 2010. On Saturday, (August 14, 2010), a winner will be chosen FOR EACH DAY from those participants who visited all the blogs listed for that day. (There will be four different winners, one winner for each day.)

THAT MEANS IF YOU MISSED A DAY, YOU STILL HAVE OTHER CHANCES WIN! And, you can go back and comment on each day's blogs, as the winners will be chosen Saturday morning!

Tuesday, August 10-Tweet Blessings

Where do you get inspiration? Me - everywhere! I was watching one of my favorite programs on TV "Color Splash" and they showed a lamp shade that inspired this card.
I stamped the bird using Ballet Blue ink onto white cardstock and then added the flourish from Flourishes and Frame with Creamy Caramel ink. The sentiment is also stamped with that ink. I then cut/embossed the panel using Spellbinders Labels 8 and sponged the edges with Creamy Caramel. I added a teeny blue jewel (from Taylored Expressions) for the eye. I also added just a teeny dot of Clear Rock Candy stickles to the centers of the flowers on the bird, trying to keep it subtle. I cut a rectangle from the Ballet Blue cs just a bit bigger than the panel and rounded the corners before mounting my image panel. The card is Ballet Blue. The background panel was created again using the flourish from Flourishes and Frame stamped with Creamy Caramel, cutting and embossing with the larger Labels 8. I then embossed this panel with the Cuttlebug Textile Texture folder and sponged the edges with Creamy Caramel. I wrapped the beautiful blue satin ribbon (also from Mark's Finest Papers) around the card and tied a bow. I popped up the bird panel with foam squares. It's a fairly simple card, but I really like the result. Do you?


August Guest Designer- Wendy-
Nancyruth -
Lois -
Vicky-
Jeanne -
Anne-
Debbie-
Peggysue-
Faith -
Susan-
Judi-
Connie-
Emily-
Karen- That's me and you are here!
Patty-
Roxie-
Vicki-
Julia-
Liz-
Claudine-
Joanne T-
Mark’s Finest Papers -

Monday, August 9, 2010

Focus on the sentiment


I really like to create cards where the beautiful sentiment is the focus. This card was created just that way. The sentiment is from Rubbernecker.

The sides of the dp on the card front is punched with a MS border punch. I then added another rectangle of the dp which is embossed with Holly Ribbons embossing folder mounted onto a vanilla rectangle cut/embossed with Spellbinders scalloped rectangle. I then stamped the sentiment with chocolate chip craft ink and clear embossed before cutting/embossing with Spellbinders Labels 13. I then added a few stamped flowers. That is framed with a Riding Hood red frame created with Spellbinders Labels 13 and popped up. I then added the corners to the sides and butterflies which were punched with a MS punch and embossed with Textile Textures folder.

Thanks for stopping by! Please come back soon.

Friday, August 6, 2010

Paper Roses


Very similar to yesterday's card, don't you think? lol That's because this was a failure from yesterday that I tweaked to make this one.

I created it for Joan's Gardens challenge to created a pink and white card. She asked that we use a Martha Stewart corner punch on four corners of it, but I don't have any! Can you believe that? So, I made do with what I did have and that was Spellbinders Eyelet borderabilities.

See those lovely paper roses? They are full roses and quite bulky, but they are what I had. Hmmmm, how can I use them on this card without all the bulk? I cut them in half with my big old scissors and they didn't even fall apart! Wooo hooo. I used my trusty hot glue gun to glue them to the card, twisted the wire stem and added the ribbon. Oh yeah, the ribbon was a little too pale of a pink, so I airbrushed it with my Copic marker to darken it a little. Worked great!

The card front is airbrushed with Copic markers using Spellbinders Flowers Silhouette Impressabilties as a stencil. The bottom is cut with the Martha Stewart Garden Trellis punch. The white sentiment layer is stamped with the sentiment in pink and cut/embossed with the Spellbinders Eyelet borderabilities. I added pearls to each corner.

Thanks for stopping by. I hope you like what I came up with.

Thursday, August 5, 2010

Pink and white one layer


I created this one layer card for Sharon's Stamp Simply challenge.

The sentiment was stamped onto the white card front and clear embossed then punched with the Martha Stewart border punch. I then airbrushed the card front using Copic markers and the Spellbinders Flower Silhouette as a stencil, masking the sentiment. I added pink rhinestones to the border and the pink satin ribbon.

I hope you like it!

Thanks for stopping by.

Wednesday, August 4, 2010

The Fabulous Fifties birthday card


Here is the card I made for my dh's birthday. I think it went along well with the theme.

The image is from Rubbernecker Stamps. I stamped it onto shimmery white cs and colored it with Copic markers before cutting/embossing with Spellbinders oval dies.
My dh has always wanted a corvette and this is the only one he will be getting in the foreseeable future. lol

I hope you like it. Thanks for stopping by!

Tuesday, August 3, 2010

Fabulous Fifties!

I threw a Fabulous Fifties birthday party for my husband last night. I had a great time, and hope everyone else did too.

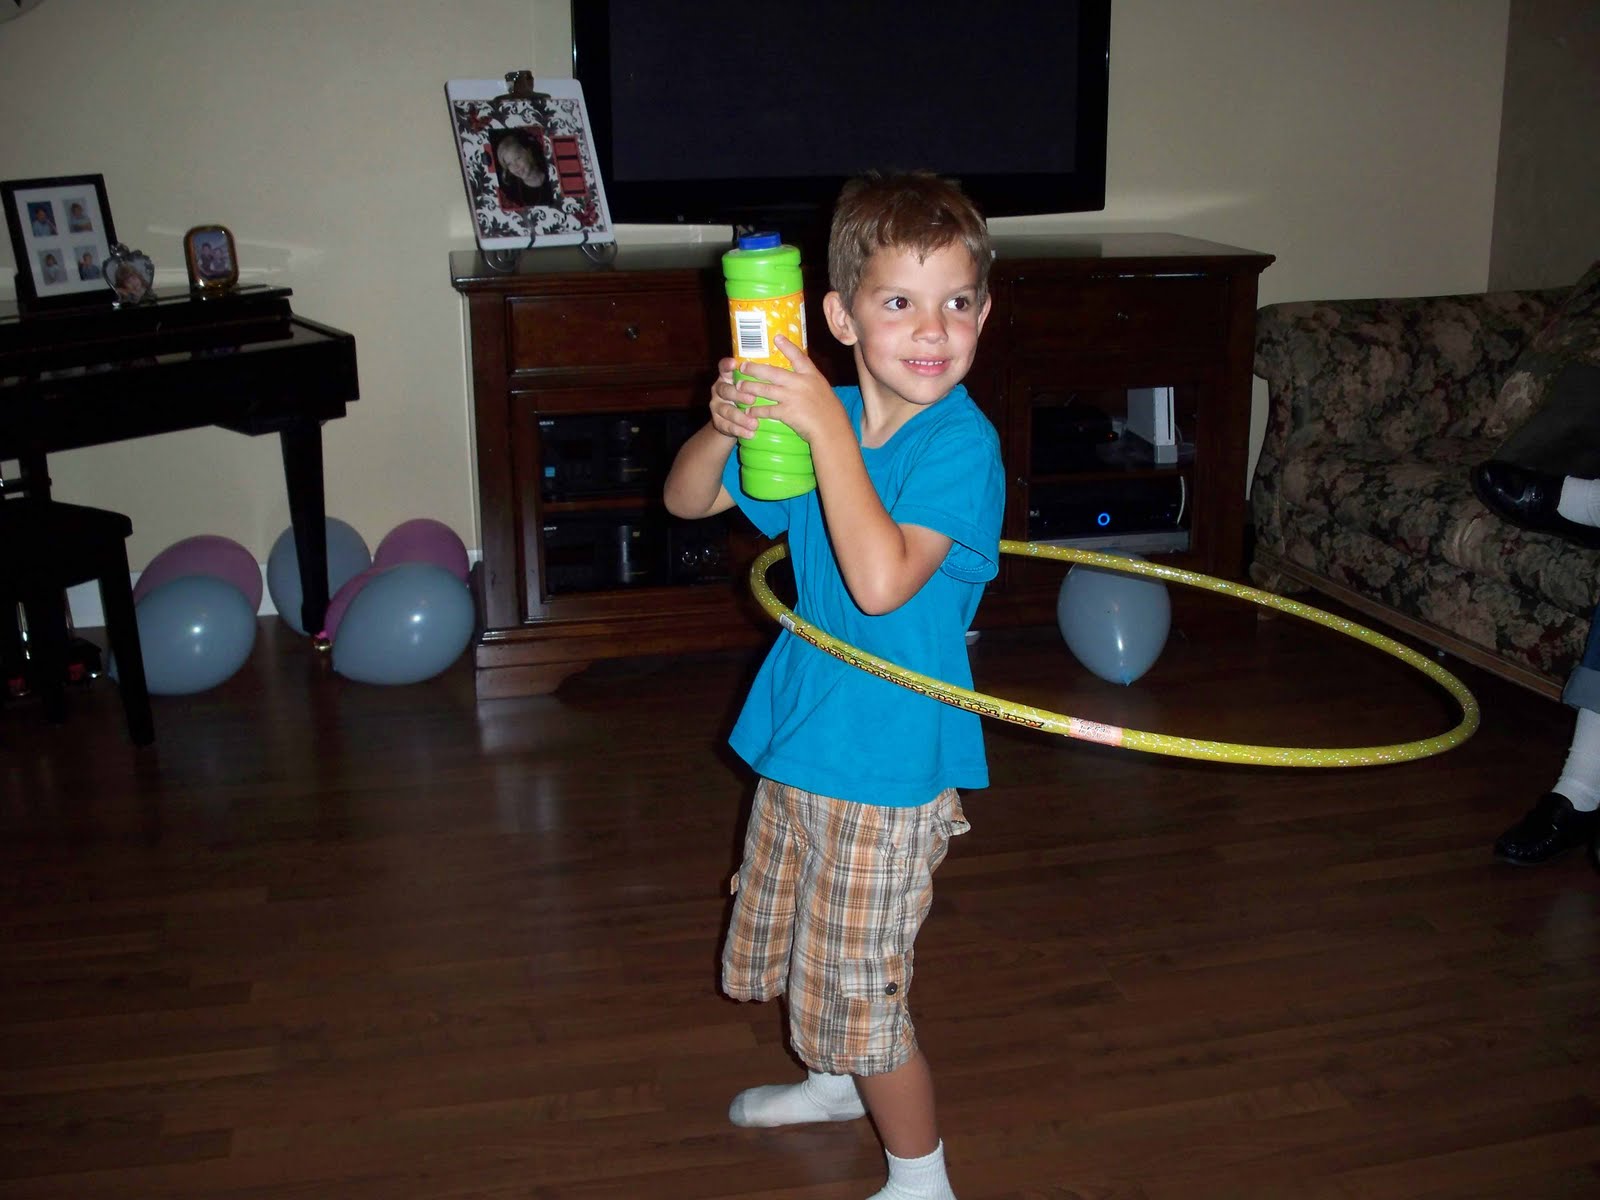
We had hamburgers, corndogs, potato chips, Fritos and rootbeer! Oh yum. There were contests too: bubble gum bubble blowing, dancing, limbo and hula hoop!

Here are some photos of the fun! I hope you enjoy looking.


That is the birthday boy!

Isn't that a great shot? I love how I caught the hula hoop totally suspended.


Danceville man!


My sister Kathy, daughter Wendy and I.

And that is me in all my 50's glory with my skinny self after my 54 lb. weight loss! The earrings were my Mother's and are really from the fifties, as is my necklace. It's one I had when I was a little girl. The glasses are borrowed from my sister. Isn't this a hoot?

Monday, August 2, 2010

Sunflower

My Dad grew up on a farm. When I was little, we would go there to visit Grandpa and Grandma and I remember the many sunflowers growing there. So now, sunflowers make me think of my Dad who passed away in 2004.


This card is the result of a happy accident. I wasn't thinking it through when I cut a card hoping to have the side of it the hinge. Unfortunately, this is a frame die and didn't quite work the way I hoped it would. But, it did leave me with a great shaped card after I just snipped the top a little, leaving the sunflower shape and an area at the bottom for my sentiment. The sunflowers were airbrushed with Copic markers. The sentiment is stamped with Chocolate Chip ink onto vanilla and airbrushed with the Copic markers. That was cut/embossed using Spellbinders oval. I then cut/embossed a curvy rectangle and embossed it with an impressability. That is mounted onto a strip of burlap. I added a button to the flower with a string of the burlap through it.

I hope you like it. Thanks for looking.

Sunday, August 1, 2010

Happy Birthday cake


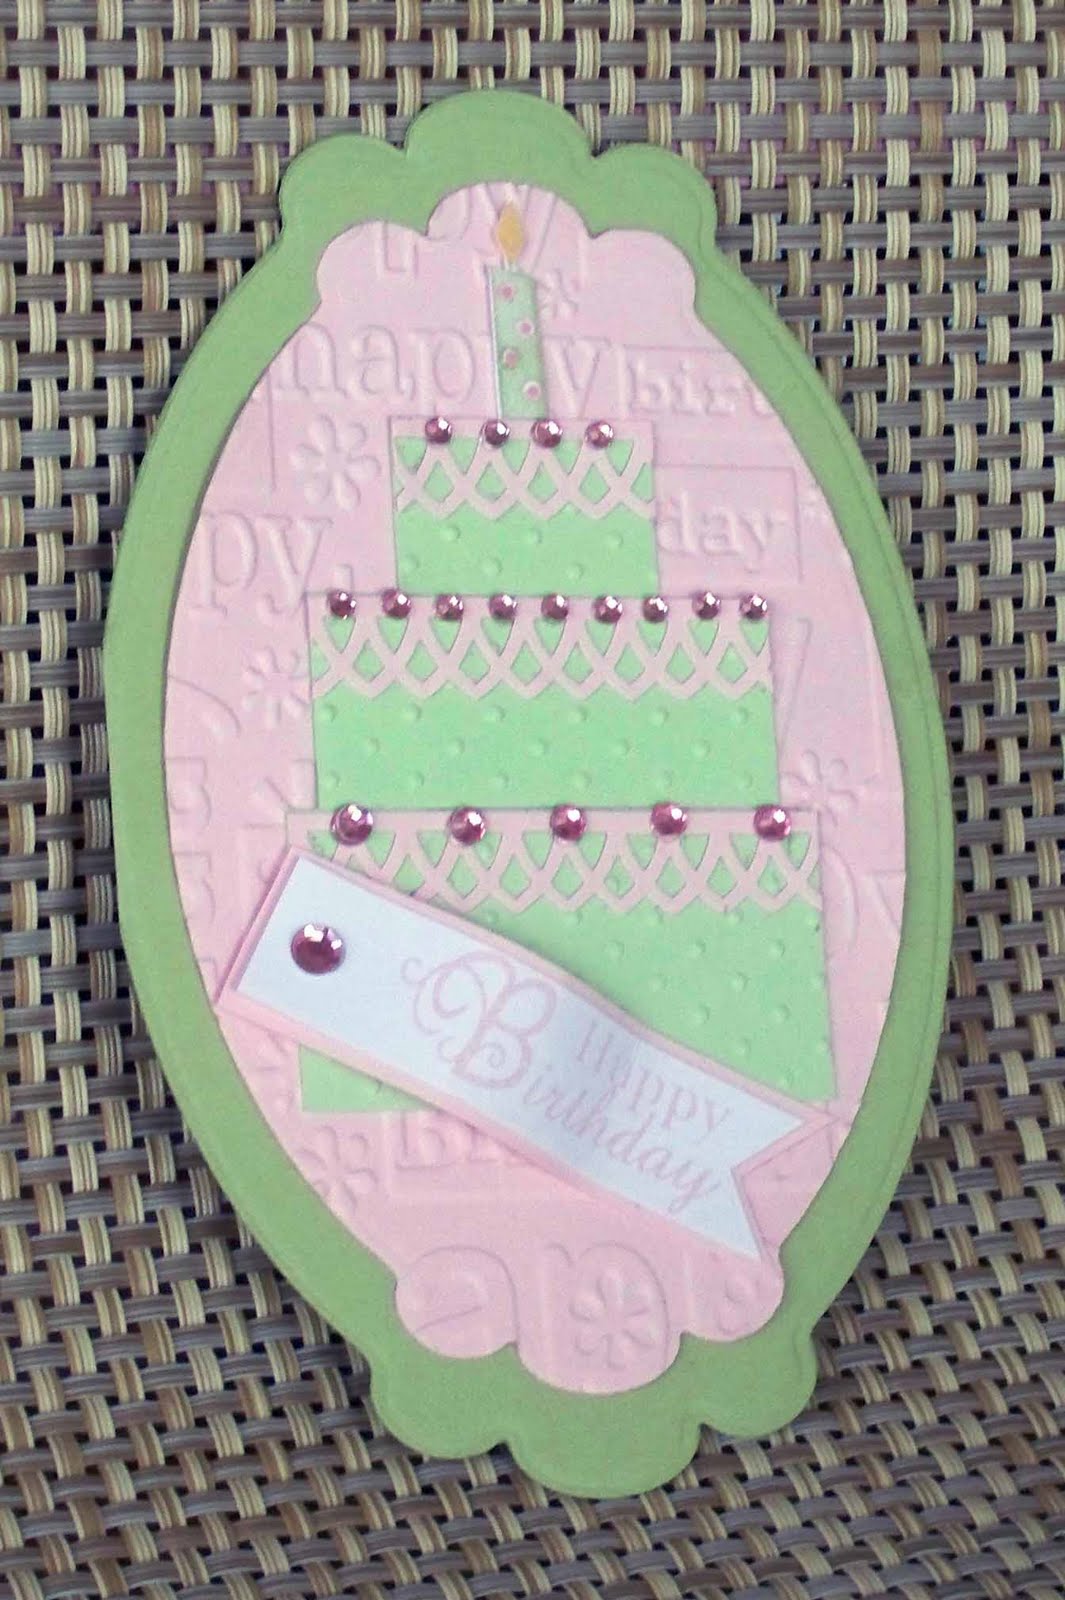
This card is not the usual shape, is it? It has a hinge on the left side. To create this card, I folded my green cs and then cut/embossed it with Spellbinders Labels Ten, making sure the fold was just inside the cutting line on the side. The pink layer was also cut using the next smaller die in the set and embossed with Cuttlebug's Happy Birthday folder. The cake is just strips of the green cs which was embossed with the Cuttlebug Swiss Dot folder. The icing is made from strips of pink cs punched with the MS arched lattice punch. I added rhinestones for a little bling and the candle on the top. The sentiment from Mark's Finest Papers Flourishes and Frame set was stamped onto white cs with pink ink and backed with pink. I just cut the end with scissors. It is attached with a foam square and I bumped it up in the center a bit before attaching it near the end. Isn't this fun?

Thanks for stopping by! Come back soon.

Saturday, July 31, 2010

Feminine and flirty!


Did you come by earlier and not see the card? Well, I was just checking to see if anyone was looking. Just kidding. Apparently I forgot to load the image. Ooops! Sorry. Now you can see it!

Can you believe I created something with pink, lace and ribbon? lol I love this flirty girly card. I used some pretty designer paper with pink, brown and green in it. The largest pink shape is pink cs cut/embossed with Spellbinders Peony die and also embossed with thier Flower Silhouette Impressabilities. The white layer over that is the same flower - Camellia from Mark's Finest Paper - stamped with brown ink and then colored with my pink Copic marker. Next is a band of green, topped with a print that coordinates with the stripe and a piece of lace and ribbon over that. The main panel has the camellia stamped with versamark ink and clear embossed. I added the sentiment stamped with brown ink. A few lovely rhinestones, and there is a lovely girly girl kind of card. Do you agree?

Thanks for stopping by!

Friday, July 30, 2010

Orange you glad you dropped by?

Here is another card I made with one of those springy images. The cake is on a spring. I think you can kind of tell that from looking at the photo this time. This card also has glitter shine here and there, orange rhinestones and fun ribbons.


Thanks for stopping by! Come again soon!

Thursday, July 29, 2010

Monochromatic

I love monochromatic cards. I hope you do too. You can't tell from the photo, but the flower in the circle is on a spring! I love movement on a card. So much fun.

Wednesday, July 28, 2010

Water bottle treat


So here is a little water bottle treat hang tag I made. I've included some flavoring packets for the water. This is a great treat for someone while it is soooooo HOT!

Tuesday, July 27, 2010

Shame on me!

It has been a week since I put anything on my blog! I can't believe it. It's not like I haven't been creating or something.

Here is one creation I made this past week. Take a look!


These are little mini cards that fit into an old cassette tape case. It is decorated too. Aren't they cute? I hope they bring some cheer to the recipient.

Thanks for stopping by!

Tuesday, July 20, 2010

Recent work

Hi there. Thanks for stopping by again. Here are a few things I've been working on.

My sweet new friend Cindy heard about my fantastic weight loss and new role as a health coach to get others to join me and get healthy. She sent me this new stamp set from Taylored Expressions called Weigh to Go. I love it! It is perfect.

Here are some cards I've created with it. So much fun!


Saturday, July 17, 2010

Another Camellia

I just love the new set I have shown you a few times now, Apples & Camellia. Here is another card I made using that stamp set as well as Flourishes & Frame. I created my own dp by using stamps from those sets on them.


The yellow card front has the flourish stamped all over it using the same shade of ink. The red panel has the Camellia stamped on it, using versamark ink and clear embossed. Isn't that lovely? So so pretty. I hope you think so too.

The main image of the Camellia was airbrushed using Copic markers.

These stamps sets are all available NOW at Mark's Finest Papers.

Now I am going to clean my stamp area so I can make the tutorial of how I tie lovely bows. It's so easy, you are going to wonder why you didn't think of it. lol

Thanks for stopping by! Have a great weekend!

Thursday, July 15, 2010

Crisp Round Apples

Mark's Finest Papers' Design Teams are celebrating our NEWEST STAMP RELEASE with a Blog Hop. Our very talented Design Teams have created exciting paper crafts for your inspiration. With the addition of New Design Team members, this is going to be a really fun-packed Hop! Sit back, and hold on to your mouse! This is going to be a FABULOUS ride! Come Hop along with us!

We have 4 New Stamp Sets Released today: Background Fun, Southwest Cowboy, Flourishes & Frame, and Apples & Camellia. For your convenience, all 4 stamp sets are available for purchase TODAY!

For your chance to win BLOG CANDY, (a set that will be released NEXT month), visit and comment on each of the following design team members' blogs on July 13, 14, 15, and 16, 2010. On Saturday, (July 17, 2010), a winner will be chosen FOR EACH DAY from those participants who visited all the blogs listed for that day. ( There will be four different winners, one winner for each day.)

SO THAT MEANS IF YOU MISSED A DAY, YOU STILL HAVE OTHER CHANCES WIN! And, you can go back and comment, as the winners will be chosen Saturday morning!

Here is my creation for today.


This card is a 5-1/2" square cut from a caramel color cardstock and stamped with the crackle background stamp from Background Fun using Ruby Red ink.

The sentiment is stamped onto vanilla cardstock with chocolate chip pigment ink and embossed with clear. That was cut/embossed using Spellbinders Deckled Mega Rectangles and sponged with Ruby Red ink and backed with a rounded corner rectangle of the blue dp. I popped this panel up with foam squares and onto the Big Scalloped Square, backed by another square with rounded corners. I stamped the apple border onto the solid dp after inking the stamp with versamark and Ruby Red ink and stamping end to end and clear embossing. That is backed with the Spellbinders Big Scalloped Petites cut from the coordinating stripe paper. The largest apple is stamped with versamark and Ruby Red ink and clear embossed before being cut out and popped up in the lower right corner. I added a double bow of light blue dotted ribbon to the sentiment panel. I hope you like my card.

Thanks for stopping by!

Friday July 16: Apples and Camellia
July Guest Designer- Melisa Waldorf-
Nancyruth -
Lois -
Vicky-
Jeanne -
Anne-
Debbie-
Peggysue-
Faith -
Susan-
Judi-
Patty-
Karen- That's me and you are here!
Connie-
Roxie-
Vicki-
Dawn
Liz
Claudine-
Mark’s Finest Papers -

Wednesday, July 14, 2010

Why settle for a circle when you can have an oval?

Mark's Finest Papers' Design Teams are celebrating our NEWEST STAMP RELEASE with a Blog Hop. Our very talented Design Teams have created exciting paper crafts for your inspiration. With the addition of New Design Team members, this is going to be a really fun-packed Hop! Sit back, and hold on to your mouse! This is going to be a FABULOUS ride! Come Hop along with us!

We have 4 New Stamp Sets Released today: Background Fun, Southwest Cowboy, Flourishes & Frame, and Apples & Camellia. For your convenience, all 4 stamp sets are available for purchase TODAY!

For your chance to win BLOG CANDY, (a set that will be released NEXT month), visit and comment on each of the following design team members' blogs on July 13, 14, 15, and 16, 2010. On Saturday, (July 17, 2010), a winner will be chosen FOR EACH DAY from those participants who visited all the blogs listed for that day. ( There will be four different winners, one winner for each day.)

SO THAT MEANS IF YOU MISSED A DAY, YOU STILL HAVE OTHER CHANCES WIN! And, you can go back and comment, as the winners will be chosen Saturday morning!

Thursday July 15: Flourishes & Frame
July Guest Designer- Melisa Waldorf-
Nancyruth -
Lois -
Vicky-
Jeanne -
Anne-
Debbie-
Peggysue-
Faith -
Susan-
Judi-
Patty-
Karen- That's me and you are here!
Connie-
Roxie-
Vicki-
Joanne
Dawn
Liz
Claudine-
Mark’s Finest Papers -


I love the circle frame, but wondered if I could make that circle into an oval. Why yes, yes I can!


To do this, I first stamped my sentiment onto the patterned paper using black pigment ink and clear embossed. Next I cut/embossed the oval using Spellbinders oval die. I took that oval and laid it onto my table, then put my stamp positioner on top of that and formed the circle into an oval, taking care to make it match. I inked the stamp with black pigment ink and stamped onto the light pink cs and clear embossed. Align the Spellbinders Labels 13 and cut/emboss. Cut/emboss Labels 11 from darker pink dotted paper. On light pink card front, emboss lower edge with Textile Texture Cuttlebug folder. Stamp flourish onto top corners using Black pigment ink and clear emboss. Pop up layers as desired and attach to card front. Attach bow of black/white dotted organdy ribbon.

So, there you have it. You can change the shape of a clear stamp. That makes it even more versatile.

Thanks for stopping by!

Tuesday, July 13, 2010

Yee haw!!!!!

Mark's Finest Papers' Design Teams are celebrating our NEWEST STAMP RELEASE with a Blog Hop. Our very talented Design Teams have created exciting paper crafts for your inspiration. With the addition of New Design Team members, this is going to be a really fun-packed Hop! Sit back, and hold on to your mouse! This is going to be a FABULOUS ride! Come Hop along with us!

We have 4 New Stamp Sets Released today: Background Fun, Southwest Cowboy, Flourishes & Frame, and Apples & Camellia. For your convenience, all 4 stamp sets are available for purchase TODAY!

For your chance to win BLOG CANDY, (a set that will be released NEXT month), visit and comment on each of the following design team members' blogs on July 13, 14, 15, and 16, 2010. On Saturday, (July 17, 2010), a winner will be chosen FOR EACH DAY from those participants who visited all the blogs listed for that day. ( There will be four different winners, one winner for each day.)

SO THAT MEANS IF YOU MISSED A DAY, YOU STILL HAVE OTHER CHANCES WIN! And, you can go back and comment, as the winners will be chosen Saturday morning!

Wednesday July 14: Southwest Cowboy
July Guest Designer- Melisa Waldorf-
Nancyruth -
Lois -
Vicky-
Jeanne -
Anne-
Debbie-
Peggysue-
Faith -
Susan-
Judi-
Patty-
Karen- That's me and you are here!
Connie-
Roxie-
Vicki-
Joanne
Julia
Claudine-
Mark’s Finest Papers -

Do you know a cowboy that has a birthday coming up? I do! My brother, Chad. This should be perfect for him.


The stamp was inked with versamark ink and then Ruby Red ink before stamping onto the card stock. I then dipped it into clear detail embossing powder and heated it. This was cut/embossed with the Spellbinders oval, then the edges and even the cowboy were sponged using Vintage Photo distress ink. That is layered onto a black cs oval. The star behind him is copper foil from Spellbinders which was embossed with the Cuttlebug stars folder and sanded. The edges were colored black with a permanent marker. The background is Ruby Red cardstock embossed with the stars folder again and matted with black to make it pop. The oval and the star were all popped up with foam squares. The birthday greeting was stamped onto the same cs as the cowboy using Vintage Photo distress ink and the edges sponged. It was curled a little and a knot of help added. The bottom border strip is Chocolate Box Core'dinations cs which was also embossed using the stars folder and sanded to bring out that turquoise color from the back. See the brads on the ends? I created those by punching a 1/4" hole into scraps of the copper embossed foil, centering that hole and punching a 1/2" hole. I ran them through my Xyron X to apply adhesive. Those were mounted onto black cs 1/2" punched pieces and then a copper brad added to the centers. I applied those to the strip using foam squares. I wrapped the hemp around the card twice and tied it with two small pieces of hemp, then added the button which was threaded with embroidery floss.

Well that's it. I hope you like it. I'm sure you will love this Southwest Cowboy stamp set. It's a great one.

Thanks for stopping by!

Monday, July 12, 2010

Background, background, background, background!

Mark's Finest Papers' Design Teams are celebrating our NEWEST STAMP RELEASE with a Blog Hop. Our very talented Design Teams have created exciting paper crafts for your inspiration. With the addition of New Design Team members, this is going to be a really fun-packed Hop! Sit back, and hold on to your mouse! This is going to be a FABULOUS ride! Come Hop along with us!

We have 4 New Stamp Sets Released today: Background Fun, Southwest Cowboy, Flourishes & Frame, and Apples & Camellia. For your convenience, all 4 stamp sets are available for purchase TODAY!

For your chance to win BLOG CANDY, (a set that will be released NEXT month), visit and comment on each of the following design team members' blogs on July 13, 14, 15, and 16, 2010. On Saturday, (July 17, 2010), a winner will be chosen FOR EACH DAY from those participants who visited all the blogs listed for that day. ( There will be four different winners, one winner for each day.)

SO THAT MEANS IF YOU MISSED A DAY, YOU STILL HAVE OTHER CHANCES WIN! And, you can go back and comment, as the winners will be chosen Saturday morning!

Tuesday July 13: Background Fun
July Guest Designer- Melisa Waldorf-
Nancyruth -
Lois -
Vicky-
Jeanne -
Anne-
Debbie-
Peggysue-
Faith -
Susan-
Judi-
Patty-
Karen- That's me and you are here!
Connie-
Roxie-
Vicki-
Cathleen-
Claudine-
Mark’s Finest Papers -

Here is the card I created featuring Background Fun.


I stamped the bg stamp onto white cardstock using: So Saffron, Brocade Blue, Certainly Celery and Regal Rose ink, then cut/embossed using Spellbinders labels Twelve. These were popped up with dimensionals onto Brocade Blue cardstock, then white, then Certainly Celery. I used Xyron to apply adhesive to the back of the lusckious chocolate satin ribbon (also from MFP) before applying it to the square and then embossing with Cuttlebug's Diamond Plate folder. That embosses the ribbon as well as the cs. I used the label punch on This was mounted onto a 5-1/2" square of So Saffron cardstock. The corners are pierced and a rhinestone added.

The sentiment is stamped with Memento Rich Cocoa ink onto a piece of So Saffron patterned paper and cut/embossed with Spellbinders Petite Oval and backed with a chocolate scalloped petite oval. A knot of that wonderful ribbon was added to the top of the sentiment panel.

Thanks for stopping by!