Wednesday, July 7, 2010

More sneak peeks!

I want to show you a couple more of the cards I've been making using the new sets being released next Tuesday by Mark's Finest Papers. They are great sets.

This one features the new set Apples & Camellia. I used the Camellia and colored it with Copic markers. I love working with those things. I went to Hobby Lobby on Monday and bought a paper pack to use while I am at my sister's house with my very limited supplies. Nice papers, don't you think? After cutting out the flower, I popped it up on a fancy tag cut/embossed with aSpellbinders die and attaching over the ribbon from Mark's Finest Papers. I made this for an internet friend that just had hip replacement surgery, so I added the Get Well Soon at the bottom. It was cut/embossed using Spellbinders scalloped oval die and then adding color from my Copic's around the edge.


How do you like this one? See those 3D flowers? I made them. Guess what I used! Come on, guess! A dried out antibacterial wipe which I colored with an ink pad and stamped with the Camellia flower before cutting it into a long strip, applying adhesive to one edge and rolling up. I then added more color with my copic marker. The vine and leaves were made the same way. The card front is stamped with the Camellia for a background for the 3D flowers Isn't that pretty? I used Victorian Velvet distress ink. The sentiment is also stamped with the same ink onto white cs and then the green flourish tag was added behind it. I added the oval which was cut with Spellbinders deckled oval and I used the Copic marker around the edge to help it stand out just a little. Layers, layers, layers! I also used the marker around the edge of the whole card. I really like the subtle difference it makes.


For this one I used more of the papers from that pack I bought on Monday. Nice colors, don't you think? I really like them. I stamped the frame from the new set Flourishes & Frame onto the pink, cut/embossed it using Spellbinders circles. Stamped the sentiment and flourish from the same set onto the blue cs and cut/embossed it with another circle die. The panel behind (don't you love those butterflies?) is that same wonderful paper and matted with the pink and the black. The plaid layer is also from the same pack and backed with black. See the little pink butterfly. That is cut from the paper and his wings are popped up to add some dimension.

Thanks for stopping by! I'd love to hear what you think of my creations!

Monday, July 5, 2010

I've been busy - really I have!

I am spending the week house/dog sitting for my sister while she is on vacation. It is like a vacation for me - her house is like a resort! There is a pool and hot tub and she lives on a lake. Ahhhhh, so nice.

The only drawback is that I had to bring a few stamping supplies - so I don't have access to all my fun toys. Now had I been home, I'm sure these cards would look totally different. I've had to be creative to say the least. Here are some of my creations since being here.

This card was made using a lovely set by Rubbernecker Stamps. I love all the leaves and the words and quotes in this set are delightful. Now please understand, I am working under an extreme handicap right now. lol

I stamped the fern onto white cs using Shabby Shutters and Forest Moss Distress inks. The edges are distressed with my wolverine fingernails. lol That was mounted onto the green cs. I stamped the sentiment using the Forst Moss ink as well and added three little buttons I had to hunt all over my sister's house to find. I didn't bring embellishments!!!!! What? OH NO! The ribbon is from Mark's Finest Papers. I love the gingham ribbons and this is a really nice one. Okay, I think that's it. I'm through whining now. ;-)


For this card I created my own dp with a stamp from this set from Mark's Finest Papers called Flourishes and Frame. The sentiment is also from this set. I'm sorry you can't see how beautiful the green cs is irl. It is a shimmery paper from Mark's Finest Papers and is delicious, for sure. I used Spellbinders dies for the borders and for the embellishment at the corner.


This is the last card I will share with you today. Having so few of my supplies, how can I make a flower using what I have? You know the old saying about necessity being the mother of invention. I gave that the test. Last night I though about it for a while and then headed for bed. You can think in your dreams you know. Thoughts of different techniques were everywhere. So this morning I combined a few I had seen around and came up with my paper posies. They are actually made from an antibacterial wipe (I had some in the car) that I let dry out, then added ink using direct to paper. Next I cut it into a long strip and added adhesive to one edge and started rolling. I added a little more ink with a copic marker and my posie was born. Not too bad. I used the same technique to create the leaves and then rolled a length of the wipe to create the vine.

The card front was stamped with the Camellia from the new set being released by Mark's Finest Papers on July 13th called Apples and Camellia inked with Victorian Velvet Distress ink. I added my vine and flowers. The sentiment (another new set: Flourishes & Frame) is stamped with the same ink onto white cs and added to the green flourish tag from Spellbinders. I had actually stamped the sentiment right on the card front, but didn't like it much so added this over that. But it showed! Oh no! Since we are to be inspired by Carrie's Cakes for the CAS challenge, I thought more layers would be good, so I added a white deckled oval. I chose the cake called hand made white chocolate roses #301 All the white edges are inked with my copic marker. It's a subtle thing, but I really like the difference it makes.

I hope you like my adventure in making do. It is a good exercise in creativity. Thanks for stopping by. Come back soon!

Saturday, July 3, 2010

Want to win a free stamp set?

Then head on over to Mark's Finest Papers blog for a challenge. Winners will be chosen and it may be you!!!!! The challenge is to create something and use a die cut on your card. Well how easy is that? WAY! Here is a sample card I created for the challenge.


I love this quote. The clear stamps are so easy to use and change the shape a little. I chose to curve the saying just a bit and then cut it out into the wavy shape. Clever, eh? lol This is a new set being released this month called Apples & Camellia. This is actually a sneak peek! Lucky you!

For the front of my card, I cut/embossed the big red apple and then stamped the cute little row of apples across it using white craft ink and then embossed with white. I trimmed off the embossed edge of the apple shape (Spellbinders) and backed it with a white shape to bring it out just a little more. Added the cute red and white gingham ribbon (also available from MFP!). As I said, the saying was positioned on my acrylic block with a curve to it and stamped using red ink. I then cut that shape out with scissors and backed it with red and cut the same shape. The border is another Spellbinders borderability and I added more of that wonderful ribbon to the top of that panel. I love gingham, especially red and white gingham. It's so fresh and fun, don't you think?
and check out the inside for the rest of the story. (As Paul Harvey would say. lol)

Isn't that a fun saying? This card is sure to cheer up a sick friend.
Now be sure to check out all the designer's creations over at the MFP blog. Wow, there is some talent on this team. Be sure to upload your fun creation. I'll cross my fingers for you that you will win a free stamp set!

Thanks for stopping by!
What a fun new set! I love apples.

Friday, July 2, 2010

I'm seeing stars!!!!!!

The SCS challenge, as well as Sharon's Stamp Simply challenge were to use stars and gold. Well, I may have gone overboard. Nah!!!!!! Not me! lol

Here is the first card I created!

Gold and stars - don't they just go together? The stars are cut using Spellbinders Stars and then stamped with Rubbernecker Flourish Set 1 with versamark ink and then embossed using gold detail ep. The sentiment is stamped onto vellum cardstock and embossed with gold detail ep. I added pearls to cover the adhesive. The card front is embossed with cuttlebug's swirl folder.

Two of my grandsons (brothers) were born on the same day - 3 years apart! lol This is a birthday card for one of them.

This is also for Joan's Gardens challenge: to make a red white and blue card and use an embossing folder. An impressabilities counts, right? It's just hard to see the impression in the photo, but it's there - promise!

The card front is embossed using Spellbinders Diamond and Star Impressabilities and mounted onto red. The stars are cut/embossed using Spellbinders Stars and intertwined. I added a little touch of the striped ribbon.

The sentiment is from a new set being released later this month by Mark's Finest Papers. It actually reads "Happy Birthday Cowboy", but I omitted cowboy for this card. See how versatile your stamps can be! That is embossed with gold ep and cut/embossed with Spellbinders Labels Trio and popped up. I also added a gold brad.

This is a birthday card for the other one. Hmmmm, which gets which? lol

The card front is navy and then I added the strip of dp from Kaiser. I stamped the Rubbernecker sentiment (omitting "tutu you") using versamark and embossing with gold ep. (Rubbernecker is having a holiday sale. Be sure to check the post below for more information!) The star is cut/embossed using Spellbinders stars and mounted onto a square of the reverse side of the paper which was embossed with Cuttlebug's swiss dots folder for a bit o' texture. I added a triple knot of hemp.

What do you think?

Thanks for stopping by. Have a safe and fabulous 4th of July! God Bless America!

Thursday, July 1, 2010

Sale!!!!

Rubbernecker & Stamp Oasis stamps will be 20% off from 7/1 Thursday Noon to 7/4 Sunday at 5 pm PST You may also qualify for a free stamp set or two. Check the Rubbernecker website for more information.

Have you missed me?

Hi there! I've been gone to two family reunions, almost back to back, but with just enough time to come home and do my laundry and pack again. I'm home!!!! I missed my toys.

Here are a few new creations I wanted to share with you.

This one features a new set that will be released in August by Mark's Finest Papers. It is such a great set - for America and for Boy Scouts. I will love using it for my grandsons that are into scouting.

I stamped the mountain scene onto vanilla cardstock using Forest Moss Distress Ink and then tore along that upper horizon. I then mounted it onto the brown cardstock and tore that to match. The card front is Always Artichoke and embossed with the diamond plate Cuttlebug folder. The word America and Home of the Free and the Brave are separate stamps, so will be oh so versatile. I grouped them here and added the small eagle, which is also separate. See why it will work so well with the scout theme? Love it! I added brads on the left for just a little sumpin' sumpin'. I hope you like this one.


I live in the desert and just marvel in awe at the beauty of the mountains on the horizons. They are truly beautiful to me and as American as they can be, so I chose this scene for today's challenge which was to create a patriotic 4th of July card without using anything in the red or blue family. Is that a challenge, or what????

The mountains were created with Copic markers and the airbrush system. The cacti are stamped with black ink and the card front is matted with black. The sentiment is stamped on vellum with black ink and clear embossed, the edges torn and attached to the card front with copper brads. I airbrushed the vellum just a little so the mountains weren't covered up too much. The cactus and sentiment are included in the new set Southwest Cowboy from Mark's Finest Papers and I'm giving you a little sneak peek. This set will be released later this month.

I hope you like my creations. Thanks for stopping by and have a safe and happy 4th of July. God bless America!

Thursday, June 24, 2010

Handsome Cowboy!

Who doesn't love looking at a cowboy? hee hee hee This is a sneak peek of a new set by Mark's Finest Papers which will be released in July. This set is called Southwest Cowboy. The sentiment is from another new set - Flourishes & Frame. Most papers are from MFP too.

The cowboy is stamped using Rich Cocoa Memento ink and then I used Stormy Sky distress ink to sponge the edges. The embossed panel used Cuttlebug Paisley folder then dtp using the rich cocoal ink. The barb wire is also from the new set Southwest cowboy, repeatedly stamped onto that panel, then distressed along the edges and direct to paper ink. The sentiment is stamped directly onto the card front using rich cocoa ink.

Thanks for looking!

Tuesday, June 22, 2010

Sneak Peek of 3 new stamp sets!

Don't you love sneak peeks? Well you are in luck today, as I am showing you three new sets to be released from Mark's Finest Papers in July. There will be a blog hop beginning July 13, so keep your eyes open.


The flower is stamped with the new set Apples & Camellia and then colored with Copic markers before being cut out. The next layer is a white peony shape, stamped with the frame from the new set Flourishes & Frame which was inked with Soft Suede and then airbrushed with a copic marker. That is backed with a soft suede peony shape which was also airbrushed with copic to give it a little more contast. The card front is Almost Amethyst and then a layer of the Soft Suede embossed with a Sizzix folder and the photo corner punch used on the corners. The squares are stamped with a fabulous background stamp from the new set Background Fun and cut/embossed with Spellbinders squares. I also added a strip of that same pattern to the center of the card front. The sentiment is from Flourishes and Frame set too. That was stamped, cut/embossed using Spellbinders Petite Ovals and a bow added.
Thanks for stopping by. I love reading your comments!

Friday, June 11, 2010

Doughnut card


It is so easy to make a doughnut card using Spellbinders nesting circles. I love how this turned out!

I started with the card front. I chose the dp first and cut the largest circle. The dp is flocked, making it even better! I then mounted that onto the chocolate chip layer and cut the next smaller circle. That was mounted onto the Taken with Teal card front and the next smaller circle was cut. For the inside, I used the chocolate chip circle from the card front and glue it in place on the inside of the card. The butterfly was stamped onto white with Rich Cocoa ink and clear embossed. I then colored the butterfly with Tempting Turquoise marker and cut/embossed this with the Spellbinders scalloped circle. That is popped up on the inside of the card. I've wanted to use this oh so cute pom pom fringe for a long time and this card was perfect for it. I mounted it onto a strip of the chocolate chip cs to really set it off. The sentiment is by Rubbernecker and was stamped and clear embossed, again using the Memento Rich Cocoa ink, cut/embossed using Spellbinders scalloped rectangle and mounted onto more Taken with Teal and Chocolate Chip cs.

I hope you like this card as much as I do! What fun!

Tuesday, June 8, 2010


I couldn't help myself, I had to do another card using the same colors, but with black to make it pop! I really like the addition of the black. What do you think?

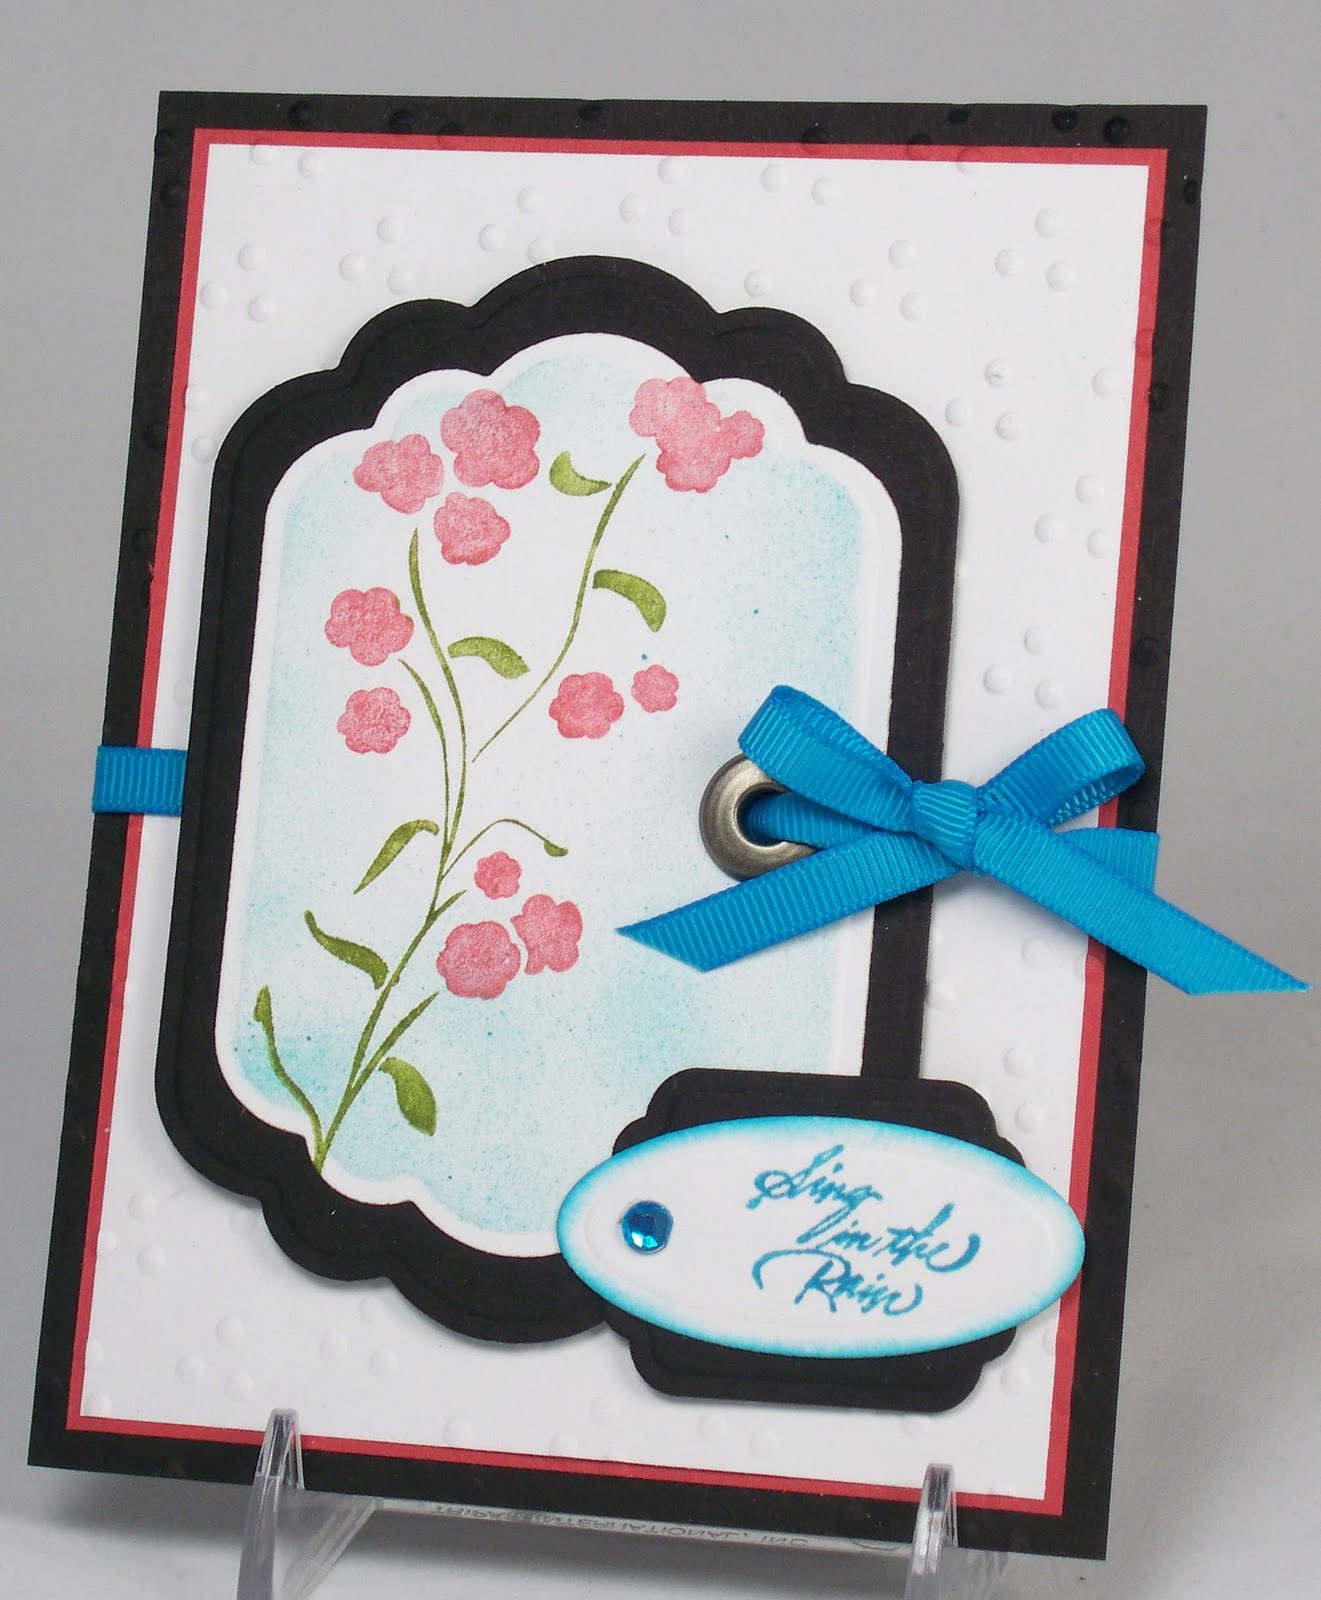
I inked the image with markers before stamping and then cut/embossed, airbrushing while still in the die. I added the jumbo eyelet. I haven't used eyelets in so long, I nearly forgot how! lol The ribbon was run around the card front, through the eyelet and tied in a small bow. The sentiment was created by omitting the rest of the verse, just coloring the small portion I wanted with a marker. I love the versatility that gives with sentiments. The edges of the sentiment oval and sponged to add a wee bit more of the turquoise color. I also added a jewel and matted with black once again. The card base is white, the next mat is Ruby Red and then black.

I hope you like it. Smile and be happy! There's no time like the present!

Monday, June 7, 2010

Depth of Life


I created this card for today's color challenge. I had only the teeniest tiniest scraps of Tempting Turquoise cardstock, but found a way to make it work. At least the ribbon is turquoise too.

The sentiment is stamped with Versamark ink and clear embossed. I used Spellbinders Ric Rac Diamond Border Petites to meet the dessert option. The butterfly was a one of those little scraps of cardstock which had been embossed with Cuttlebug's Snowflake folder. I like the veining it gave the butterfly. I added Stickles to the body of the butterfly. I also used Cuttlebug's Swiss Dots folder on the border panel.

Have a great day!

New News!

I am excited to announce I have been asked to join Mark's Finest Papers Design Team! Isn't that fun? I am very excited to be sharing my creations using their images. Fantastic! Be on the watchout. It's gonna be so fun!

Friday, June 4, 2010

Vintage once again.

I really do love vintage - in furnishings, in cards, in clothing - pretty much everything.

Today's SCS challenge was It's a Boy Thing and so I got to ink up this wonderful Rubbernecker image. I just love it. It really looks like an old photo, don't you think? I used the Spellbinders Deckled Mega rectangle to give that old photo look to the edges. I intentionally left some of the vanilla to look even more like an old photo.


The image is stamped onto vanilla cardstock using Pumice Stone Distress Ink. The dp's are from Kaiserscrapbook. The image actually reminds me of a photo I have seen of my Grandfather and his brother. They served in the Army together in WW I, and so the star dp really seemed appropriate. I added the twill tape and cut the star from the star dp too. The word Brothers is computer generated. Don't you love the brads with it? They add just the right vintage/masculine look, don't you think?

I used:
Rubbernecker Brothers 502-06
Paper: very vanilla and dp by Kaiserscrapbook
Ink: Pumice Stone distress ink
brads, twill tape
Spellbinders Deckled Mega Rectangles, Stars

Thursday, June 3, 2010


Today's challenge on SCS was "No Place Like Home" and we were to use bits of home on our cards. Well, what better way to furnish a home than with a baby! We seem to have lots of them in our family lately. One of my nieces just gave birth to a very big boy, and he is delicious. This card celebrates that.

I stamped the image with Rich Cocoa ink and colored with copic markers. I also airbrushed that soft blue around the edges. The panel was cut/embossed with Spellbinders Labels One. The main panel is mounted onto a square of Barely Banana with the corners rounded. I added a bottom strip of the dp and gathered crochet trim with a blue satin ribbon.

I used:
Stamps: Stampin' Up! Sketches and Small Script
Ink: Memento Rich Cocoa, Certainly Celery, asst. Copic markers
Paper: White, Bashful Blue, dp by Kaiserscrapbook
Accessories: Spellbinders Labels One, Corner Rounder, blue satin ribbon, crochet trim

Monday, May 31, 2010

With Grateful Heart


I created this card this Memorial Day in honor of all the men and women who have served and continue to serve this great country. Thank you from the bottom of my heart. My Father is one of them. He served in the navy during World War II. I am on my way to the cemetery to remember him today.

This is called a tent card. The image on the inside was inked with markers before stamping. It says "God bless America". I used a Spellbinders Star to cut through all three layers of the card front and a smaller star to cut/emboss the vellum heart to dangle in the opening. The sentiment was stamped and the edges torn before adhering to the front of the card with brads.

I hope you like it. Thanks for stopping by.

Thursday, May 27, 2010

I'm so amazed!

Okay, it is time for me to share! Take a look at my before photo and what I look like today! I can't say before and after because I'm not finished, but I am well on my way!

I have lost 37 pounds - so far! What do you think? I am on the best program ever! You know why I say that? Because it works! I have tried so many other things and nothing has worked and kept me motivated. Watching the weight drop every week is the big motivator for me! Oh yeah baby! It's coming off. lol I feel like I am renting clothes, as I only wear them a short time before, as my daughter says, "You have droopy drawers!"

You know what's funny though? I still think of myself way bigger. Yesterday I brought home a pair of size 10 shorts. I began trying them on thinking they wouldn't even go over my knees! Imagine my surprise when they not only went over my knees, but over my hips, and I could button and zip them without laying on the bed, exhaling and using pliers to get the zipper to go up. AND I could still fit my hands in the pockets!!!!!

Can you tell I am on cloud 9????? Oh yeah, this is the best. And trust me when I say, if I can do it - ANYONE can do it!

If you would like more information, please email me coachkarenh@gmail.com

Tuesday, May 25, 2010

Christmas in May

I created this card for a challenge on the Justrite blog to create a Christmas card in May.

I wanted to create a card that was easily mailable (not so bulky) and so this is what I came up with. I really like to use a religious image for my Christmas cards and this set has two images that I really love.

I stamped this beautiful Justrite image onto vanilla cardstock using Vintage Photo Distress Ink and then clear embossing. This was cut using Spellbinders Circles dies. Next I stamped the sentiment onto vanilla cardstock with Versamark ink and embossing with Gold detail embossing powder. This was cut/embossed using two Spellbinders circle dies, creating the open circle. The base card is chocolate cardstock and the paper on it is from Crafty Secrets Classic Paper Designs. I layered a brown velvet ribbon onto the darker chocolate ribbon, wrapping the top around the dp layer and tucking it behind. The image was added using foam squares to pop it up just a bit, then when I added the sentiment border, it was popped up even a little more. A simple card that is easily mailed.

What do you think?

Monday, May 24, 2010

Black Magic

Today's challenge is to create something using the Black Magic technique - which is to stamp an image (today I did the same thing for my sentiment) with white craft ink onto a dark cs. I heat set it before coloring over the white with watercolor pencils. I added a few highlights with a white gel pen. I also added the white border with a white watercolor pencil and the white gel pen onto the image panel. The sentiment panel is cut/embossed using Spellbinders Mega Curved Rectangles. That sentiment panel is mounted over a strip of pink which is embossed with the Cuttlebug Swiss Dots folder.


Here is what I used:
Rubbernecker: Floral 496-02, Flourish bg 462, Blooms 237
Spellbinders Mega Curved Rectangles
Cuttlebug Swiss Dots Folder
Cardstock: White, Black, Pixie Pink
Ink: White craft, Pixie Pink
Other: Watercolor pencils, White gel pen

Thanks for stopping by!

Wednesday, May 19, 2010

Interesting colors, don't you think?


I created this card for the color challenge on SCS which was to use: So Saffron, Rich Razzleberry and Dusty Durango together. Now I never would have put these colors together myself, but they do go.

I stamped my rose using versamark ink onto shimmery white cardstock and embossed with gold embossing powder. Then I sprayed it (soaked it really) with water and added the three colors, letting them float around a bit. It's much prettier in real life than you can capture in the photo. I matted the cut rose onto a so saffron layer which was cut/embossed with Spellbinders Lattice Pendant. I also stenciled it before removing from the die and also sponged a bit of the Rich Razzleberry ink onto it as well. The next layer a square of Dusty Durango cs, the corners punched with the ticket punch and the wrought iron corner punch. All this was mounted onto the Rich Razzleberry card (4-14" square). I then added the half domes in the corners and a bow. What do you think of these colors together?

Monday, May 17, 2010

Babies, babies everywhere!

Wow, everywhere I turn there are new babies! I created this card for a niece that just adopted a sweet new baby boy. It is also combining two SCS challenges: one to honor Cathleen (ctorina) and the other to create a frame on your card.


I stamped the Rubbernecker image onto vanilla cardstock using Vintage Photo distress ink and then coloring with Copic markers - B21, E11, and E15. This was cut with Spellbinders circle nestabilities. The round frame was created by using two sizes of the nesties together. I colored it with my Copic marker to get it to match just right. The card base is vanilla, but I colored a border around the edge with my blue marker and then added a stripe of the dark suntan. The plaid paper is created with the markers as well. I colored the word JOY on a sentiment stamp with a marker, so I would only get that word and stamped it. That panel is embossed with the Cuttlebug Swiss Dots folder. The mat for that is cut with Spellbinders scalloped rectangle and then colored iwth the marker to match. I added a button tied with embroidery floss as the finishing touch.

Thanks for stopping by! Come back soon!

Saturday, May 15, 2010

Asian influence

I helped a sweet friend (hi Jill!) with some bridal shower invitations recently. Her sister really likes Asian, so this is what we came up with.


We stamped the Rubbernecker Bamboo Background with versamark and embossed with black detail embossing powder. We really wanted to use these lanterns but didn't want to cover up all the beautiful bamboo background, so using versamark ink again, we stamped them onto vellum and heat embossed with gold detail embossing powder. This way the beautiful bamboo background shows through. We cut with Spellbinders Labels Two and attached with black brads. We then mounted the whole thing onto black. I think they turned out great! What do you think?

Here is what I used:
Rubbernecker Bamboo Background SKU:250-10
Rubbernecker Chinese Lanterns SKU:1080 SO
Spellbinders Labels Two
Gold Detail embossing powder
Embossing powder Black Superfine by Ranger
brads: unknown
Cardstock: Basic Black, Real Red, Vellum

Thanks for stopping by! Come back soon!

Friday, May 14, 2010

JustRite Manly Card`

JustRite is showcasing new stamps being released and part of the fun is a contest creating manly cards. Now, those seem to be difficult for lots of people, including me. I generally tend to lean towards flowers, ribbons, and sparkle. Well, most men don't really like that - for themselves anyway. So here is my attempt at a manly card.

I used JustRite's By The Sea set. This set is great for manly cards, but really isn't limited to just manly, for sure. They are such lovely images for summer.

I stamped the image using versamark ink onto a light blue cardstock and embossed with clear. This was cut using Spellbinders Classic oval and mounted onto another from Not Quite Navy cardstock. The card is Riding Hood Red with another layer of the Not Quite Navy and then a panel of Daisy Bucket designs Garden Gate Evening Primrose paper. I actually used the reverse side (the stripe). I used foam squares to mount the image oval. On the right side of the card, I used twill tape which is adhered with Xyron adhesive. I tied a figure eight knot using regular old twine and adhered the knot with a pop up glue dot. I adhered the ends on the back of the panel using hot glue, since there is so much bulk there. It looks manly to me. What do you think?

Sunday, May 9, 2010

Happy Mother's Day


"Be a Mother who is committed to loving her children into standing on higher ground than the enviroment surrounding them. Mother's are endowed with a love that is unlike any other love on the face of the earth."
— Marjorie Pay Hinckley

"The family is eternal. Love must be nurtured. It must be spoken. We must put away our pride, our haughtiness, our shyness, our misunderstandings, and with humility say, "I love you. Is there something I can do to help you?" You can never be completely happy under any other circumstances."
-Marjorie Pay Hinckley

"We women have a lot to learn about simplifying our lives. We have to decide what is important and then move along at a pace that is comfortable for us. We have to develop the maturity to stop trying to prove something. We have to learn to be content with what we are." — Marjorie Pay Hinckley


"Home is where you are loved the most and act the worst."
— Marjorie Pay Hinckley


"Be kind. Everyone you meet is fighting a hard battle."
— Marjorie Pay Hinckley


Charity Never Faileth


"Think about your particular assignment at this time in your life. It may be to get an education, it may be to rear children, it may be to be a grandparent, it may be to care for and relieve the suffering of someone you love, it may be to do a job in the most excellent way possible, it may be to support someone who has a difficult assignment of their own. Our assignments are varied and they change from time to time. Don't take them lightly. Give them your full heart and energy. Do them with enthusiasm. Do whatever you have to do this week with your whole heart and soul. To do less than this will leave you with an empty feeling." — Marjorie Pay Hinckley

"The trick is to enjoy life. Don't wish away your days, waiting for better ones ahead." — Marjorie Pay Hinckley

"We are all in this together. We need each other. Oh, how we need each other. Those of us who are old need you who are young, and hopefully, you who are young need some of us who are old...We need deep and satisfying and loyal friendships with each other. These friendships are a necessary source of sustenance. We need to renew our faith every day. We need to lock arms and help build the kingdom so that it will roll forth and fill the whole earth."
— Marjorie Pay Hinckley

"I know it is hard for you young mothers to believe that almost before you can turn around the children will be gone and you will be alone with your husband. You had better be sure you are developing the kind of love and friendship that will be delightful and enduring. Let the children learn from your attitude that he is important. Encourage him. Be kind. It is a rough world, and he, like everyone else, is fighting to survive. Be cheerful. Don't be a whiner."
— Marjorie Pay Hinckley

"As we got closer to marriage, I felt completely confident that Gordon loved me. But I also knew somehow that I would never come first with him. I knew I was going to be second in his life and that the Lord was going to be first. And that was okay. It seemed to me that if you understood the gospel and the purpose of our being here, you would want a husband who put the Lord first."
-Marjorie Hinckley


"The grand and the simple. They are equally wonderful."
— Marjorie Pay Hinckley


"There are some years in our lives that we would not want to live again. But even these years will pass away, and the lessons learned will be a future blessing." — Marjorie Pay Hinckley


"With intellectual curiosity the world will always be full of magic and wonder."
— Marjorie Pay Hinckley


"The thing about growing old is that when you wake up with a new pain, you can just about count on it becoming a permanent part of your life!"
— Marjorie Pay Hinckley

"I don't want to drive up to the pearly gates in a shiny sports car, wearing beautifully, tailored clothes, my hair expertly coiffed, and with long, perfectly manicured fingernails. I want to drive up in a station wagon that has mud on the wheels from taking kids to scout camp. I want to be there with a smudge of peanut butter on my shirt from making sandwiches for a sick neighbor's children. I want to be there with a little dirt under my fingernails from helping to weed someone's garden. I want to be there with children's sticky kisses on my cheeks and the tears of a friend on my shoulder. I want the Lord to know I was really here and that I really lived." — Marjorie Pay Hinckley

"Elder Neal A. Maxwell once said, "We are here in mortality, and the only way to go is through; there isn't any around!" I would add, the only way to get through life is to laugh your way through it. You either have to laugh or cry. I prefer to laugh. Crying gives me a headache."
— Marjorie Pay Hinckley

“I feel to invite women everywhere to rise to the great potential within you. I do not ask that you reach beyond your capacity. I hope you will not nag yourselves with thoughts of failure. … I hope you will simply do what you can do in the best way you know. If you do so, you will witness miracles come to pass” Gordon B. Hinckley

Try a little harder to be a little better. Gordon B. Hinckley

Sparkle and shimmer!

I just love sparkle and shimmer. This project has lots and lots of it, trust me. You just can't see it very well in the photo.


I wanted to do a smoosh background, so I dropped some reinkers onto my craft mat, misted lightly with water and this is where the smooosh came in. Smoosh, smoosh, smoosh the tag and dry. Then I sprayed with gold glimmer mist. Oooooo, it is so pretty in real life. The bottom of the tag is punched with a Martha Stewart punch. Now I always get the back of my project messy when I do the smoosh technique, so I adhered it to a folded piece of artichoke cardstock. The green was just too flat with all that sparkle, so I misted it with the gold as well. Oh yeah, that's the ticket. I scored the top of the tag and the card so it would bend and open properly and then punched through all layers and tied the ribbons. So pretty. The image was also stamped onto a tag and clear embossed, then colored with Copic markers and AtYou Spica pens. I added some liquid pearls to the pin heads. This was cut/embossed using Spellbinders scalloped circle, misted with gold glimmer mist and then popped up with foam squares. What loveliness!

Thanks for stopping by! Have a beautiful day full of love and happiness!

Hugs,
Karen

Friday, May 7, 2010

I love stamping!


I really do enjoy creating with paper and ink.

I created this card using colors that I really enjoy. Do you like them too?

The sentiment is stamped and clear embossed before adding the flourish, top and bottom and airbrushing to match the designer paper. The next layer is stamped with the polka dots in brown to coordinate. The teal layer is a patterned paper which was also lightly airbrushed just to get it to match better and darken it a smidge. All panels are matted with chocolate chip. I hope you like it.

I used:
Stamps: Rubbernecker Petite Heart, Flourish, SU Polka Dot
Paper: Very Vanilla, Chocolate Chip, My Mind's Eye Free Bird "Passion" Robin's Egg
Inks: Memento Rich Cocoa, Copic BG45
Accessories: Clear embossing powder

Thursday, May 6, 2010

Rubbernecker has come out with some wonderful new vintage stamps and I absolutely love them.

Here is a card I created using one of the new images. It is similar to the other sisters image, but slightly different.


As some of you may have noticed, I love vintage. For this card, I stamped the Sisters image from Rubbernecker with Chipped Sapphire distress ink onto vanilla cardstock. This was cut/embossed/matted using Spellbinders Deckled Rectangles. The lace was white, so I airbrushed it with Copic markers to achieve a vintage look and adhered it to the back bottom edge of the image panel. The pin is woven through, adding pearls here and there. The sentiment is from Rubbernecker stamp that says Believe in your dreams. I omitted the rest of the sentiment, wanting just the beautiful dreams portion. That was cut/embossed/matted with Spellbinders Classic ovals and popped up with foam squares. I added a half pearl to the sentiment panel. The card front is stamped with the Rubbernecker Victorian Damask background stamp using Chipped Sapphire distress ink onto blush blossom cardstock, then embossed with Cuttlebug Textile Texture folder. This is mounted onto The Paper Company dark blue shimmer cardstock. I hope you like it.

I used:
Stamps: Rubbernecker Victorian Damask BG, Sisters, Dreams text
Paper: Vanilla, Blush Blossom, Dark Blue Shimmer
Ink: Chipped Sapphire distress ink, Copic B97, E11, C5
Addessories: Spellbinders dies, Cuttlebug Textile Texture folder, lace, hatpin, pearls, foam squares

Sunday, May 2, 2010

A Giveaway!

I love giveaways, don't you? If you are interested in a fun one, head over to my friend Karen's blog to find out the details. Nikki Sivils is giving away some delicious papers.

Thursday, April 29, 2010

Let the trumpets chorus! I have “winners” to announce!

The Rubbernecker April Release Blog Hop Winners are:

from MY blog:

Holly said…

“How soft and pretty - love this sweet pink card! That ribbon treatment is awesome! “


AND

from Julia’s blog:

Leslie said…

“I am always amazed at the beauty and creativity of your cards. I am going to give this card a try….it is simple but lovely. Thanks for the inspiration and sharing”

CONGRATULATIONS to Holly and to Leslie! You have each won your choice of one of the collections from Rubbernecker Stamps! Please send your email addy & mailing information along with your choice of new collections (as posted in the blog hop post) to Bev at texasgrammyx2 at yahoo dot com!

Tuesday, April 27, 2010

April Release Blog Hop!

Welcome to my post for the Rubbernecker April Blog Hop.

I've used two of the new releases on my card: Victorian Damask Background SKU-498 and Sisters SKU-002 from the new vintage line.


I inked the stamp with one of the new Ranger Distress Inks - Victorian Velvet and oooh is it pretty! I added a bit more of that ink around the edges with an ink blender. That is mounted onto a white mat cut/embossed with Spellbinders Fair Isle Pendant which was also lighlty inked with the ink blending tool. The background of the light pink cardstock is stamped with the Victorian Damask background stamp and again I added more ink around the edges. The word Friend is from the Fall Trilogy Set and punched out and popped up on the Spellbinders Fancy Tags shape. I added three KaiserScrapbook rhinestones. On the right edge, the border is white cardstock cut/embossed with Spellbinders Fair Isle border. The ribbon wove beautifully through the holes and really showcases the whole image, don't you think?

I hope you like the results. Now be sure to leave a comment and visit all the other designer's blogs and leave comments so you will be eligible to win some of the new release stamps!

Julia Aston
Tammy Hershberger
Joan Ervin
Kittie Caracciolo
Cathleen Torina
Karen Hunsaker - that's ME! You're already here! ;-)
Juliana Swanson
Charlene Merrick
Bev Gerard


PRIZES: Each of two prize winners will get to choose one free 'collection' of stamps from the following:

'African-American Figures'

'Fashion Ladies'

'Floral'

'Vines'

'Vintage'

'Weeds'

You have until Wednesday, April 28th midnight EST to leave comments and be eligible to win. The winner will be announced Thurday April 29th on Bev's blog.

I hope you've had a good time hopping amongst our blogs! Thanks for stopping by!